© Copyright 2012 by Conrad Electronic SE. 01_0712_v1 Deze gebruiksaanwijzing voldoet aan de technische stand bij het in druk bezorgen. Wijziging van techniek en uitrusting voorbehouden. Alle rechten, vertaling inbegrepen, voorbehouden. Reproducties van welke aard dan ook, bijvoorbeeld fotokopie, microverfilming of de registratie in elektronische gegevensverwerkingsapparatuur, vereisen de schriftelijke toestemming van de uitgever. Nadruk, ook van uittreksels, verboden.
Inhaltsverzeichnis Seite Einführung ............................................................................................................................................................... 3 1. Bestimmungsgemäße Verwendung .................................................................................................................. 4 2. Produktbeschreibung ......................................................................................................................................... 4 3.
Einführung Sehr geehrte Kundin, sehr geehrter Kunde, wir bedanken uns für den Kauf dieses Produkts. Mit diesem Gerät haben Sie ein Produkt erworben, welches nach dem heutigen Stand der Technik gebaut wurde. Dieses Produkt erfüllt die Anforderungen der geltenden europäischen und nationalen Richtlinien. Die Konformität wurde nachgewiesen, die entsprechenden Erklärungen und Unterlagen sind beim Hersteller hinterlegt.
1. Bestimmungsgemäße Verwendung Bei dem Mc Crypt DJ-Mixer handelt es sich um ein Audio-Mischpult für den Einsatz im Heimbereich und im semiprofessionellen Bereich. Mit diesem Gerät lassen sich niederpegelige Audiosignale verschiedener Musikquellen mischen. Das Gerät wird dabei zwischen die zu mischenden Audiosignalquellen und einen Audioverstärker geschaltet. Dieses Produkt darf nur über das beiliegende Netzteil mit Strom versorgt werden.
3. Symbolerklärung Dieses Zeichen auf dem Gerät weist den Benutzer darauf hin, dass er vor der Inbetriebnahme des Gerätes diese Bedienungsanleitung lesen und beim Betrieb beachten muss. Das Symbol mit dem Blitz im Dreieck wird verwendet, wenn Gefahr für Ihre Gesundheit besteht, z.B. durch elektrischen Schlag. Im Gerät befinden sich keine vom Benutzer zu wartenden Teile. Öffnen Sie das Gerät deshalb nie. Das Symbol mit dem Pfeil ist zu finden, wenn besondere Tipps und Hinweise zur Bedienung gegeben werden.
4. Sicherheitshinweise • Das Produkt ist kein Spielzeug, es ist nicht für Kinder geeignet. Kinder können die Gefahren, die im Umgang mit elektrischen Geräten bestehen, nicht einschätzen. • Stellen Sie keine Gefäße mit Flüssigkeiten, z.B. Gläser, Eimer, Vasen oder Pflanzen, in die unmittelbare Nähe des Produkts. Flüssigkeiten könnten ins Gehäuseinnere gelangen und dabei die elektrische Sicherheit beeinträchtigen.
5.
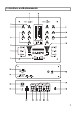
5. Anschluss- und Bedienelemente (1) Eingangswahlschalter Mit den Eingangswahlschaltern wählen Sie zwischen den einzelnen Eingängen (Signalquellen) der Kanäle. Beispiel: Befindet sich der Schalter des Kanals A PH1/LN1–LN2 in Stellung LN2 bedeutet dies, dass das Signal des mit den Anschlüssen LN2 verbundenen Gerätes auf den Kanal A gelegt wird. Der PH1/LN1-Eingang wird in dieser Schalterstellung nicht wiedergegeben.
5. Anschluss- und Bedienelemente (5) Klangregler Mit diesen Klangreglern verändern Sie den Klang des jeweiligen Kanals bzw. des Mikrofons. • HI = Höhenklangregler • MID = Mittenklangregler • LOW = Tiefenklangregler • Linker Regleranschlag bedeutet maximale Absenkung. • Rechter Regleranschlag bedeutet maximale Anhebung. • Mittelstellung (eine leichte Rasterung ist spürbar) bedeutet keine Beeinflussung des Signals durch den Regler (Neutralstellung).
5. Anschluss- und Bedienelemente (11) Regler LEVEL Mit diesem Regler wird die Lautstärke des Kopfhörers eingestellt. Stellung „0“ = minimaler Pegel Stellung „10“ = maximaler Pegel Drehen Sie den Regler auf Stellung „0“, bevor Sie den Kopfhörer ein- oder ausstecken, aufsetzen oder das Mischpult ein- oder ausschalten. Es besteht die Gefahr eines Gehörschadens durch eine überhöhte Lautstärke am Kopfhörerausgang. (12) Kanalfader Mit den Kanalfadern stellen Sie den Pegel des jeweiligen Kanals ein.
5. Anschluss- und Bedienelemente (17) Anschluss AC 12V Hier wird der Niedervoltstecker des beiliegenden Netzteils zur Stromversorgung des Mischpults eingesteckt. (18) Anschlussklemmen GND Zur Vermeidung von Brummstörungen kann über diese Schraubklemmen eine Masseverbindung zwischen dem Mischpult und den Masseleitungen der Plattenspieler (meist schwarzes Kabel mit Klemmschuh) hergestellt werden.
5. Anschluss- und Bedienelemente (23) Eingangsbuchsen für Kanal B An diese Stereo-Cinch-Eingänge werden die Audioquellen, wie CD-Player, Kassettendecks, MP3 Player, Plattenspieler oder andere Wiedergabegeräte angeschlossen. Das Buchsenpaar LN-3/PH-2 ist umschaltbar. Die Geräteart (LINE bzw. PHONO) wird mit dem Wahlschalter LN-3/ PH-2 (22) ausgewählt. (24) Wahlschalter LN-1/PH-1 Dieser Schalter legt fest, ob ein Line-Gerät oder ein Plattenspieler an die Eingangsbuchsen LN- 1/PH-1 angeschlossen ist.
6. Aufstellung/Montage Der Mc Crypt DJ-Mixer kann auf einer ebenen Fläche aufgestellt werden oder auch in ein Pult eingebaut werden. Hierzu dienen die beiliegenden Montagewinkel und -schrauben. Achten Sie bei der Aufstellung bzw. bei der Pultmontage mit anderem Equipment auf ausreichende Belüftung. Stellen Sie das Gerät nicht auf weiche Untergründe, wie z.B. einen Teppich oder auf ein Bett etc. Außerdem darf die Luftzirkulation nicht durch Gegenstände wie Zeitschriften, Tischdecken, Vorhänge o.ä.
7. Anschluss Trennen Sie vor dem Anschluss das Mischpult und alle anderen Geräte, die mit dem Mischpult verbunden werden sollen von der Netzspannung (Netzteil bzw. Netzstecker aus der Steckdose ziehen). Benutzen Sie zum Anschluss der Cinchein- und -ausgänge nur hierfür geeignete abgeschirmte Cinchleitungen. Für den Anschluss des Mikrofoneingangs benutzen Sie bitte nur ein geeignetes Mikrofonkabel. Bei Verwendung falscher Kabel können Störungen auftreten.
7. Anschluss Mikrofoneingang MIC (19) An diesen Eingang können Sie Ihr Mikrofon anschließen. Anschluss USB Schließen Sie hier die USB-Schnittstelle Ihres Computers an. b) Anschluss der Ausgänge Ausgang MAIN (21) Schließen Sie an den Ausgang MAIN einen freien Cincheingang Ihres Haupt-Verstärkers (z.B. AUX) an. Ausgang REC (21) Wenn Sie das Ausgangssignal des Mischpults mit einem Aufnahmegerät aufzeichnen wollen, schließen Sie den Aufnahmeeingang des Gerätes an die Buchsen REC (21) des Mischpults an.
7.
8. Inbetriebnahme Nehmen Sie das Gerät nur dann in Betrieb, wenn Sie sich mit den Funktionen und mit dieser Bedienungsanleitung vertraut gemacht haben. Überprüfen Sie nochmals alle Anschlüsse auf Richtigkeit. a) Mischpult ein- und ausschalten Ein Nichtbeachten der nachfolgend beschriebenen Reihenfolge beim Ein- und Ausschalten des Mischpults könnte die Lautsprecher oder den Verstärker beschädigen.
8. Inbetriebnahme c) Aussteuerungsanzeigen Die Aussteuerungsanzeige (2) gibt Auskunft über den Ausgangspegel. Der Pegel sollte in der Aussteuerungsanzeige den „0“db-Wert möglichst nicht dauerhaft überschreiten, da es ansonsten zu Verzerrungen des Musiksignals kommen kann. Ein kurzes Aufblinken bzw. ein kurzer Ausschlag über den „0“db-Wert hinaus bei Signalspitzen ist jedoch unbedenklich. d) Lautstärkeregelung • Regeln Sie die Lautstärke am angeschlossenen Verstärker auf Minimum.
8. Inbetriebnahme e) Mithören/Vorhören Drehen Sie den Regler LEVEL (11) an seinen linken Anschlag (Stellung „0“) bevor Sie den Kopfhörer ein- oder ausstecken, aufsetzen oder das Mischpult ein- oder ausschalten! Es besteht die Gefahr einer Gehörschädigung durch eine überhöhte Lautstärke am Kopfhörerausgang. • Mit dem Regler CUE/PGM (10) bestimmen Sie, ob Sie das Ausgangssignal oder das Eingangssignal der einzelnen Kanäle des Mischpultes über den Kopfhörer hören können.
8. Inbetriebnahme h) Wiedergabe über den USB-Eingang • Schalten Sie Ihren Computer ein und warten Sie, bis Ihr Computer das Betriebssystem vollständig geladen hat. • Stellen Sie die Verbindung zwischen dem Anschluss USB (20) und der USB-Schnittstelle des Computers her. • Bringen Sie den Eingangswahlschalter von Mischpultkanal B in Stellung USB. • Schalten Sie das Mischpult mit dem Schalter POWER (2) ein.
10. Wartung Überprüfen Sie regelmäßig die technische Sicherheit des Mischpults z.B. auf Beschädigung des Netzteils und des Gehäuses. Wenn anzunehmen ist, dass ein gefahrloser Betrieb nicht mehr möglich ist, so ist das Gerät außer Betrieb zu setzen und gegen unbeabsichtigten Betrieb zu sichern.
12. Behebung von Störungen Mit dem Mc Crypt DJ-Mixer haben Sie ein Produkt erworben, welches nach dem Stand der Technik gebaut wurde und betriebssicher ist. Dennoch kann es zu Problemen oder Störungen kommen.
12.
Table of contents Page Introduction ........................................................................................................................................................... 25 1. Intended use ..................................................................................................................................................... 26 2. Product description .............................................................................................................................
Introduction Dear customer, Thank you for purchasing this product! With this device, you have purchased a state-of-the-art product. This product meets the requirements of all applicable European and national guidelines. Its conformity has been certified and the corresponding declarations and documents can be obtained from the manufacturer. To maintain this status and to ensure risk-free operation, you, as the user, must comply with these operating instructions.
1. Intended use This Mc Crypt DJ Mixer is an audio mixing desk for home or semi-professional use. This device can be used to mix low-level audio signals from various sources of music. The device is connected between the audio signal sources being mixed and an audio amplifier. This product may only be powered using the enclosed power unit. The power unit has only been approved for connection to 230 V/50 Hz alternating current. It may only be used indoors; never outdoors.
3. Explanation of symbols This symbol on the device indicates that the user should read these operating instructions prior to using the product. A lightning-bolt symbol in a triangle indicates a health hazard, e.g. danger of an electric shock. The device contains no parts that should be serviced by the user. Therefore, never open the device. The arrow symbol indicates special information and advice on operating the device.
4. Safety instructions • This product is not a toy and should be kept out of the reach of children. Children do not understand how dangerous electrical devices can be. • Never position vessels or containers containing liquids, such as glasses, buckets, vases or plants, in the direct vicinity of the product. Liquids could enter into the interior of the housing and impair the electrical safety of the device. There is also a great risk of fire or a fatal electric shock.
5.
5. Connection and control elements (1) Input selection switch You can use the input selection switches to select between the individual inputs (signal sources) for the channels. Example: If the switch for channel A PH1/LN1–LN2 is in position LN2, the signal from the device connected to the LN2 connection is routed to channel A. Input PH1/LN1 is not reproduced in this switch position. To play back from this input, the input selection switch from channel A has to be switched to position PH1/LN1.
5. Connection and control elements (5) Equaliser You can change the tone of the relevant channel or the microphone using the equaliser controls. • HI = treble control • MID = mids control • LOW = bass control • Turn the control knob as far as it will go to the left for maximum reduction. • Turn the control knob as far as it will go to the right for maximum increase. • The central position (felt by a light clicking into place) means that the signal remains unaltered (neutral setting).
5. Connection and control elements (11) LEVEL control You can use this control to set the headphones volume. Position “0” = minimum level Position “10” = maximum level Turn the control knob to the “0” position before plugging in, unplugging or putting on the headphones or before switching the mixer on or off. Otherwise, there is risk of damage to your hearing as a result of excessive volume from the headphone output. (12) Channel faders The channel faders are for adjusting the level of each channel.
5. Connection and control elements (17) AC 12 V connection The low voltage plug on the enclosed power unit is inserted here to supply the mixer with power. (18) GND terminals To prevent buzzing, an earth connection can be made from the mixer to the earthing lines (usually a black cable with clamp-type socket) of the record player using these screw terminals. (19) MIC connection A dynamic microphone or a condenser microphone with its own power supply and 6.3 mm jack can be connected to this socket.
5. Connection and control elements (23) Input sockets for channel B Audio sources, such as CD players, cassette decks, MP3 players, record players or other reproduction devices, are connected to these stereo cinch inputs. You can switch the two LN-3/PH-2 sockets. You select the type of device (LINE or PHONO) with the LN-3/PH-2 selection switch (22). (24) LN-1/PH-1 selection switch This switch specifies whether a line device or a record player is connected at the LN-1/PH-1 input sockets.
6. Installation/Assembly The Mc Crypt DJ mixer can be placed on an even surface or it can also be installed in a desk. For this purpose we have included installation angles and screws. When setting the device up or installing it in a desk make sure to pay attention to sufficient ventilation. Do not place the device on soft surfaces, such as a carpet or a bed etc. Moreover, the air circulation must not be obstructed by such objects as magazines, table cloths or the like.
7. Connection Before connecting, disconnect the mixer and all other devices which are to be connected to the mixer from the mains voltage (unplug power unit or mains plug from the socket). When connecting the cinch inputs and outputs, use only shielded cinch cables suitable for this purpose. For connecting the microphone input, please only use a suitable microphone cable. Using incorrect cables may lead to interference.
7. Connection MIC microphone input (19) You can connect your microphone to this input. USB connection You can connect the USB interface of your computer to this input. b) Connecting the outputs MAIN output (21) Connect a free cinch input from your main amplifier (e.g. AUX) to the MAIN output. REC output (21) If you wish to record the output signal from the mixing desk using a recording device, connect the recording input of the device to the REC jacks (21) on the mixing desk.
7.
8. Initial operation Do not put the device into operation until your have familiarised yourself with the functions and these operating instructions. Check again that all connections are correct. a) Switching the mixer on and off Failure to observe the order described in the following when switching the mixer on and off could damage the loudspeakers or the amplifier. Switching on • Make sure that all channel faders (12) are set to minimum volume (channel fader pulled right back to the lowest point).
8. Initial operation c) Recording level display The recording level display (2) provides information about the output level. The level on the indicator should not exceed the „0“ dB value as otherwise distortion of the music signal can occur. A short blinking or deflection beyond the „0“ dB value in the case of signal peaks is not harmful. d) Volume control • Adjust the volume of the connected amplifier to minimum. • Turn the MASTER control (9) and the GAIN control (3) to minimum.
8. Initial operation e) Listening-in/pre-listening Turn the LEVEL control (11) as far as it will go to the left („0“ position) before plugging in, unplugging or putting on the headphones or switching the mixer on or off. Otherwise you risk damage to your hearing through excessive volume from the headphone output. • Use the CUE/PGM control (10) to specify whether you want to hear the output signal or the input signal from the mixer’s individual channels on the headphones.
8. Initial operation h) Playback via USB Input • Switch your computer on and wait until your computer has booted the operating system completely. • Connect the connection USB (20) to the USB interface of your computer. • Out the input selection switch of the mixer channel B to the position USB. • Turn on the mixer with the POWER switch (2). • The operating system automatically recognises the USB interface of your mixer as an external USB audio device without requiring any drivers for this.
10. Maintenance Regularly check the safety of the mixer, for example, for damage to the power unit or the housing. If you have reason to believe that the device can no longer be operated safely, disconnect it immediately and secure it against being operated unintentionally. Pull the power unit out of the socket.
12. Troubleshooting In purchasing the Mc Crypt DJ Mixer, you have acquired a reliable product which has been designed using state-ofthe-art technology. Problems and malfunctions may, however, still arise. We would therefore like to describe how you can eliminate certain malfunctions yourself. Always follow the safety instructions carefully.
12.
Table des matières Page Introduction ........................................................................................................................................................... 47 1. Utilisation conforme .......................................................................................................................................... 48 2. Description du produit ............................................................................................................................
Introduction Chère cliente, cher client, Nous vous remercions pour l’achat de ce produit. Avec cet appareil, vous avez acquis un produit à la pointe du développement technique et bénéficiant d’une grande sécurité de fonctionnement. Ce produit répond aux exigences des directives européennes et nationales en vigueur. La conformité a été vérifiée et les déclarations et documents afférents ont été déposés chez le fabricant.
1. Utilisation conforme Cette table de mixage Mc Crypt DJ est une table de mixage audio destinée à l’usage personnel et semi-professionnel. Cet appareil permet de mixer des signaux audio à faible niveau sonore provenant de différentes sources musicales. Il se branche entre les sources de signaux audio à mixer et un amplificateur audio. Ce produit doit uniquement être alimenté en courant via le bloc d’alimentation fourni.
3. Explication des symboles Ce signe sur l’appareil indique à l’utilisateur qu’il doit lire ce mode d’emploi avant la mise en service de l’appareil et qu’il doit le respecter pendant le fonctionnement. Le symbole de l’éclair dans un triangle est utilisé afin de signaler un danger pour votre santé, p. ex. par une décharge électrique. Aucune pièce de l’appareil ne requiert un entretien de la part de l’utilisateur. N’ouvrez donc jamais l’appareil.
4. Consignes de sécurité • Le produit n’est pas un jouet, ne le laissez pas à la portée des enfants. Les enfants ne sont pas en mesure d’évaluer les risques résultant de la manipulation des appareils électriques. • Ne placez pas de récipients comportant des liquides, par ex. seaux, vases ou plantes, à proximité immédiate de l’appareil. Les liquides pourraient pénétrer à l’intérieur du boîtier et compromettre la sécurité électrique.
5.
5. Eléments de raccordement et de commande (1) Sélecteur d’entrée Les sélecteurs d’entrée vous permettent de choisir entre les différentes entrées (sources de signaux) des canaux. Exemple : Si l’interrupteur du canal A PH1/LN1–LN2 se trouve en position LN2, cela signifie que le signal de l’appareil relié aux raccordements LN2 occupe le canal A. Dans cette position, l’entrée PH1/LN1 n’est pas restituée. Pour reproduire cette entrée, le sélecteur d’entrée doit être branché sur PH1/LN1.
5. Eléments de raccordement et de commande (5) Boutons de réglage du son Vous pouvez changer le son du canal ou du microphone respectif à l’aide de ces boutons de réglage du son. • HI = bouton de réglage du son des aigus • MID = bouton de réglage du son des médiums • LOW = bouton de réglage du son des graves • La butée gauche du bouton de réglage représente une atténuation maximale. • La butée droite du bouton de réglage représente un renforcement maximal.
5. Eléments de raccordement et de commande (11) Régulateur LEVEL Ce bouton de réglage permet de régler le volume du casque d’écoute. Position « 0 » = niveau minimal Position « 10 » = niveau maximal Tournez le régulateur jusqu’à la position « 0 » avant de brancher ou de débrancher le casque d’écoute, ou de mettre en marche ou à l’arrêt la table de mixage. Vous éviterez ainsi de subir des dommages auditifs causés par un volume excessif au niveau de la sortie casque d’écoute.
5. Eléments de raccordement et de commande (17) Raccordement AC 12V C’est ici qu’est branché le connecteur basse tension du bloc d’alimentation fourni pour l’alimentation électrique de la table de mixage. (18) Bornes de raccordement GND Afin d’éviter tout ronflement, établissez une mise à la terre entre la table de mixage et les câbles de mise à la terre (il s’agit en principe du câble noir avec cosse de serrage) de la platine tourne-disques à l’aide des bornes à vis.
5. Eléments de raccordement et de commande (23) Prises d’entrée pour le canal B Ces entrées Cinch stéréo permettent de raccorder les sources audio, telles qu’un lecteur CD, un magnétophone, un lecteur MP3, une platine tourne-disques ou tout autre appareil de lecture. La paire de prises LN-3/PH-2 est commutable. Le choix du type d’appareil (LINE ou PHONO) s’effectue via le commutateur de sélection LN-3/PH2 (22).
6. Mise en place / Montage Le Mc Crypt mélangeur pour DJ peut être placé sur une surface plane ou également monté dans un pupitre de mixage. Utilisez pour le montage les supports et les vis de montage joints. Veillez à une aération suffisante lorsque le mélangeur est mis en place ou installé dans un pupitre de mixage avec des équipements accessoires. Ne placez pas l’appareil sur une surface souple, par ex. un tapis ou sur un lit, etc.
7. Raccordement Avant de raccorder la table de mixage, mettez-la hors tension ainsi que tous les autres appareils qui doivent y être connectés (retirez le bloc d’alimentation ou la fiche de la prise de courant). N’utilisez que des câbles de connexion Cinch blindés, appropriés pour le raccordement des entrées et sorties Cinch. Utilisez un câble microphone approprié pour le raccordement de l’entrée microphone. L’utilisation de câbles autres que ceux spécifiés peut entraîner des perturbations.
7. Raccordement Entrée microphone MIC (19) Vous pouvez connecter votre microphone sur cette entrée. Branchement USB Branchez ici le port USB de votre ordinateur. b) Raccordement des sorties Sortie MAIN (21) Raccordez une entrée Cinch libre de votre amplificateur principal (par ex. AUX) à la sortie MAIN.
7.
8. Mise en service Ne mettez l’appareil en service qu’après vous être familiarisé avec les fonctions et le présent mode d’emploi. Vérifiez une nouvelle fois que tous les raccordements sont corrects. a) Mise en marche et arrêt de la table de mixage Le non-respect de l’ordre décrit ci-dessous pour la mise en marche et l’arrêt de la table de mixage peut endommager les haut-parleurs ou l’amplificateur.
8. Mise en service c) Indicateurs de contrôle de niveau L’indicateur de contrôle de niveau (2) renseigne sur le niveau de sortie. Dans la mesure du possible, le niveau affiché sur l’indicateur de contrôle de niveau ne doit pas dépasser durablement « 0 » dB, au risque de provoquer des distorsions du signal musical. Un bref clignotement ou un bref passage au-dessus de « 0 » dB au niveau des crêtes de signaux n’est en rien inquiétant.
8. Mise en service e) Ecoute et pré-écoute Tournez le régulateur LEVEL (11) jusqu’à la butée gauche (position « 0 ») avant de brancher ou de débrancher le casque d’écoute, ainsi que de mettre en marche ou à l’arrêt la table de mixage ! Risque de dommage auditif causé par un volume excessif au niveau de la sortie casque d’écoute.
8. Mise en service h) Lecture à partir de l’entrée USB • Allumez votre ordinateur et attendez que le système d’exploitation soit complètement chargé. • Reliez un câble entre la prise USB (20) et le port USB de l’ordinateur. • Déplacez le sélecteur d’entrée du canal B pour la table de mixage sur USB. • Allumez la table de mixage en actionnant l’interrupteur POWER (2).
10. Entretien Contrôlez régulièrement la sécurité technique de la table de mixage en vous assurant par ex. de l’absence de dommages au niveau du bloc d’alimentation et du boîtier. Lorsque le fonctionnement sans risque de l’appareil n’est plus assuré, mettez-le hors service et assurez-vous qu’il ne pourra pas être remis en service involontairement.
12. Dépannage Avec la table de mixage Mc Crypt DJ, vous avez acquis un produit à la pointe du développement technique et bénéficiant d’une grande sécurité de fonctionnement. Il est toutefois possible que des problèmes ou des pannes surviennent.
12.
Inhoudsopgave Pagina Inleiding ............................................................................................................................................................... 69 1. Reglementair gebruik ....................................................................................................................................... 70 2. Productbeschrijving ....................................................................................................................................
Inleiding Geachte klant, Hartelijk dank voor de aanschaf van dit product. Met dit apparaat heeft u een product gekocht dat volgens de huidige stand van de techniek is ontwikkeld. Dit product voldoet aan de voorwaarden van de geldende Europese en nationale richtlijnen. De conformiteit is aangetoond, de bijbehorende verklaringen en documenten zijn gedeponeerd bij de fabrikant.
1. Reglementair gebruik De Mc Crypt DJ-mixer is een audio-mengpaneel voor gebruik thuis en op semi-professioneel gebied. Met dit apparaat kunnen audiosignalen met een laag niveau van verschillende muziekbronnen worden gemixt. Het apparaat wordt hierbij tussen de te mixen audiosignaalbronnen en een audioversterker geschakeld. Dit product mag alleen met de meegeleverde netadapter van stroom worden voorzien. De netadapter is alleen goedgekeurd voor aansluiting op 230 V/50 Hz wisselspanning.
3. Verklaring van symbolen Dit teken op het apparaat wijst de gebruiker erop, dat hij voor ingebruikneming van het apparaat de gebruiksaanwijzing moet lezen en deze bij gebruik in acht moet nemen. Het symbool met de bliksemschicht in een driehoek geeft aan dat er gevaar bestaat voor uw gezondheid, bijv. door een elektrische schok. In het apparaat bevinden zich geen onderdelen die door de gebruiker moeten worden onderhouden. Het apparaat mag daarom nooit worden geopend.
4. Veiligheidsvoorschriften • Houd het product buiten bereik van kinderen; het is geen speelgoed. Kinderen kunnen niet inschatten welke gevaren aan het gebruik van elektrische apparatuur zijn verbonden. • Zet geen bakken met vloeistoffen, bijv. glazen, emmers, vazen of planten in de buurt van het product. Vloeistof kan in de behuizing dringen en daarbij afbreuk doen aan de elektrische veiligheid.
5.
5. Aansluitings- en bedieningselementen (1) Keuzeschakelaars voor de ingang Met de keuzeschakelaars voor de ingang kiest u tussen de afzonderlijke ingangen (signaalbronnen) van de kanalen. Voorbeeld: Als de schakelaar van kanaal A PH1/LN1–LN2 zich in stand LN2 bevindt, betekent dat, dat het signaal van het apparaat dat met de aansluitingen LN2 is verbonden, op kanaal A wordt gelegd. De PH1/LN1-ingang wordt in deze schakelaarstand niet weergegeven.
5. Aansluitings- en bedieningselementen (5) Klankregelaars Met deze klankregelaars verandert u de klank van het desbetreffende kanaal resp. van de microfoon. • HI = klankregelaar hoog • MID = klankregelaar midden • LOW = klankregelaar laag • Linker regelaaraanslag betekent maximale daling. • Rechter regelaaraanslag betekent maximale stijging. • Middelste stand (licht vastklikken merkbaar) betekent geen beïnvloeding van het signaal door de regelaar (neutrale stand).
5. Aansluitings- en bedieningselementen (11) Regelaar LEVEL Met deze regelaar wordt het volume van de koptelefoon ingesteld. Stand „0“ = minimaal niveau Stand „10“ = maximaal niveau Draai de regelaar naar stand „0“, voordat u de koptelefoon insteekt of losmaakt, opzet of het mengpaneel in- of uitschakelt. Er bestaat gevaar voor gehoorschade door een te hoog volume bij de koptelefoonuitgang. (12) Kanaalfaders Met de kanaalfaders stelt u het niveau van het desbetreffende kanaal in.
5. Aansluitings- en bedieningselementen (17) Aansluiting AC 12V Hier wordt de laagspanningsstekker van de meegeleverde netadapter voor de stroomvoorziening van het mengpaneel ingestoken. (18) Aansluitklemmen GND Ter voorkoming van brommende geluiden kan via deze schroefklemmen een massaverbinding tussen het mengpaneel en de massaleidingen van de platenspeler (meestal zwarte kabel met klemhuis) tot stand worden gebracht.
5. Aansluitings- en bedieningselementen (23) Ingangsbussen voor kanaal B Op deze stereo-cinchingangen worden de geluidsbronnen, zoals cd-speler, cassettedeck, MP3 player, platenspeler of andere weergave-apparatuur aangesloten. Het bussenpaar LN-3/PH-2 is omschakelbaar. Het type apparaat (LINE resp. PHONO) wordt met de keuzeschakelaar LN-3/PH-2 (22) geselecteerd. (24) Keuzeschakelaar LN-1/PH-1 Deze schakelaar legt vast of een line-apparaat of een platenspeler op de ingangsbussen LN-1/PH-1 is aangesloten.
6. Opstellen en montage De Mc Crypt DJ-mixer kan op een vlakke ondergrond geplaatst worden of in een mengpaneel ingebouwd worden. Maak hiervoor gebruik van de meegeleverde montagehoeken en schroeven. Zorg bij het opstellen resp. de inbouw in een mengpaneel en het gebruik van ander materiaal voor voldoende ventilatie. Plaats het apparaat niet op een zachte ondergrond zoals bv. een tapijt of een bed e.d. De luchtcirculatie mag bovendien niet door voorwerpen zoals tijdschriften, tafelkleden, gordijnen e.d.
7. Aansluiting Verbreek voor het aansluiten de stroomtoevoer naar het mengpaneel en alle andere apparaten die met het mengpaneel verbonden moeten wordent (haal de netadapter resp. de stekker uit de contactdoos). Gebruik voor de aansluiting van de cinchingangen en -uitgangen alleen hiervoor geschikte, afgeschermde cinchkabels. Gebruik voor de aansluiting van de microfooningang alleen hiervoor geschikte microfoonkabels. Bij gebruik van andere kabels kunnen storingen optreden.
7. Aansluiting Microfooningang MIC (19) Op deze ingang kunt u uw microfoon aansluiten. USB-aansluiting Sluit hier de USB-interface van uw computer aan. b) Aansluiting van de uitgangen Uitgang MAIN (21) Sluit op de uitgang MAIN een vrije cinchingang van uw hoofdversterker (bijv. AUX) aan. Uitgang REC (21) Als u het uitgangssignaal van het mengpaneel met een opnameapparaat wilt opnemen, sluit u de opname-ingang van het apparaat aan op de bussen REC (21) van het mengpaneel.
7.
8. Ingebruikneming Neem het apparaat alleen dan in gebruik, als u de gebruiksaanwijzing heeft doorgelezen en de functies van het apparaat heeft begrepen. Controleer nogmaals of alle aansluitingen juist zijn. a) Mengpaneel in- en uitschakelen Door het niet in acht nemen van de hierna beschreven volgorde bij het in- en uitschakelen van het mengpaneel kunnen de luidsprekers of de versterker beschadigd raken.
8. Ingebruikneming c) Volume-indicators De volume-indicator (2) geeft informatie over het uitgangsniveau. Het niveau dient zo min mogelijk permanent de „0“db-waarde op de volume-indicator te overschrijden, omdat er anders vervormingen van het muzieksignaal kunnen ontstaan. Een kort oplichten resp. een korte uitslag tot boven de „0“dB-waarde bij signaalpieken is echter geen probleem. d) Volumeregeling • Draai het volume op de aangesloten versterker naar het minimum.
8. Ingebruikneming e) Meeluisteren/voorbeluisteren Draai de regelaar LEVEL (11) tot de linker aanslag (stand „0“) voordat u de koptelefoon insteekt of losmaakt, opzet of het mengpaneel in- of uitschakelt! Er bestaat gevaar voor gehoorschade door een te hoog volume bij de koptelefoonuitgang. • Met de regelaar CUE/PGM (10) bepaalt u of u het uitgangssignaal of het ingangssignaal van de afzonderlijke kanalen van het mengpaneel via de koptelefoon kunt horen.
8. Ingebruikneming h) Weergave via de USB-ingang • Zet uw computer aan en wacht tot uw computer het besturingssysteem volledig heeft geladen. • Maak de verbinding tussen de USB-aansluiting (20) en de USB-interface van uw computer. • Plaats de ingangskeuzeschakelaar van mengpaneelkanaal B in de stand USB. • Schakel het mengpaneel met de schakelaar POWER (2) in.
10. Onderhoud Controleer regelmatig de technische veiligheid van het mengpaneel bijv. op beschadigingen aan de netadapter en de behuizing. Wanneer kan worden aangenomen dat een veilig gebruik niet meer mogelijk is, mag het apparaat niet meer worden gebruikt en moet het worden beveiligd tegen onbedoeld gebruik.
12. Verhelpen van storingen U heeft met de Mc Crypt DJ-mixer een product aangeschaft dat volgens de nieuwste stand van de techniek is ontwikkeld en veilig is in het gebruik. Toch kunnen zich problemen of storingen voordoen.
12.