
Operation Manual


Installation
• Whenchoosingthelocation,makesuretoavoiddirectsunlight,vibration,dust,heat,coldandhumidity.
Providesufcientaircirculationwheninstallingtogetherwithotherequipment.Keepsufcientdistance
fromsourcesofheat.Donotdirectstrongspotlightsandlightsourcesattheproduct.Thismayleadto
overheatingRiskofre!)
• Theheatdissipationoftheproductmustnotbeimpeded.Donotplacetheunitonsoftsurfaces,suchas
carpetsorbeds.Donotrestrictaircirculationwithnewspapers,tablecloths,curtainsetc.Thisimpedes
heatdissipationandmayleadtooverheating(riskofre!)
• Alwaysoperatetheunitonastable,notheat-sensitivesurface
• Makesuretheproductisinstalledsecurelyonastablesurface.Iftheproductshouldfallitmaycauseinjuries.
• Keep unit away from products with strong magnetic elds, such as transformers, motors wireless
telephones,transceiversetc.,becausetheymaycauseinterferencewiththeunit.Keepasmuchdistance
aspossiblefromsuchdevices.
• Donotdrillholesoradditionalscrewsintothehousing,topreventcontactwithdangerousvoltages.
• Donotpinchconnectingcablesordamagethemonsharpedges.Alwaysruncablessothatnobodycan
tripoverorgetentangledinthem.Riskofinjury!
• Cablesmustbeofsufcientlength.Avoidmechanicaltensionstresses.Theymaydamagethecablesand/
ortheunit.Riskofdangerouselectricshock!
• Becauseofthegreatdiversityoflacquersandpolishingagentsforfurniture,itispossiblethatachemical
reactionwillcausethefeetofthedevicetoleavevisibleresidueonthefurniture.Theunitshouldnever
beplacedonvaluablefurnituresurfaceswithoutproperprotection.
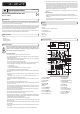
Connections
(23) USB Jack, Type B
PowersupplyprovidedviaUSBjack.IftheunitisconnectedtoaplayerwithaUSBconnection,simultaneous
audioplaybackispossible(forinstancemixer-PC).
Adjust the audio output of your player accordingly (see software documentation of your
operating system and/or your audio software).
(20) Input jack MIC / LINE IN 1
ThecombinedinputjackMIC / LINE IN 1allowstheconnectionofa:
- microphonewithXLRconnection
- playerwith6.35mmjack
Connect only symmetrical cables and microphones. Never connect the high level signal
with the input jack MIC/LINE IN 1 once the unit is turned on. It might damage the unit.
(21) Input jacks LINE IN 2 / 3
Thesecinchjackspermittheconnectionofastereosignalsource(white=leftchannel,red=rightchannel).
(18) Output jacks 2TK
Thesecinchjackspermittheconnectionofataperecorderoradigitalaudiomagnetictape(white=left
channel,red=rightchannel).
(19) Input jack 2TK
Thesecinchjackspermittheconnectionofastereosignalsource(white=leftchannel,red=rightchannel).
(1) Output jack MAIN OUT
This3.5mmjackisintendedfortheconnectionofaspeakeroramplier.
(3) Output jack MON.
TheoutputjackMON.isintendedforheadphoneswith3.5mmjacks.
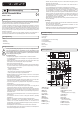
Connectionexample:
MIC/LINE 1
IN
LINE 2/3
IN
2TK
IN OUT
MAIN
OUT
MON. PWR
L
R
L
R
MAIN
2TK
GAIN
LINE/USB 2TK/BT
PAIR
MX 3BT
Bluetooth
+500
12KHz 80Hz 12KHz 80Hz
LEVEL LEVEL
MONITOR
CLIP
PEAK
HIGH LOW PAN HIGH LOW BAL
+15
-15
-0-
+15
-15
-0-
L
R
L
R
+15
-
0
+10
-
0
+6
-
0
+10
-
0
CH1 CH2/3
MAIN MIX
L R
TO
MONITOR
TO
MAIN
LINE IN
USB PLAY
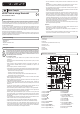
Description of operating elements
(22) On/Off switch PWR
WiththeOn/OffswitchPWRyoucanturnthemixeronoroff.
(17) LINE / USB key
IfyouswitchtheLINE / USBkeytoposition ,thesignalwillbedeliveredviatheUSBinput.Inkey
position
,thecinchjacksLINE IN 2/3deliverthesignalfeed.
(16) Control dial GAIN
ThecontroldialGAINadjuststhelevelofthemonoinputsignal.
(15) HIGH / LOW slider
TheHIGH / LOWslidersadjustthehighsandlowsofthechannel.
(14) PAN / BAL slider
ThePAN / BALsliderpositionsthechannelinthestereoeld.
ThePANsliderdeterminesthedistributionofthemonosignalontherightandleftchannelofthestereo
outputs.Inthemiddleposition,thesignalissuppliedbybothoutputs.InpositionR,thesignalisonlysupplied
bytherightside,andinpositionLonlybytheleft.
TheBAL(balance)slideradjuststhelevelratiobetweenleftandrightstereosignalinput.
(13) LED indicator PEAK
Thisindicatesmonolevelclipping(microphone).IfthisLEDindicatorlightsup,itindicatessignalclipping.
Toavoidsignalclippingordistortion,illuminationoftheLEDindicatorshouldbeavoided.Reducethelevel
ofthesignalsourceaccordingly.
(11/12) Control dial LEVEL
ThecontroldialLEVELadjuststheindividuallevelsoftherespectivechannels.
(10) Control dial MAIN MIX
ThecontroldialMAINMIXadjuststhelevelsoftheMAIN MIXoutputs.
(9) LED indicator CLIP
ThisindicatesclippingoftheMAIN MIXoutput.Theindicatorlightsupincaseofsignalclipping.Toavoid
signalclippingordistortion,illuminationoftheLEDindicatorshouldbeavoided.Reducethelevelofthe
signalsourceaccordingly.
(8) Control dial MONITOR
ThecontroldialGAINadjuststheleveloftheheadphoneoutput.
(7) PAIR key
WiththePAIRkey,youcanconnectthemixerwithaplayerthatsupportsBluetooth®.
(6) MAIN/2TK key
Thisassignsthe2TKinputtotheMONITORoutput.
Key position
Thecontrolisactivated;the2TKinputsignalisassignedtotheMONITORoutput.
Key position
Controlisdeactivated;signalisassignedfromMAIN MAXoutputtoMONITORoutput.
(4) 2TK/BT key
Thiscontrolstheassignmentof2TKandBluetooth®inputs.
Key position
Controlisactivated;signalisassignedfrom2TK/BTtoMAIN MAXoutput.
Key position
Controlisdeactivated,assignmentisturnedoff.
(2) LED indicator PWR
TheLEDindicatorPWRilluminatesiftheunitisinoperation.
(5) LED indicator
IftheLEDindicator ashes,theunitisinsearchorstandbymode.
IftheLEDindicator
lightsup,theunitisconnectedtoaBluetooth®device(seeConnect Devices via
Bluetooth®).
Operation
Do not operate this unit before you have become familiar with its functions and with this
manual. Check all connections once again for correctness. Never operate the unit if it
appears damaged.
Make sure devices connected with the unit do not get overloaded. Playback must never
be distorted. Should distortions be audible, although the volume of the amplier was not
set too high, turn the unit off immediately and check the connections. If there is nothing
wrong with the connection, consult a technician.
1. Makesurealldeviceshavebeenturnedoff.ConnectallnecessaryaudioandUSBcablestothemixer.The
mixercanbepoweredwiththeUSBadapterprovided,orviaaplayerwithUSBconnection(min.500mA).
UsetheUSBjacktoconnecttheUSBcablewiththeUSBadapter.
2. SettheslidersHIGH / LOW / PAN / BAL(14,15)tothemiddlepositionandturnallothercontroldials(8,
10,11,12,16)allthewaytotheleft.
3. Turnonallexternaldevices,forexamplespeakerorampliers.
4. Usetheon/offkeyPWR(22)toturnthemixeron.Inkeyposition
,themixeristurnedon(theLED
indicatorPWR(2)illuminates).Inkeyposition
,themixeristurnedoff.