Comodo Endpoint Security Manager SME Edition Software Version 2.1 Administrator Guide Guide Version 2.1.
Comodo Endpoint Security Manager - SME - Administrator Guide Table of Contents 1.Introduction to Endpoint Security Manager - SME..................................................................................................................4 1.1.Software Components and System Requirements..............................................................................................................6 1.2.Removing Incompatible Products..........................................................................
Comodo Endpoint Security Manager - SME - Administrator Guide 2.6.About...............................................................................................................................................................................185 2.7.Logging out of ESM Console...........................................................................................................................................188 3.How To... Tutorials....................................................................
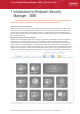
Comodo Endpoint Security Manager - SME - Administrator Guide 1.Introduction to Endpoint Security Manager - SME Endpoint Security Manager (ESM) SME is designed to help administrators of corporate networks deploy, manage and monitor Comodo endpoint security software on managed networked computers. Total Protection for networked computers ESM allows administrators to leverage and maximize the protection offered by Comodo's endpoint security solutions.
Comodo Endpoint Security Manager - SME - Administrator Guide Features: • New web browser-based panorama style user interface compatible with touch-screen computers • New Dashboard interface with Active Tiles™ and configurable email alerts • New policy-based Comodo Internet Security configuration management • New Internet policy supports different CIS configuration for laptops • Integration with the latest Comodo Internet Security • New Active Reports™ with built in drill down to computers Guide
Comodo Endpoint Security Manager - SME - Administrator Guide 1.1.Software Components and System Requirements Software Components ESM consist of three interdependent software components: • The Administrative Console • The Central Service • The Remote Agent Administrative Console The Administrative Console provides access to all functionality of Endpoint Security Manager through a friendly and highly configurable interface.
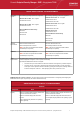
Comodo Endpoint Security Manager - SME - Administrator Guide CENTRAL SERVICE COMPUTER - SYSTEM REQUIREMENTS Operating System The following operating systems are supported: The following operating systems are supported: Windows Server 2003 - SP 1 or higher Windows Server 2003 - SP1 or higher Small Business Server Small Business Server Windows Server 2008 - SP2 or higher Small Business Server Windows Server 2008 - SP2 or higher Small Business Server R2 Small Business Server Small Business Server R2 M
Comodo Endpoint Security Manager - SME - Administrator Guide ADMINISTRATIVE CONSOLE COMPUTER - SYSTEM REQUIREMENTS Software Browsers and software Other Requirements Microsoft Silverlight 4.0 Microsoft Silverlight 4.0 Microsoft Internet Explorer 7.0 or higher Microsoft Internet Explorer 7.0 or higher Mozilla Firefox 3.0 or higher Mozilla Firefox 3.0 or higher Google Chrome 4.0 or higher Google Chrome 4.0 or higher Comodo Dragon 15.0 or higher Comodo Dragon 15.
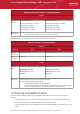
Comodo Endpoint Security Manager - SME - Administrator Guide Vendor Product Name Uninstall Type Detect only Components AVAST Software avast! Free Antivirus avast! Free Antivirus Symantec Corporation Symantec Endpoint Protection Automatic Symantec Endpoint Protection Agnitum Outpost Security Suite Pro 7.1 Detect only Outpost Security Suite Pro 7.1 Sophos Limited Sophos Endpoint Security and Automatic Control Sophos AutoUpdate Sophos Anti-Virus Sophos Client Firewall McAfee SecurityCenter 11.
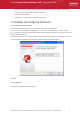
Comodo Endpoint Security Manager - SME - Administrator Guide • Select Control Panel > Programs and Features (Win 7, Vista); Control Panel > Add or Remove Programs (XP) • Select your current antivirus or firewall program(s) from the list • Click Remove/Uninstall button • Repeat process until all required programs have been removed 1.3.Installing and Configuring the Service 1.
Comodo Endpoint Security Manager - SME - Administrator Guide To complete the initialization phase you must read and accept to the License Agreement. After you have read the End-User License Agreement, check the 'I accept the terms in the License Agreement' box and click 'Next' to continue installation. If you decline, you cannot continue with the installation. The release notes for the current version of ESM will be displayed. Read the notes and click 'Next'. 3.
Comodo Endpoint Security Manager - SME - Administrator Guide • Typical - Installs most common components (ESM Server and Documentation) to the default location of C:\Program Files > Comodo > Endpoint Security Manager. This is the option recommended for most users. On selecting 'Typical' and clicking 'Next', the setup progress will move to finalization.
Comodo Endpoint Security Manager - SME - Administrator Guide Choose the components that you want to install. Custom Setup - Key Control Description Icons with the ▼ symbol to the right are the currently selected installation option. Clicking this icon will open a menu allowing the user to select alternative installation options. These alternative installation options are explained in the next four rows of this table.
Comodo Endpoint Security Manager - SME - Administrator Guide Custom Setup - Key Indicates that the component named to the right of the icon will be installed as and when the user requires. Choosing this option will create a shortcut to the Comodo folder on the Windows start menu - allowing the feature to be installed when the shortcut is selected. Indicates that the component named to the right of the icon will not be installed. Browse.... The 'Browse...
Comodo Endpoint Security Manager - SME - Administrator Guide Click 'Next' then 'Install' to begin the installation process. 4. Finalizing the Installation Once installation is complete the finish dialog is displayed - offering admins the opportunity to either finish and exit the installer or finish and start the configuration tool. Endpoint Security Manager - SME Administrator Guide | © 2013 Comodo Security Solutions Inc.
Comodo Endpoint Security Manager - SME - Administrator Guide • Select the 'Launch ESM Configuration Tool' check box to open the configuration utility immediately after exiting the installer.
Comodo Endpoint Security Manager - SME - Administrator Guide Groups - ESM allows computer groups to be created as required by the structure of the corporate organization. Once groups have been created sorting the computers in the network, admins can run tasks (such as applying security policy, running AV scans and deploying agents) as required for specific groups. Policy - A policy is the security configuration of Comodo Internet Security (CIS) deployed on an endpoint or a group of endpoints.
Comodo Endpoint Security Manager - SME - Administrator Guide Next: Quick Start Guide 1.6.Quick Start Guide This tutorial briefly explains how an administrator can setup Endpoint Security Manager - SME then install and monitor installations of Comodo Internet Security (CIS) on networked computers. We recommend admins to have read the 'Best Practices' section before putting this tutorial into practice.
Comodo Endpoint Security Manager - SME - Administrator Guide Tip: You can find the server hostname/IP and the ESM port numbers by opening the configuration tool on the server. Click 'Start > All Programs > Comodo > Endpoint Security Manager > ESM Configuration Tool'. 2. Login to the console using the Windows administrator user ID and password of the system that ESM was installed on to begin using your software. 3.
Comodo Endpoint Security Manager - SME - Administrator Guide The remainder of this step describes the first method - remote installation. 1. Click 'computers' in the top navigation (2nd link from the left) to open the 'computers' area. 2. Click the 'deploy' tile from the 'computers' area to start the wizard (by default, the tile is positioned bottom right). 3. The first stage is to choose how you want to import (Target Type).
Comodo Endpoint Security Manager - SME - Administrator Guide to select all the computers, select the check box beside the 'target computer'. Swipe left (or click the right arrow button) to move onto the next step. 7. Credentials. Next up is to choose whether the agent has to be installed under the currently logged in user account or the network administrator account.
Comodo Endpoint Security Manager - SME - Administrator Guide • If deployment fails, click on the words 'Deployment Failed' to discover the reason. The info box also contains advice that may remediate the issue. Endpoint Security Manager - SME Administrator Guide | © 2013 Comodo Security Solutions Inc.
Comodo Endpoint Security Manager - SME - Administrator Guide • Once deployment is successful, click the 'Finish' icon at the base of the interface to exit the wizard. If you have chosen to install both the agent & CIS then those endpoints should now be reporting to ESM. Step 4 - Check that target endpoints are reporting correctly 1. Click 'dashboard' from the top navigation. 2.
Comodo Endpoint Security Manager - SME - Administrator Guide 3. Tiles on the dashboard display real-time information regarding connectivity, virus outbreaks and security policy compliance. Other tiles allow you to quickly launch common tasks such as updating virus databases and running antivirus scans. In this first instance, click the 'Total Online' and 'Non-reporting' tiles to check that the import process went according to plan.
Comodo Endpoint Security Manager - SME - Administrator Guide • To start, click the 'computers' link from the top navigation followed by the 'group' tile. Select required computers, leave policy as (Locally Configured), type a name for the group then finish. • If you wish to create multiple groups, repeat the previous step until all computers have been assigned. • See 'Creating Endpoint Groups' if you need help with this wizard. See 'The Computers area' for an overview of functionality.
Comodo Endpoint Security Manager - SME - Administrator Guide 2.The Administrative Console The Administrative Console is the nerve center of Endpoint Security Manager, allowing administrators to deploy, manage and monitor Comodo endpoint security software on networked computers.
Comodo Endpoint Security Manager - SME - Administrator Guide license in this screen. See 'About' section for more details. • Logout - Allows administrators to logout of the ESM Console. • Settings Bar - Allows administrators to add Active Tiles™ to the dashboard area by clicking the ellipsis button and dragging to the dashboard. Refer to the section Adding and Reconfiguring Tiles for more details.
Comodo Endpoint Security Manager - SME - Administrator Guide Next - The Dashboard Area. 2.2.The Dashboard Area Active Tiles™ are classified according to category, with each category of tile capable of displaying multiple information types. Tiles can be added or removed according to your preference. See 'Default Tiles' section below if you would like to see quick explanations of the tiles on the default layout. Tile Categories: • Quick Actions - Tiles that launch specific tasks.
Comodo Endpoint Security Manager - SME - Administrator Guide number of endpoints on which virus or malware was found within the defined threshold. See Outbreak configurable parameters on System Status Tile page for more details. • # Malware found - Displays the number of malware identified and not handled by the local CIS installation in the endpoint(s). See Malware Found configurable parameters on System Status Tile page for more details.
Comodo Endpoint Security Manager - SME - Administrator Guide • Update AV Bases – ('Quick Actions' tile category) Launches the update virus database wizard. After clicking the tile, admins will need to select which computers to update before initiating the update process. • Non-Reporting – ('System Status' tile category) Lists any managed endpoints that are failing to report to ESM.
Comodo Endpoint Security Manager - SME - Administrator Guide • Clicking will remove the tile from the dashboard. 2.2.1.1. Quick Actions Tiles The Quick Action category of tiles enables administrators to launch common and important tasks on managed endpoints. Tasks that can be assigned to a Quick Action tile are: • Antivirus Scan Action - Launches the 'Run a Scan Wizard' when clicked. After clicking this tile, admins should select the target machines and scan profile ('My Computer' or 'Critical Areas').
Comodo Endpoint Security Manager - SME - Administrator Guide The 'quick actions tile properties' dialog will appear. 3. Choose the type of action you want to see on the tile at the properties dialog. You can add as many Quick Action tiles as as you wish for different actions. Endpoint Security Manager - SME Administrator Guide | © 2013 Comodo Security Solutions Inc.
Comodo Endpoint Security Manager - SME - Administrator Guide To change the type of information displayed in the Quick Actions tile, click the words 'Quick Actions' at the bottom of the tile then the icon: . To remove the tile, click the icon : Running An Antivirus Scan on Multiple Endpoints Clicking the Antivirus Scan tile will open step 1 of the scanning wizard. The remaining steps are displayed below the blue title bar with the current step in bold.
Comodo Endpoint Security Manager - SME - Administrator Guide • • Actual CIS • Unsupported CIS • No CIS Installed • No Antivirus Click the right arrow to confirm your selection and move to the next step. Step 2 - Select Scan Profile The 'Scan Profile' defines the areas and folders to be scanned in the endpoints. • My Computer - All drives on the endpoint will be scanned.
Comodo Endpoint Security Manager - SME - Administrator Guide • Click the Finish icon to start the update process in the endpoints. The administrator can confirm the update process by clicking the 'view' tile (click 'computers' then 'view'). 2.2.1.2. Policy Status Tile The 'Policy Status' tile displays the status of endpoint compliance with their assigned CIS security policy. The specifics of each policy manage the settings in the Comodo Internet Security software installed on an endpoint.
Comodo Endpoint Security Manager - SME - Administrator Guide • Click any of the Policy Status tile in the dashboard to open the 'View All Computers' screen. • OR Click 'computers' from the top menu, select the 'view' tile to open the 'View All Computers' screen. • Select 'Non-Complaint' category from the left side pane and in the right side a list of Non-Complaint' endpoints will be displayed.
Comodo Endpoint Security Manager - SME - Administrator Guide 2.2.1.3. Endpoint Updates Tile Displays a summary of endpoints that are updated, outdated or unknown.
Comodo Endpoint Security Manager - SME - Administrator Guide 3. Select the information to be displayed as per your requirement in the properties tile and click 'save'. The new tile will be added to the dashboard area. You can add as many 'Updates' tiles as as you wish for the information you wish to see in the dashboard. 4. To change the type of information for a particular tile, click the words 'Virus Database' at the bottom of the tile then the icon: . To remove the tile, click the icon: . 2.2.1.4.
Comodo Endpoint Security Manager - SME - Administrator Guide • 'Infections' refers to malware that has been detected but not 'handled' by Comodo Internet Security (it has not been deleted, disinfected or quarantined and is still located on the endpoint). If the malware was handled successfully by CIS then it will not show on this tile. • Administrators are advised to immediately investigate machines currently shown as hosting malware.
Comodo Endpoint Security Manager - SME - Administrator Guide 2.2.1.5. Connectivity Tile The Connectivity tile displays of the number of endpoints that are currently online and can be controlled through the ESM console.
Comodo Endpoint Security Manager - SME - Administrator Guide 3. Select the information to be displayed as per your requirement in the properties tile and click 'save'. The new tile will be added to the dashboard area. You can add as many 'Connectivity' tiles as as you wish for the information you wish to see in the dashboard. 4. To change the type of displayed information for a particular tile, click the words 'Connectivity' at the bottom of the tile then the icon: .
Comodo Endpoint Security Manager - SME - Administrator Guide 2. Drag the 'Getting Started' tile into the dashboard. 3. Click the right or left arrows to navigate for more help links. The arrow will turn blue in color when the mouse cursor is placed over it. 2.2.1.7. System Status Tile The 'System Status' tiles provide real time updates on critical network security data.
Comodo Endpoint Security Manager - SME - Administrator Guide greater than the defined values (default = 1). When you drag a system status tile onto the dashboard (See 'Adding a System Status Tile') you will be asked to: • Choose the type of tile (select from the list of six types described above. Alternatively, select 'All'). • Specify an alert threshold number. The parameters of the threshold will vary depending on the type of tile. If the threshold is exceeded then the tile will turn red.
Comodo Endpoint Security Manager - SME - Administrator Guide Since the System Status tile also serves as an alert to indicate the occurrence of events that require immediate attention of the administrator, the administrator should configure the maximum permissible values for the parameters while adding the tile. See the System Status Tile - Table of Information Displayed and Configurable Parameters. The administrator can also configure for ESM to send automated emails on occurrence of such events.
Comodo Endpoint Security Manager - SME - Administrator Guide Information NonReporting Description Configurable Parameters Shortcut to... and not handled by the local CIS installation in the endpoint(s). endpoints so that if the number of endpoints infected by malware equals to or exceeds this value, the tile alerts the administrator. Default = 1 'Infected' category preselected, which lists the endpoints affected along with the name and location of the malware.
Comodo Endpoint Security Manager - SME - Administrator Guide when the number equals to or exceeds two, then: 1. Click the ellipsis button on the settings bar at the lower left of the interface. 2. Drag the System Status tile to the dashboard. The 'system status tile properties' dialog will appear. 3. Select 'Outdated' from the 'Show:' drop-down. The 'Outdated' tab will appear beneath the 'Show:' drop-down. 4. Enter 2 in the Number of 'AV outdated:' text field. 5.
Comodo Endpoint Security Manager - SME - Administrator Guide • Click anywhere on the tile to open the license details and upgrade wizard. Upgrading Your License 1. Navigate to Dashboard area. The License Status tile will display the number of endpoint covered by and the validity period of your current license. 2. Click the 'License Status' tile. The details of your current license are displayed. 3. Click the 'Upgrade license' link to move to the next step - Entering the new license key.
Comodo Endpoint Security Manager - SME - Administrator Guide 4. Enter the license activation key you received via email. Note: If you do not have a new license key, click the 'Get new License Key online' link to purchase it online from Comodo website. 5. Swipe the screen to the left or click the right arrow to move to the next step - New License. The details of your new license will be displayed. 6. Swipe the screen to left or click 'Finish' to activate the new license and exit the wizard.
Comodo Endpoint Security Manager - SME - Administrator Guide 2.2.1.9. Software Tile The ‘Software Updates’ tile quickly informs the administrator when updated versions of Comodo Internet Security or the ESM agent are available. It also shows the number of endpoints running outdated software. Note - even if no new updates are available, it is still possible for computers to be running outdated software if previously downloaded updates have not yet been installed.
Comodo Endpoint Security Manager - SME - Administrator Guide 3. Choose the type of information you want to be displayed in the tile from the Properties dialog and click 'save'. The new tile will be added to the dashboard area. 4. To change the type of information displayed in the Software tile, click the words 'Software Updates' at the bottom of the tile then the icon: . 5. To remove the tile, click the icon: .
Comodo Endpoint Security Manager - SME - Administrator Guide 2.3.The Computers Area The 'Computers' area plays a key role in the ESM Administrative Console interface by providing system administrators with the ability to import, view and manage networked computers.
Comodo Endpoint Security Manager - SME - Administrator Guide Adding an endpoint to ESM requires an agent to be installed in it. The agent can be installed in two ways: • Install agent while importing computers • Download and Install agent 'manually' on endpoint computers Once the agent is installed, the endpoints can communicate with and be managed by ESM. 2.3.1.
Comodo Endpoint Security Manager - SME - Administrator Guide Step 1 - Select the Target Type Computers can be imported into ESM in the following ways: • Active Directory - imports computers from an Active Directory Domain. • Workgroup - imports computers from a Workgroup. • Network Addresses - imports individual computers specified by their IP Addresses or Host Names. • Managed Computers - allows to update installed Comodo software in managed computers.
Comodo Endpoint Security Manager - SME - Administrator Guide Importing from Active Directory • Choose 'Active Directory' and move to the next step by swiping to left or clicking the right arrow. Step 2 - Domain Name • Select Current Domain or Custom Domain. Current Domain should be chosen if the ESM service computer is currently a member of the domain you wish to use to target for installation.
Comodo Endpoint Security Manager - SME - Administrator Guide Domain Import Settings - Table of Parameters Current Domain (Selected by default) Selecting this option will import any computers from the Active Directory domain that the ESM service computer is a member of. Custom Domain Selecting this option allows the administrator to specify an alternative Active Directory domain from which computers will be imported.
Comodo Endpoint Security Manager - SME - Administrator Guide • Click the icon to expand or collapse the tree structure • Select the target endpoints onto which you wish to install the agent and import into ESM • Click the right arrow or swipe left to move to step 3 to select the endpoints Importing Computers from Workgroup • Choose 'Workgroup' and move to the next step by clicking the right arrow.
Comodo Endpoint Security Manager - SME - Administrator Guide ESM enables the administrator to specify the workgroup name in two ways: • Find Workgroups - Makes ESM to search for the workgroups associated with the network and enables administrator to select the workgroup(s) from which the endpoints are to be imported in the next step. Note: The Workgroup is discovered from the local area network attached to the ESM service computer.
Comodo Endpoint Security Manager - SME - Administrator Guide • Enter the name of a network Workgroup and click the right arrow to move to step 3 to select the endpoints. Importing Computers by Specifying Network Addresses • Choose 'Network Addresses' and move to the next step by swiping to the left or clicking the right arrow. Step 2 - Adding IP Addresses The next step is to add the target computers by specifying their IP address(es) or Host Names.
Comodo Endpoint Security Manager - SME - Administrator Guide Computers can be added in four ways: • Import individual computers by specifying their IP addresses one-by-one - Enter the IP address of the computer and click 'Add'. The IP address will be added and displayed below the text box. To add more computers, repeat the process. • Import individual computers by specifying their names one-by-one - Enter the name of the target computer as identified in the network and click 'Add'.
Comodo Endpoint Security Manager - SME - Administrator Guide • Select the endpoint(s) that you want to deploy the agent and CIS to. You can use the filter option to select the endpoints from the list displayed.
Comodo Endpoint Security Manager - SME - Administrator Guide Credentials - Table of Parameters Current User Credentials (Selected by default) Selecting this option will install the agent using the credentials of the currently logged - in ESM administrator account in each endpoint. Custom Credentials Selecting this option allows the administrator to specify an administrative account for installation of the agent.
Comodo Endpoint Security Manager - SME - Administrator Guide • Click 'Check for Updates' to find out if any newer version of ESM Agent and CIS are available • If any newer versions are available, you can choose to download them to the ESM server by clicking 'Download' • Swipe to the left or click the right arrow to move to the next step Step 6 - Internet Security The next step is to choose installation options for Comodo Internet Security (CIS): Endpoint Security Manager - SME Administrator Guide |
Comodo Endpoint Security Manager - SME - Administrator Guide • Select 'Install Comodo Internet Security' check box if you wish CIS to be installed along with the agent. Note: If the option to install CIS is not be selectable, your license for Comodo Endpoint Security Manager did not include CIS software. • Select the version of CIS you wish to install on the selected endpoints from the drop-down. Note – the drop-down will be empty the first time ESM is run.
Comodo Endpoint Security Manager - SME - Administrator Guide • Suppress reboot after installation - CIS installation will restart of the endpoints for the installation to take effect. If you do not want the endpoints to be restarted on completion of installation, select this check box. CIS installation will complete but will take effect only on the next restart of the endpoint.
Comodo Endpoint Security Manager - SME - Administrator Guide ESM will start installing the agent/CIS on to the selected endpoints and the progress per endpoint will be displayed. Endpoint Security Manager - SME Administrator Guide | © 2013 Comodo Security Solutions Inc.
Comodo Endpoint Security Manager - SME - Administrator Guide If any of the selected endpoints have older versions of CIS than the one selected in the previous Step 6, they will be automatically uninstalled and the selected version will be installed. Step 8 - Deployment Complete On completion of installation, the results screen will appear. • If deployment fails, click on the words 'Deployment Failed' to discover the reason. The info box also contains advice that may re-mediate the issue.
Comodo Endpoint Security Manager - SME - Administrator Guide • Click the Finish icon or swipe the screen to the left to exit the wizard. The endpoints selected in Step 3 are now added to ESM and are ready for management through ESM. Refer to the section 'Viewing Endpoints' for more details on how to view the list of imported endpoints. The newly added computers will be added to the default group 'Unassigned'.
Comodo Endpoint Security Manager - SME - Administrator Guide The ESM setup file can be downloaded as an executable from the admin console. The file can be transferred onto media such as DVD, CD, USB memory so that the agent can be installed manually onto target machines rather than via the ESM interface. A single copy of the installation files can be used to install the agent on any number of target machines.
Comodo Endpoint Security Manager - SME - Administrator Guide Important Note: Web browsers run on server OS may not allow downloading files through it by default, due to policy restrictions. For this reason, in order to download the agent setup file through the ESM admin console accessed through a web browser like Internet Explorer installed on a server, the local computer policy of the server has to be configured to disable the file download restrictions.
Comodo Endpoint Security Manager - SME - Administrator Guide Option Description Step 1 - Welcome Screen The welcome screen of the agent installation wizard will be displayed. Click 'Next' to continue. Step 2 – Specifying Server Address and Port In the next step you must enter the host or IP address of the server in which ESM is installed and the port number the endpoint should be connected. By default, these fields will be populated with the details of the server from which the agent is downloaded.
Comodo Endpoint Security Manager - SME - Administrator Guide The next stage is to select the products to be installed. The installer will first check whether any of these items are already installed. You must first uninstall any older versions of CIS or the Agent that are detected. Ensure that the required products are selected in then click 'Next'. Step 4 - Ready to Install The next step allows you to confirm the choices made in the previous step.
Comodo Endpoint Security Manager - SME - Administrator Guide Step 6 - Installation Complete Upon setup completion, the 'Finish' dialog will be displayed: • Click 'Finish' to exit the wizard. The agent will now automatically establish the connection to your ESM service computer or server. 2.3.1.3. Updating Comodo Software on Managed Computers Once an endpoint is managed, ESM allows you to update the ESM agent as well as CIS using the Deploy wizard.
Comodo Endpoint Security Manager - SME - Administrator Guide • Select 'Managed Computers' and click the right arrow or swipe left to proceed to the next step. Endpoint Security Manager - SME Administrator Guide | © 2013 Comodo Security Solutions Inc.
Comodo Endpoint Security Manager - SME - Administrator Guide The 'Managed Computers' interface will be displayed. • Select the group from the left hand side pane. The member endpoints of the selected group will be listed in the right hand side pane. Endpoint Security Manager - SME Administrator Guide | © 2013 Comodo Security Solutions Inc.
Comodo Endpoint Security Manager - SME - Administrator Guide • Select the endpoints that you want to check and update the ESM Agent and CIS application from the list. • Click the filter icon in the 'Name' column header to search for a particular endpoint, enter the endpoint name and click 'Apply'. • After selecting the endpoints, click the right arrow or swipe left to proceed to the next step. The next stage 'Packages' displays the version details of ESM Agent and CIS.
Comodo Endpoint Security Manager - SME - Administrator Guide • Click 'Check for Updates' to find out if any newer version of ESM Agent and CIS are available • If any newer versions are available, you can choose to download them to the ESM server by clicking 'Download' • Click the right arrow or swipe left to move to the next step The next step is to choose installation options for Comodo Internet Security (CIS): • Select 'Install Comodo Internet Security' check box if you wish CIS to be installed a
Comodo Endpoint Security Manager - SME - Administrator Guide • Select whether you want to include all the components (Firewall and Antivirus), Antivirus only or Firewall only from the Components drop-down. • Suppress reboot after installation - CIS installation will restart of the endpoints for the installation to take effect. If you do not want the endpoints to be restarted on completion of installation, select this check box.
Comodo Endpoint Security Manager - SME - Administrator Guide • Click 'Start Deployment' The deployment progress will be displayed. Endpoint Security Manager - SME Administrator Guide | © 2013 Comodo Security Solutions Inc.
Comodo Endpoint Security Manager - SME - Administrator Guide On completion of installation, the results screen will appear. Endpoint Security Manager - SME Administrator Guide | © 2013 Comodo Security Solutions Inc.
Comodo Endpoint Security Manager - SME - Administrator Guide • Click the Finish icon or swipe the screen to the left to exit the wizard Note: If you have selected 'Suppress reboot after installation' checkbox, the endpoints that were updated have to be restarted for the update to take effect. 2.3.2. Creating Endpoint Groups Creating groups of computers allows the administrator to split large networks up into convenient and/or logical groupings.
Comodo Endpoint Security Manager - SME - Administrator Guide The Create Group wizard will start with Step 1 - Select Computers. The remaining steps are displayed below the blue title bar with the current step highlighted in blue. To move backwards or forwards between steps, use the arrows on either side of the title bar (or left click and drag to swipe the screens left or right). To move between previous and next steps, you can also click steps displayed below the title bar.
Comodo Endpoint Security Manager - SME - Administrator Guide • Click the filter icon in the 'name' column header to search for a particular endpoint and click 'Apply' • Click the filter icon in the 'IP' column header to search for endpoints with particular IP(s) and click 'Apply' • Click the filter icon 'Apply' in the 'group' column header to search for a particular endpoint in a particular gropu and click • Select the endpoint computers to be added to the new group and click the right arrow/swip
Comodo Endpoint Security Manager - SME - Administrator Guide • Select the Local Security Policy and Internet Security Policy for the CIS installations from the respective drop-downs and click the right arrow to move to the next step. For more details on ESM policies, see the section 'The Policies Area'. Step 3 - Naming the Group The next step is to name the created group. Endpoint Security Manager - SME Administrator Guide | © 2013 Comodo Security Solutions Inc.
Comodo Endpoint Security Manager - SME - Administrator Guide • Enter a name as the group has to identified by ESM in the 'Name' text field. • Enter a short description for the created group in the 'Description' text field. This description will appear in the 'View All Computers' Interface. • Click the right arrow to move to the next step.
Comodo Endpoint Security Manager - SME - Administrator Guide From this interface the administrator can: • Create a new group • Edit a group (add / remove endpoints, change default security policies) • View and manage individual endpoints (security policies, CIS management mode and quarantined items) • Remove groups or endpoints • Launch antivirus scans on groups or individual endpoints • Launch database updates on groups or individual endpoints To access the 'View All Computers' interface, clic
Comodo Endpoint Security Manager - SME - Administrator Guide The left hand column contains a list of pre-set and user defined groups. Clicking on any group will display all endpoints in that group. The preset groups are: • All Computers - Displays the list of all the endpoints managed by ESM in the right hand side (RHS) pane. • Online - Displays a list of endpoints that are currently online and connected to ESM console.
Comodo Endpoint Security Manager - SME - Administrator Guide View All Computers Interface - Table of Column Descriptions Column Heading name Description Displays the name of the Endpoint computers with their IP address beneath the name. Also, the endpoint icon indicates whether the endpoint is online or offline. - Indicates that the endpoint is online and connected to ESM - Indicates that the endpoint is offline and not connected to ESM status cis Indicates whether the endpoints are online or offline.
Comodo Endpoint Security Manager - SME - Administrator Guide actions Displays the progress of currently executed action or last completed action on the endpoint like running an Antivirus scan or virus database updates. The action column also displays shortcut icons for running an Antivirus scan and updating virus database on the endpoint. - Clicking this icon starts a full computer Antivirus scan on the endpoint if it is online.
Comodo Endpoint Security Manager - SME - Administrator Guide • To change the name and description, directly edit the respective text fields • To change the Local and Internet connection security policies applied to the member endpoints of the group, select the policies from the respective drop-downs • To forcibly change the management mode of CIS installations in the endpoints to Remote mode, enabling management by ESM, click the 'force remote mode' button • Click 'Save' icon for the changes to take
Comodo Endpoint Security Manager - SME - Administrator Guide • To add more computers to the group, simply select the check-boxes beside the desired computer names • To remove the existing member endpoints, simply uncheck the items • Click 'Save' icon for the changes to take effect Viewing Details of an Endpoint Computer, Applying Policies Individually and Managing Quarantined Items The 'Computer Properties' interface displays the system details like the name, hardware configuration, OS version, group
Comodo Endpoint Security Manager - SME - Administrator Guide The 'general' screen provides the computer related details like the IP Address, Computer name, Operating System and Hardware configuration of the endpoint. The interface also displays the version of the ESM agent currently installed at the endpoint and the connection status. Advanced Screen The 'Advanced' screen of the Computer Properties interface displays the ESM related details of the endpoint computer.
Comodo Endpoint Security Manager - SME - Administrator Guide The 'Group Details' the details of the Group to which the endpoint belongs: • Member of Group - Name of the group. Clicking the Name of the group will open the 'Group Properties' interface of the group. Refer to Viewing and Editing a Group for more details on this interface. • Group Local Policy - Displays the Local network connection security policy assigned for the group.
Comodo Endpoint Security Manager - SME - Administrator Guide Clicking the policy name will open the 'Policy Properties' interface of the policy. Refer to Viewing Details, Editing and Applying a Policy to Endpoints for more details on this interface. • Current Policy Status - Displays whether the endpoint is in complaint or non-compliant to the policy of the group it belongs. If it is non-complaint, you can click the 'Reapply Policy' button to apply the group's policy to the endpoint.
Comodo Endpoint Security Manager - SME - Administrator Guide The 'General' details provides the version of CIS installed, its mode of management and the components like Antivirus only, Firewall only and All Components installed. If the CIS is in local administration mode, you can switch it to remote management mode by the ESM, by clicking the 'force remote mode' button. The Virus Signature Database details provides the version of the virus signature database in the endpoint and its update status.
Comodo Endpoint Security Manager - SME - Administrator Guide the endpoint during its real-time and on-demand scans and moved to its quarantine.
Comodo Endpoint Security Manager - SME - Administrator Guide Removing Groups or Endpoints Administrators can remove groups or individual endpoints by simply selecting them and clicking the 'Remove' icon . A confirmation dialog will be displayed: The ESM agents in the member endpoints of the selected group or the selected endpoint(s) will be automatically removed.
Comodo Endpoint Security Manager - SME - Administrator Guide contains a list of packages that have previously been downloaded. Administrators can download selected packages from here to facilitate offline installation to remote endpoints. Finally, the interface also lists any endpoints running outdated software. Clicking the ‘update’ computers’ button will install the latest versions on these computers. To view the Updates manager interface, navigate to 'computers' area and click the 'Update' tile.
Comodo Endpoint Security Manager - SME - Administrator Guide packages loaded to the ESM server • checked-in packages - Enables the administrator to view the versions of the ESM agent and CIS package loaded to ESM server for deployment onto endpoints • outdated computers - Enables the administrator to check whether any of the endpoints are running with outdated version of CIS application and to update them to the latest version available in the checked-in packages The administrator can navigate between
Comodo Endpoint Security Manager - SME - Administrator Guide • Click 'Download offline package' beside the package you want to download to the local computer. The 'File Download' dialog will be displayed. • Click the 'Save' button to save the application in your computer. • Navigate to a location where you want to save the application and click the 'Save' button. Endpoint Security Manager - SME Administrator Guide | © 2013 Comodo Security Solutions Inc.
Comodo Endpoint Security Manager - SME - Administrator Guide The selected application will be download and saved in your computer. Outdated Computers In the 'Outdated Computers' screen displays the details of the computers that require update of the ESM agent, CIS application or both. Endpoint Security Manager - SME Administrator Guide | © 2013 Comodo Security Solutions Inc.
Comodo Endpoint Security Manager - SME - Administrator Guide If the version number of CIS or Agent is displayed in red color, it means that it is outdated. • Click 'update computer(s)' to begin the update process. ESM will start installing the agent/CIS on to the selected endpoints and the progress will be displayed. On completion of installation, the status of the installation will be displayed. Endpoint Security Manager - SME Administrator Guide | © 2013 Comodo Security Solutions Inc.
Comodo Endpoint Security Manager - SME - Administrator Guide • Click the refresh button . The status of all managed endpoints including the latest versions of CIS and Agent applications will be displayed. 2.4.The Policies Area A policy is the security configuration of Comodo Internet Security (CIS) deployed on an endpoint or a group of endpoints.
Comodo Endpoint Security Manager - SME - Administrator Guide • View All Policies - Allows administrators to view, add, reconfigure and export ESM polices • Create Policy - A step-by-step wizard that takes admins through the policy import, specification and deployment process Before proceeding with creating a policy, read the 'Key Concepts' section below to gain a baseline understanding first.
Comodo Endpoint Security Manager - SME - Administrator Guide Exception - if the policy is 'Locally Configured' then remote mode have no effect (see below). • • • Local Mode - An endpoint that is locally managed effectively takes the machine 'offline' so ESM will not automatically re-apply assigned policy if an endpoint falls out of compliance. This allows administrators to change a policy at the local machine without having ESM constantly re-apply the 'old' policy in the background.
Comodo Endpoint Security Manager - SME - Administrator Guide • Click the filter icon in any of the respective column header to search for a particular policy or component, enter or select and click 'Apply' • Click 'Reset' to display all the items View All Policies Interface - Table of Column Descriptions Column Heading Description Policy Displays the name of the Policy. Components Indicates the components of CIS for which the policy applies the configuration settings.
Comodo Endpoint Security Manager - SME - Administrator Guide • Select the policy by clicking or touching the desired policy from 'View All Policies' interface to highlight it. Click the Export icon • . The Windows 'Save As' dialog will appear. Select the destination in the computer from which you are accessing ESM, provide a file name and click 'Save'. The policy will be saved as an xml file. The file can be imported into ESM at any time.
Comodo Endpoint Security Manager - SME - Administrator Guide To change these details, the administrator can directly edit the respective text boxes in the upper pane and click the 'Save' icon at the bottom of the page. The lower pane displays the details of the security settings. You can change the security settings in this screen or in the 'antivirus settings', 'firewall settings' and 'defense+ settings' screens.
Comodo Endpoint Security Manager - SME - Administrator Guide Real Time Scanning The Real time Scanning (aka 'On-Access Scanning') is always ON and checks files in real time when they are created, opened or copied. (as soon as a user interacts with a file, Comodo Antivirus checks it). This instant detection of viruses assures the user, that the system is perpetually monitored for malware and enjoys the highest level of protection. The Real Time Scanner also scans the system memory on start.
Comodo Endpoint Security Manager - SME - Administrator Guide • Automatically update virus database - When this check box is selected, Comodo Internet Security checks for latest virus database updates from Comodo website and downloads the updates automatically, on system startup and subsequently at regular intervals. • Show notification messages - Alerts are the pop-up notifications that appear in the lower right hand of the screen whenever the on-access scanner discovers a virus on your system.
Comodo Endpoint Security Manager - SME - Administrator Guide • Scan archive files - When this check box is selected, the Antivirus scans archive files such as .ZIP and .RAR files. You are alerted to the presence of viruses in compressed files before you even open them. These include RAR, WinRAR, ZIP, WinZIP, ARJ, WinARJ and CAB archives.
Comodo Endpoint Security Manager - SME - Administrator Guide The Scheduled Scanning setting screen allows an administrator to customize the scheduler that lets you timetable scans according to your preferences. • Scan archive files - When this check box is selected, the Antivirus scans archive files such as .ZIP and .RAR files during any scheduled scan. You are alerted to the presence of viruses in compressed files before you even open them.
Comodo Endpoint Security Manager - SME - Administrator Guide You can add files and folders in Exclusions list by selecting the folder from the drop-down and entering the path in the text field or enter the entire path in the field after selecting 'None' in the drop-down. • Click the 'add' button. If you want to remove an item from the list, select it and click the 'remove' button. Click the 'save' icon for any changes to the settings to take effect.
Comodo Endpoint Security Manager - SME - Administrator Guide • Alert Settings General Settings In the General Settings tab, an administrator can customize firewall security by using the Firewall Security Level slider to change preset security levels. The choices available are: • Block All • Custom Policy • Safe Mode • Training Mode • Disabled • Block All Mode: The firewall blocks all traffic in and out of a computer regardless of any user-defined configuration and rules.
Comodo Endpoint Security Manager - SME - Administrator Guide the network. The administrator can choose to grant that application Internet access by selecting 'Treat this application as a Trusted Application' at the alert. This deploys the predefined firewall policy 'Trusted Application' onto the application. 'Safe Mode' is the recommended setting for most users - combining the highest levels of security with an easy-tomanage number of connection alerts.
Comodo Endpoint Security Manager - SME - Administrator Guide • • Very High: The firewall shows separate alerts for outgoing and incoming connection requests for both TCP and UDP protocols on specific ports and for specific IP addresses, for an application. This setting provides the highest degree of visibility to inbound and outbound connection attempts but leads to a proliferation of firewall alerts.
Comodo Endpoint Security Manager - SME - Administrator Guide loopback requests - In conjunction with the slider, these checkboxes allow you to fine-tune the number of alerts you see according to protocol. Click the 'save' icon for any changes to the settings to take effect. For more details on the Firewall Settings, see http://help.comodo.com/ for Comodo Internet Security.
Comodo Endpoint Security Manager - SME - Administrator Guide • Paranoid Mode: This is the highest security level setting and means that Defense+ monitors and controls all executable files apart from those that you have deemed safe. Comodo Internet Security does not attempt to learn the behavior of any applications - even those applications on the Comodo safe list and only uses your configuration settings to filter critical system activity.
Comodo Endpoint Security Manager - SME - Administrator Guide Image Execution Control is an integral part of the Defense+ engine. If the Defense+ Security Level is set to 'Training Mode' or 'Clean PC Mode', then it is responsible for authenticating every executable image that is loaded into the memory. Comodo Internet Security calculates the hash of an executable at the point it attempts to load into memory.
Comodo Endpoint Security Manager - SME - Administrator Guide • Partially Limited - The application is allowed to access all the Operating system files and resources like clipboard. Modification of protected files/registry keys is not allowed. Privileged operations like loading drivers or debugging other applications are also not allowed. • Limited - Only selected operating system resources can be accessed by the application.
Comodo Endpoint Security Manager - SME - Administrator Guide Sandbox Security Level Slider The Security Level slider in the settings screen allow administrators to switch the Sandbox between Enabled and Disabled states. The programs included in the Sandbox is executed with the set restrictions only if the Sandbox is in Enabled state. If disabled, the programs is run normally without any restrictions.
Comodo Endpoint Security Manager - SME - Administrator Guide To add new file(s) to Trusted Files list • Click the 'add' button In the 'Open' dialog, select the file that you want add to the list and click 'Open'. The selected file will be added to the list. Endpoint Security Manager - SME Administrator Guide | © 2013 Comodo Security Solutions Inc.
Comodo Endpoint Security Manager - SME - Administrator Guide If you want remove a file from the list, select it and click the 'remove' button. • Click 'yes' to confirm removal of the selected file from the list. Click the 'save' icon for any changes to the settings to take effect. Trusted Vendors In Comodo Internet Security, there are two basic methods in which an application can be treated as safe.
Comodo Endpoint Security Manager - SME - Administrator Guide actual code signing certificate. To add trusted vendors • Enter the name of the vendor as given in the code signing certificate in the text field. • Click the 'add' button. The vendor will be added to the list. If you want to remove a vendor from the list, select it and click the 'remove' button. Click the 'save' icon for any changes to the settings to take effect. For more details on the Defense+ Settings, see http://help.comodo.
Comodo Endpoint Security Manager - SME - Administrator Guide • Automatically check for the program updates - This option determines whether or not Comodo Internet Security should automatically contact Comodo servers for updates. With this option selected, Comodo Internet Security automatically checks for updates every 24 hours AND every time you start your computer. If updates are found, they are automatically downloaded and installed.
Comodo Endpoint Security Manager - SME - Administrator Guide • Select 'Use http proxy' if you want Comodo Internet Security to use the Proxy Server. Enter the proxy server IP address or name in the 'Server' text box and enter the port number in the 'Port' text box. • If your Proxy Server needs authentication, Select 'Proxy server requires authorization'. Type your Login ID in the 'Login' text box and enter the password in the 'Password' text box.
Comodo Endpoint Security Manager - SME - Administrator Guide • If you want to download the updates always from the Comodo servers, you can leave the setting as it is.
Comodo Endpoint Security Manager - SME - Administrator Guide • Click 'yes' to remove the selected item(s) Note: Policies which are currently applied and used by groups or endpoints cannot be deleted. Before removing an unwanted policy, the administrator has to apply a different policy to the groups/endpoints to which this policy is currently applied. Tip: Hold Shift or CTRL to select multiple items. 2.4.2.
Comodo Endpoint Security Manager - SME - Administrator Guide click and drag to swipe the screens left or right) or click a step with a click-able active link below the title bar. Step 1 - Select Source Type The new policies can be created from three types of sources: • Computers - Imports the security settings configured locally from a selected source computer to create a new policy. • Another Policy - Enables to choose an existing policy and use it as the starting point to create a new policy.
Comodo Endpoint Security Manager - SME - Administrator Guide • Click the filter icon in the 'cis mode' column header to search for endpoints with CIS in Local, Remote or Unknown mode and click 'Apply'. • Click 'Reset' to display all the items. • Options: • • Force source computer to be remotely managed after policy import is complete - To configure the settings locally, the source computer would have been switched to local administration mode.
Comodo Endpoint Security Manager - SME - Administrator Guide • Type the path of the location where the policy xml file is saved or click 'Browse' and navigate to the required policy XML file • Click the right arrow to move to Step 3 - Settings Step 3 - Settings The next step is to select the components of CIS for which the security settings are to be imported into the policy. Endpoint Security Manager - SME Administrator Guide | © 2013 Comodo Security Solutions Inc.
Comodo Endpoint Security Manager - SME - Administrator Guide • All Available Settings - Imports all the settings from the source selected in the chosen step 2, above • Custom components settings - Enables the administrator to select the components of CIS so that only those settings corresponding to the selected components are imported into the policy from the source selected in step 2 • • Antivirus Settings - Imports the settings relevant to the Antivirus component • Firewall Settings - Imports the
Comodo Endpoint Security Manager - SME - Administrator Guide • • Allow Local Administration - Configures the agent to allow the CIS installation at the target machine to be switched to local administration mode should the user desire to change the security settings. The administrator may choose to not allow the user to alter the security settings in his/her computer, so as to not lead to a security hole in the network.
Comodo Endpoint Security Manager - SME - Administrator Guide If none of these addresses succeeded or if Internet Server Address value wasn't specified, the Agent will try the remaining hosts in the Server Network Addresses list, applying the corresponding policy based upon analysis per RFC 3330 of a connection succeeding via a special use address as indicating Local policy, and a public address indicating Internet policy. • Click the right arrow to move to the step 5 - Selecting Targets.
Comodo Endpoint Security Manager - SME - Administrator Guide • Name - Enter a name according to criteria deemed suitable to the security settings. • Description - Enter short text that best describes the policy. • Options: • Apply Policy after Finish - The newly created policy will be only be applied to the target endpoints immediately if this checkbox is selected. If not selected, the endpoints will pick up the new policy when they check in at the next policy poll.
Comodo Endpoint Security Manager - SME - Administrator Guide The 'reports' area contains three screens: • reports gallery - Enables the administrator to generate, view and download different types of real-time reports • reports explorer - Enables the administrator to view and download previously generated reports • settings - Enables the administrator to configure archival of reports The administrator can navigate between these screens by clicking respective links at the left hand side navigation.
Comodo Endpoint Security Manager - SME - Administrator Guide Available report types are: • details - General information about target endpoint(s) such as operating environment and hardware details. • configuration - Information on components of CIS installed at the endpoints and their configuration status. • infections - Information on malware discovered during the antivirus (AV) scans and not handled successfully (deleted, disinfected or quarantined) locally by CIS and the endpoints affected by them.
Comodo Endpoint Security Manager - SME - Administrator Guide Sorting the Endpoints Clicking on the arrow in the middle of the 'Name' column header sorts the endpoints in ascending/descending order of their names. Filtering the Entries You can filter the list of endpoints by clicking the icon next to the column label. For example, clicking the filter icon in the 'name' column will allow you to search for a particular endpoint.
Comodo Endpoint Security Manager - SME - Administrator Guide download link in the report explorer page. You can choose the printable file to be generated in portable document (.pdf) or spreadsheet (.xls) format. Viewing the Report On completion of generation of any report, the interface will automatically open the 'Reports Explorer' from where you can view the report.
Comodo Endpoint Security Manager - SME - Administrator Guide • Select the group from the left hand side pane and select the member endpoint(s) for which you wish to generate the computer details report from the right hand side pane. • Swipe the screen to the left or click the right arrow to move to step 2.
Comodo Endpoint Security Manager - SME - Administrator Guide completion, the report generated can be downloaded to the administrator's computer. • Swipe the screen to the left or click Finish icon to start generating the report. View the Report The 'reports explorer' screen will be opened with the running reports tab selected. All the reports being generated currently will be listed with their status. On completion of required report generation, select the report and click the details icon displayed.
Comodo Endpoint Security Manager - SME - Administrator Guide • The successive pages will contain network addresses, hardware details, software details and so on of the endpoint computers, with each page dedicated for an endpoint. To move to the successive pages, swipe the window to left or right or click the left and right arrows at the sides of the interface. Endpoint Security Manager - SME Administrator Guide | © 2013 Comodo Security Solutions Inc.
Comodo Endpoint Security Manager - SME - Administrator Guide Endpoint Security Manager - SME Administrator Guide | © 2013 Comodo Security Solutions Inc.
Comodo Endpoint Security Manager - SME - Administrator Guide Available Report Filters The report screen allows the administrator to optimize the search by using the filter option. The available filters for the Computer Details report are: • Installed software • Version of the software • Publisher of the software To filter the results: • Click the filter icon in any of the respective column header to search for a particular item The filter drop-down will appear.
Comodo Endpoint Security Manager - SME - Administrator Guide The 'Create CIS Configuration report' wizard will start. Step 1 - Selecting Targets The 'Select Targets' screen will be displayed. • Select the group from the left hand side pane and select the member endpoint(s) for which you wish to generate the CIS configuration report from the right hand side pane. • Swipe the screen to the left or click the right arrow to move to step 2.
Comodo Endpoint Security Manager - SME - Administrator Guide • Click the Finish icon or swipe the screen to left to start generating the report. View the Report • The 'reports explorer' screen will be opened with the running reports tab selected. All the reports being generated currently will be listed with their status. • On completion of required report generation, select the report and click the details icon be displayed.
Comodo Endpoint Security Manager - SME - Administrator Guide • If you have opted for generating a downloadable report file in Step 2 - Options, the report can be downloaded by clicking the Download icon at the bottom of the report page. Available Report Filters The report screen allows the administrator to optimize the search by using the filter option.
Comodo Endpoint Security Manager - SME - Administrator Guide • Click the filter icon appear. in any of the respective column header to search for a particular item. The filter drop-down will • Type or enter the filter criteria fully or partly and click 'Apply'. Only the entries that match the criteria will be displayed in the report. • Click 'Reset' to display all the items. 2.5.1.3.
Comodo Endpoint Security Manager - SME - Administrator Guide • Select the group from the left hand side pane and select the member endpoint(s) for which you wish to generate the computer infections report from the right hand side pane. • Swipe the screen to the left or click the right arrow to move to step 2. Step 2 – Options • Generate downloadable report file - Select this option if you need to print or archive the report. You can choose the printable file to be generated in portable document (.
Comodo Endpoint Security Manager - SME - Administrator Guide • The report will contain a pie chart that provides an at-a-glance comparison of computers that are affected/not affected by malware from the selected target endpoints. • Following this is a list of affected computers along with their IP addresses, online/offline statuses and the name and location of malware detected on that computer.
Comodo Endpoint Security Manager - SME - Administrator Guide quarantined items or restore them to their original locations after analyzing the report from the Computer details > Internet Security screen. Refer Viewing Endpoints > Computer Properties > Internet Security for more details.
Comodo Endpoint Security Manager - SME - Administrator Guide • Select the group from the left hand side pane and select the member endpoint(s) for which you wish to generate the Quarantined Items report from the right hand side pane. • Swipe the screen to the left or click the right arrow to move to step 2. Step 2 – Options • Select your options for the report: • Generate downloadable report file - Select this option if you need to print or archive the report.
Comodo Endpoint Security Manager - SME - Administrator Guide Step 3 - Generate Report • Click the Finish icon or swipe the screen to left to start generating the report. View the Report • The 'reports explorer' screen will be opened with the running reports tab selected. All the reports being generated currently will be listed with their status. • On completion of required report generation, select the report and click the details icon be displayed.
Comodo Endpoint Security Manager - SME - Administrator Guide Downloading the Report If the administrator had opted for generating a downloadable report file in step 2 - Options, the report can be downloaded by clicking the download icon at the bottom of the report page. Available Report Filters The report screen allows the administrator to optimize the search by using the filter option.
Comodo Endpoint Security Manager - SME - Administrator Guide The 'Create Antivirus Updates Report' wizard will start. Step 1 - Selecting Targets The 'Select Targets' screen will appear: • Select the group from the left hand side pane and select the member endpoint(s) for which you wish to generate the virus signature database updates report from the right hand side pane. • Swipe the screen to the left or click the right arrow to move to step 2.
Comodo Endpoint Security Manager - SME - Administrator Guide the most up-to-date AV signature database in the report and give details only on those having outdated databases. • Generate downloadable report file - Select this option if you need to print or archive the report. You can choose the printable file to be generated in portable document (.pdf) or spreadsheet (.xls) format. On completion, the report generated can downloaded to the administrator's computer.
Comodo Endpoint Security Manager - SME - Administrator Guide • The report will contain a summary pie chart and an at-a-glance comparison report on numbers of computers that have outdated/up-to-date AV databases as compared to the latest database version indicated. • Following the summary, details of each computer, with their IP Addresses and the installed AV database versions are displayed.
Comodo Endpoint Security Manager - SME - Administrator Guide • Click the filter icon in any of the respective column header to search for a particular item • Type or enter the filter criteria fully or partly or select and click 'Apply' Only the entries that match the criteria will be displayed in the report. • Click 'Reset' to display all the items 2.5.1.6.
Comodo Endpoint Security Manager - SME - Administrator Guide • Choose the component from Antivirus, Firewall and Defense+ and swipe the screen or click the right arrow to move to step 2 - Selecting targets Step 2 - Selecting Targets The 'Select Targets' screen will appear: • Select the group from the left hand side pane and select the member endpoint(s) for which you wish to generate the CIS Log report from the right hand side pane.
Comodo Endpoint Security Manager - SME - Administrator Guide Step 3 - Selecting the Report Period The next step is to choose the time period, that the report should include the log saved during it. • Specify the period start and end dates in the respective text fields in MM/DD/YYYY format. Alternatively, clicking the calendar icon at the right end of the text box displays a calendar to select the dates. Endpoint Security Manager - SME Administrator Guide | © 2013 Comodo Security Solutions Inc.
Comodo Endpoint Security Manager - SME - Administrator Guide Step 4 - Options • Generate downloadable report file - Select this option if you need to print or archive the report. You can choose the printable file to be generated in portable document (.pdf) or spreadsheet (.xls) format. On completion, the report generated can be downloaded to the administrator's computer. Step 5 - Generate Report • Click the Finish icon or swipe the screen to left to start generating the report.
Comodo Endpoint Security Manager - SME - Administrator Guide • On completion of required report generation, select the report and click the details icon be displayed. . The report page will The report will contain a bar-graph summary of actions taken and the list of log entries for the component selected in step 1, recorded at the target endpoints selected at step 2 for the time period selected in step 3. If more than one computer is selected in step 2, the log reports are given for them one by one.
Comodo Endpoint Security Manager - SME - Administrator Guide Column Descriptions • Computer – Indicates the endpoint at which the threat was detected • Location - Indicates the location where the application detected with a threat is stored. • Malware - Name of the malware event that has been detected. • Action - Indicates action taken against the malware through Antivirus. • Status - Gives the status of the action taken. It can be either 'Success' or 'Fail'.
Comodo Endpoint Security Manager - SME - Administrator Guide • Application - Indicates which application or process propagated the event. • Action - Indicates how the firewall has reacted to the connection attempt. • Protocol - Represents the Protocol application attempted to use to create the connection. This is usually TCP/IP or UDP - which are the most heavily used networking protocols. • Source IP - States the IP address of the host that made the connection attempt.
Comodo Endpoint Security Manager - SME - Administrator Guide Column Descriptions • Computer – Indicates the endpoint at which the event has propagated • Application - Indicates which application or process propagated the event • Target - Represents the location of the target file • Date - Contains precise details of the date and time of the access attempt Available Filters for Defense+ Log Report The report screen allows the administrator to optimize the search by using the filter option.
Comodo Endpoint Security Manager - SME - Administrator Guide To filter the results: • Click the filter icon in any of the respective column header to search for a particular item • Type or enter the filter criteria fully or partly or select and click 'Apply' Only the entries that match the criteria will be displayed in the report.
Comodo Endpoint Security Manager - SME - Administrator Guide The Create 'Policy Compliance Report' wizard will be started. Step 1 - Selecting Targets The 'Select Targets' screen will appear: Endpoint Security Manager - SME Administrator Guide | © 2013 Comodo Security Solutions Inc.
Comodo Endpoint Security Manager - SME - Administrator Guide • Select the group from the left hand side pane and select the member endpoint(s) for which you wish to generate the 'Policy Compliance' report from the right hand side pane. • Swipe the screen to the left or click the right arrow to move to step 2. Step 2 - Options The next step allows the administrator to choose the options for the report: Endpoint Security Manager - SME Administrator Guide | © 2013 Comodo Security Solutions Inc.
Comodo Endpoint Security Manager - SME - Administrator Guide • • Include only non-compliant computers - The report will contains details of only the computers that are non-compliant • Generate downloadable report file - Select this option if you need to print or archive the report. You can choose the printable file to be generated in portable document (.pdf) or spreadsheet (.xls) format. On completion, the report generated can downloaded to the administrator's computer.
Comodo Endpoint Security Manager - SME - Administrator Guide The report screen allows the administrator to optimize the search by using the filter option.
Comodo Endpoint Security Manager - SME - Administrator Guide The 'Create Policy Delta Report' wizard will start. Step 1 - Selecting Targets The 'Select Targets' screen will be displayed: Endpoint Security Manager - SME Administrator Guide | © 2013 Comodo Security Solutions Inc.
Comodo Endpoint Security Manager - SME - Administrator Guide • Select the group from the left hand side pane and select the member endpoint(s) indicated as 'non-compliant' for which you wish to generate the 'Policy Delta' report from the right hand side pane. • Swipe the screen to the left or click the right arrow to move to step 2. Step 2 - Options • Generate downloadable report file - Select this option if you need to print or archive the report.
Comodo Endpoint Security Manager - SME - Administrator Guide The status of each component indicates the difference in configuration of the component with respect to the actual setting as per the policy applied. • Absent in target policy - means component is present on the endpoint, but the settings for it are not contained in the policy applied by ESM. The administrator can apply a different policy imported from a different source that contains settings for all the components.
Comodo Endpoint Security Manager - SME - Administrator Guide • Missing - means either the component is absent on both the policy and the endpoint sides or on the endpoint side. • Changed - means the configuration of the component in the endpoint side is different from the policy applied. • Not Changed - means the configuration of the component is the same on both the policy and the endpoint sides.
Comodo Endpoint Security Manager - SME - Administrator Guide The 'Create Malware Statistics Report' wizard will start. Step 1 - Select Targets The 'Select Targets' screen will appear: Endpoint Security Manager - SME Administrator Guide | © 2013 Comodo Security Solutions Inc.
Comodo Endpoint Security Manager - SME - Administrator Guide • Select the group from the left hand side pane and select the member endpoint(s) for which you wish to generate the 'Malware Statistics' report from the right hand side pane. • Swipe the screen to the left or click the right arrow to move to step 2. Step 2 - Selecting Report Parameters The next step is to select the period for which you wish the report to be created.
Comodo Endpoint Security Manager - SME - Administrator Guide • The time period options available are: • Year - Generates statistics from any year (from 1st January YYYY). • Month - Generates statistics from the beginning of the current month (from 1st MM YYYY). • Week - Generates statistics for any of the weeks between Sunday and Saturday. The week can be selected from a calendar in the next step 'Select Period'. • Daily - Generates statistics for any one day.
Comodo Endpoint Security Manager - SME - Administrator Guide The next screen allows you to choose the specific time period as per the selection made in step 2. • Swipe the screen or click the right arrow to move to step 4 - Options Step 4 – Options • Generate downloadable report file - Select this option if you need to print or archive the report. You can choose the printable file to be generated in portable document (.pdf) or spreadsheet (.xls) format.
Comodo Endpoint Security Manager - SME - Administrator Guide • On completion of required report generation, select the report and click the details icon be displayed. . The report page will The report will contain a bar-graph representation malware statistics of the selected target computers for the selected time period.
Comodo Endpoint Security Manager - SME - Administrator Guide 'Deleted', 'Ignored' and 'Quarantined' are the decisions taken by CIS in reaction to each piece of detected malware. The first chart indicates that a total of malware alerts were generated in the time period. The 2nd chart breaks down 10 alerts by the decisions taken by CIS. Example 2 - Malware Statistics report with Details per Computer: • The screenshot on the next page shows an example of 'Malware Statistics' Detailed Report.
Comodo Endpoint Security Manager - SME - Administrator Guide Available Report Filters The report screen allows the administrator to optimize the search by using the filter option.
Comodo Endpoint Security Manager - SME - Administrator Guide The 'Create Top 10 Malware Report' wizard will start. Step 1 - Selecting Targets The 'Select Targets' screen will appear: • Select the group from the left hand side pane and select the member endpoint(s) for which you wish to generate the 'Top 10 Malware' report from the right hand side pane. • Swipe the screen to the left or click the right arrow to move to step 2.
Comodo Endpoint Security Manager - SME - Administrator Guide • Specify the period start and end dates in the respective text fields in MM/DD/YYYY format. Alternatively, clicking the calendar icon at the right end of the text box displays a calendar to select the dates. Step 3 – Options • Generate downloadable report file - Select this option if you need to print or archive the report. You can choose the printable file to be generated in portable document (.pdf) or spreadsheet (.xls) format.
Comodo Endpoint Security Manager - SME - Administrator Guide • Click the Finish icon or swipe the screen to left to start generating the report. Viewing the Report • The 'reports explorer' screen will be opened with the running reports tab selected. All the reports being generated currently will be listed with their status. • On completion of required report generation, select the report and click the details icon be displayed.
Comodo Endpoint Security Manager - SME - Administrator Guide The report will display a bar graph representation of comparison of the malware in terms of their number of occurrences and a list of top 10 malware with details on number of appearances and the target computer(s) at which the malware is detected. Available Report Filters The report screen allows the administrator to optimize the search by using the filter option.
Comodo Endpoint Security Manager - SME - Administrator Guide • Type or enter the filter criteria fully or partly or select and click 'Apply'. Only the entries that match the criteria will be displayed in the report. • Click 'Reset' to display all the items. Downloading the Report If the administrator had opted for generating a printable report file in step 2, the report can be downloaded by clicking the Download icon at the bottom of the report page. 2.5.2.
Comodo Endpoint Security Manager - SME - Administrator Guide • status - Filters the reports based on their completion status • date requested - Filters the reports based on their requisition date • date completed - Filters the reports based on their completion date To filter the results: • Click the filter icon in any of the respective column header. • Type the filter criteria fully or partly or select and click 'Apply'. Only the entries that match the criteria will be displayed in the report.
Comodo Endpoint Security Manager - SME - Administrator Guide • about • server information • license information You can navigate within these screens by clicking the respective links at the top left, swiping the screen and clicking the left and right arrows. About The 'About' screen displays the current ESM SME version. • If any newer version of the application is available, you can download it by clicking the 'Download version...' link.
Comodo Endpoint Security Manager - SME - Administrator Guide License Information The license information screen displays the details of the current license information. If you want to include more endpoints than is allowed for your current license and manage them, you can upgrade your license by clicking the 'upgrade license' link . Refer to License Status Tile section for more information on upgrading your license.
Comodo Endpoint Security Manager - SME - Administrator Guide 2.7.Logging out of ESM Console Administrators can logout of the ESM console by clicking the 'logout' link at the top right of the interface. Endpoint Security Manager - SME Administrator Guide | © 2013 Comodo Security Solutions Inc.
Comodo Endpoint Security Manager - SME - Administrator Guide Closing the browser window or tab containing the console or pressing the 'Refresh' button will also logout the administrators. 3.How To... Tutorials The 'How To...' section of the guide contains guidance on using ESM effectively. Click on the links below to go the respective tutorial page for guidance of the respective feature.
Comodo Endpoint Security Manager - SME - Administrator Guide are currently in place. • Endpoints can be moved into groups in the 'Computers' area. See 'Creating Endpoint Groups' for more details. • Policies can be specified and assigned to groups/individual computers in the 'Policies' area. See 'Creating a New Policy' and 'The Policies Area - Key Concepts' for more details.
Comodo Endpoint Security Manager - SME - Administrator Guide 5. Click 'Install' to begin installation of the agent. Once complete, you will be presented with a confirmation message in the 'Status' area. Click 'Close' to exit the wizard. The endpoint should now be successfully connected to ESM service.
Comodo Endpoint Security Manager - SME - Administrator Guide Once the machine is in 'Local Mode', the link will be 'Manage Remotely': Once the administrator has created the policy on the new machine, it can be imported in ESM from this machine then applied to target computers as required (including the one from which the settings are imported). Note - remember to keep the machine in 'Local Mode' until import and deployment is complete.
Comodo Endpoint Security Manager - SME - Administrator Guide Firewall Settings The firewall component of Comodo Internet Security offers the highest levels of security against inbound and outbound threats, can stealth endpoint ports against hackers and can prevent malicious software from transmitting confidential data over the Internet.
Comodo Endpoint Security Manager - SME - Administrator Guide Defense+ Settings The Defense+ component of Comodo Internet Security is a host intrusion prevention system that constantly monitors the activities of all executable files on endpoint PCs. With Defense+ activated, the only executables that are allowed to run are the ones you give permission to. The Defense+ area also allows admins to configure sandbox settings.
Comodo Endpoint Security Manager - SME - Administrator Guide • If more details are required for these settings, see http://help.comodo.com/ for Comodo Internet Security. For more details on installing CIS in an endpoint computer and connecting it to ESM from the CIS interface, refer the sections How to Install CIS and How to Connect CIS to ESM at the Local Endpoint. 3.3.
Comodo Endpoint Security Manager - SME - Administrator Guide • Add the Internet reachable server IP address (alternatively hostname or FQDN) to the 'Server network addresses' list (just begin typing in the first blank row) Endpoint Security Manager - SME Administrator Guide | © 2013 Comodo Security Solutions Inc.
Comodo Endpoint Security Manager - SME - Administrator Guide • Click OK. • You will be prompted to restart the service. • Click 'Yes' to restart the service. • If your network is equipped with a router or other similar device, it should be configured with ESM ports forwarding (list of ports to be forwarded are listed in the 'Server Ports' on the right. Default ports are 57193, 57194 (console) and 9901 (agent).
Comodo Endpoint Security Manager - SME - Administrator Guide OR • Install CIS on the local machine then click the 'Manage This Endpoint' link. This will start a connection wizard. On specifying the Internet reachable IP address or hostname of the ESM server the wizard starts installation of the agent and establishes the connection between the endpoint and the ESM server.
Comodo Endpoint Security Manager - SME - Administrator Guide 8. Select 'Install Comodo Internet Security' check box. 9. Select the version of CIS you wish to install on the selected endpoints from the drop-down. 10. Select whether you want to include all the components (Firewall and Antivirus), Antivirus only or Firewall only from the Components drop-down. 11. Suppress reboot after installation - CIS installation will restart of the endpoints for the installation to take effect.
Comodo Endpoint Security Manager - SME - Administrator Guide On completion of installation, the result screen will appear. Endpoint Security Manager - SME Administrator Guide | © 2013 Comodo Security Solutions Inc.
Comodo Endpoint Security Manager - SME - Administrator Guide 15. Click Finish icon to exit the wizard. The agent and CIS are installed in the selected endpoints successfully. See section 'Importing Computers by Automatic Installation of Agent' for more details on installation of agent and CIS automatically. To install CIS in endpoint computers manually 1. Download the latest version of CIS and copy the setup file in the endpoint computer that you want to install the CIS. 2.
Comodo Endpoint Security Manager - SME - Administrator Guide Appendix 1 The Service Configuration Tool The Service Configuration Tool enables the administrator to start and stop the ESM central service, change server and agent ports settings, change database connection settings and view a log of database events. The tool is installed as a separate application and can be accessed from the Windows Start Menu.
Comodo Endpoint Security Manager - SME - Administrator Guide The main interface of the tool will be opened.
Comodo Endpoint Security Manager - SME - Administrator Guide • To start the service, simply click the 'Start' button Main Settings The Main Settings page displays the ESM server IP addresses and/or hostnames in the 'Server Network Addresses' field and Database connection settings, Console Port, Secure Console Port and Agent Ports at the right. • To add an IP or Hostname, simply begin typing in the blank row beneath those already listed.
Comodo Endpoint Security Manager - SME - Administrator Guide • Edit the parameters directly in the 'Connection Properties' dialog • To test whether the connections settings are appropriate click 'Test Connection' • Click OK for your changes to take effect • You will need to enter the hostname/IP and console port in the address bar of your browser to connect to the ESM server. For example, https://192.168.111.
Comodo Endpoint Security Manager - SME - Administrator Guide • To view the details of the currently installed server certificate, click the 'View' button. • If multiple SSL certificates are used in the server, a certificate name error may occur when a HTTPS connection is established. To avoid this, bind the required certificate using the 'Bind Other Certificate' option. • To import certificates from other locations, click the 'Import' button.
Comodo Endpoint Security Manager - SME - Administrator Guide The email alerts will appear to come from ESM Server by default if the 'From' field contains a simple email address. Your personal mail configuration may be useful in completing the mail server section. To locate mail settings in: • Outlook 2003 - Start Outlook 2003 and click Tools > Email Accounts > select the email account for which you want to view the settings and click Change... > More Settings...
Comodo Endpoint Security Manager - SME - Administrator Guide • Click the 'Start' or Stop' button to enable or disable the proxy server. • The settings panel allows the administrator to configure the proxy server port, validity period of the cache content in hours and to define a path for the cache folder. • Click the 'Clean Cache Folder...' button to remove the content in the cache folder.
Comodo Endpoint Security Manager - SME - Administrator Guide • The type of alerts that are displayed can be filtered by clicking the 'Errors', 'Warnings' and 'Information' buttons • Alternatively, type a specific search term into the text field then click the 'Apply Filter' button • Each cell can be individually selected by clicking it • Multiple cells can be selected whilst holding down the 'Shift' or 'CTRL' keys and left-clicking on target cells • Cells can be copied to the clipboard by clicking
Comodo Endpoint Security Manager - SME - Administrator Guide Column Control Types/Format Definition / Description • Use the control to view a condensed version of the message (this is the default view). • Use the control to copy the contents of the message to the clipboard. Control Type Description Filter by event Click this button to add or remove events of type 'Error' from the displayed list.
Comodo Endpoint Security Manager - SME - Administrator Guide About Comodo The Comodo companies are leading global providers of Security, Identity and Trust Assurance services on the Internet. Comodo CA offers a comprehensive array of PKI Digital Certificates and Management Services, Identity and Content Authentication (Two-Factor - Multi-Factor) software, and Network Vulnerability Scanning and PCI compliance solutions.