
Operator's Manual


-- 10 --
OPERATION
4. Pull starter rope handle sharply 5 times (no
more than 3 times above 32° C/90° F). If en-
gine starts and runs prior to 5 pulls, allow en-
gine to run for 5 seconds; then, fully squeeze
the throttle trigger to disengage the starting
system (start lever returns to RUN position).
Steps 5 and 6 are not necessary.
5. Fully squeeze the throttle trigger to disen-
gage the starting system (start lever returns
to RUN position).
6. Pull starter rope handle sharply while
squeezing throttle trigger until engine starts
and runs.
There is a simplified start reminder (with
illustrations to describe each step) loc-
ated on the back of the blower.
STARTING A WARM ENGINE
1. Squeeze and hold the throttle trigger.
2. Pull starter rope handle sharply while
squeezing throttle trigger until engine starts
and runs.
NOTE: Normally, the warm starting proce-
dure can be used within 5--10 minutes after
the unit is turned off. If the unit sits for more
than 10 minutes without being used, it will be
necessary to start the unit by following the
steps under STARTING A COLD ENGINE or
following the starting instruction steps shown
on the unit.
STARTING A FLOODED ENGINE
Flooded engines can be started by moving the
start lever to the RUN position and fully
squeezing the throttle trigger. Pull the starter
handle repeatedly while squeezing throttle
trigger until engine starts and runs. This could
require pulling the starter handle many times,
depending on how badly the unit is flooded. If
the unit still doesn’t start, refer to the TROU-
BLESHOOTING TABLE.
MAINTENANCE
WARNING: Avoid touching muffler
unless engine and muffler are cold. A hot
muffler can cause serious burns.
WARNING: Disconnect the spark
plug before performing maintenance except
for carburetor adjustments.
CHECK FOR LOOSE
FASTENERS AND PARTS
S Muffler
S Spark Plug Boot
S Air Filter
S Housing Screws
CHECK FOR DAMAGED OR
WORN PARTS
Contact an authorized service dealer for re-
placement of damaged or worn parts.
S Fuel Tank. Discontinue use of unit if fuel
tank is damaged or leaks.
S Vacuum Bag -- Discontinue use of vacuum
bag if it is torn or damaged.
INSPECT AND CLEAN UNIT & LABELS
S After each use, inspect complete unit for
loose or damaged parts. Clean the unit and
decals using a damp cloth with a mild deter-
gent.
S Wipe off unit with a clean dry cloth.
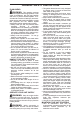
CLEAN AIR FILTER
Air Filter Cover
Air Filter
Button
A dirty air filter decreases engine perform-
ance and increases fuel consumption and
harmful emissions. Always clean after every
5 hours of operation or yearly, whichever
comes first.
1. Clean the cover and the area around it to
keep debris from falling into the carburetor
chamber when the cover is removed.
NOTE: Move choke lever to RUN position
before opening air filter cover.
2. Remove parts as illustrated.
NOTE: Do not clean filter in gasoline or
other flammable solvent. Doing so can
create a fire hazard or produce harmful
evaporative emissions.
3. Wash the filter in soap and water.
4. Allow filter to dry.
5. Apply a few drops of oil to the filter;
squeeze filter to distribute oil.
6. Replace parts.