GB INSTRUCTION MANUAL IMPORTANT INFORMATION: Please read these instructions carefully and make sure you understand them before using this unit. Retain these instructions for future reference. ES MANUAL DE INSTRUCCIONES INFORMACIÓN IMPORTANTE: Lea atentamente las instrucciones y asegúrese de entenderlas antes de utilizar esta aparato. Conserve las instrucciones para la referencia en el futuro.
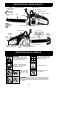
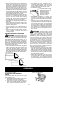
IDENTIFICATION (WHAT IS WHAT?) Chain Front Hand Guard Adjustment Tool (Bar Tool) Bar Sprocket Hole Front Handle Starter Rope Idle Speed Screw ON/STOP Switch Chain Muffler Primer Bulb Bumper Spike Bar Oil Fill Cap Starter Housing Fuel Mix Fill Cap Cylinder Cover Chain Direction of Travel Throttle Lockout Rear Handle Guide Bar Chain Catcher Throttle Trigger Choke Knob Chain Brake Chain Adjustment Knob IDENTIFICATION OF SYMBOLS WARNING! Read and understand the instruction manual before using th
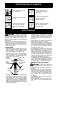
IDENTIFICATION OF SYMBOLS Starting Reminder Move ON/STOP switch to the ON position. Pull the starter rope sharply 5 times with your right hand. Slowly press primer bulb 6 times. Push the choke/fast idle lever in to the HALF CHOKE position. Pull choke/fast idle lever out to the full extent (to the FULL CHOKE position). Pull the starter rope sharply with your right hand until the engine starts. SAFETY RULES S Always use approved hearing protection.
S Make sure the chain will not make contact with any object while starting the engine. Never try to start the saw when the guide bar is in a cut. S Do not put pressure on the saw at the end of the cut. Applying pressure can cause you to lose control when the cut is completed and may cause serious personal injury. S Stop the engine before setting the saw down. S Do not operate a chain saw that is damaged, improperly adjusted, or not completely and securely assembled.
S Mix and pour fuel in an outdoor area on bare ground; store fuel in a cool, dry, well ventilated place; and use an approved, marked container for all fuel purposes. Wipe up all fuel spills before starting saw. S Move at least 10 feet (3 meters) from fueling site before starting engine. S Turn the engine off and let saw cool in a non-combustible area, not on dry leaves, straw, paper, etc. Slowly remove fuel cap and refuel unit.
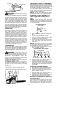
S Keep a good, firm grip on the saw with both hands when the engine is running and don’t let go. A firm grip will help you reduce kickback and maintain control of the saw. Keep the fingers of your left hand encircling and your left thumb under the front handlebar. Keep your right hand completely around the rear handle whether your are right handed or left handed. Keep your left arm straight with the elbow locked.
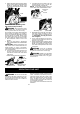
ATTACHING THE BAR & CHAIN (If 7. Carefully remove new chain from package. Prepare the chain by checking the proper direction. Without following the illustration, it is easy to place the chain on the saw in the wrong direction. Use the illustration of the chain to determine the proper direction. not already attached) 1. Move ON/STOP switch to the STOP position. 2. Make sure chain brake is disengaged (see CHAIN BRAKE in the OPERATION section).
5. Return adjustment knob handle to original position. Ensure teeth of adjustment knob handle are engaged with notches in the chain brake and adjustment knob handle is laying flat. 4. Lift adjustment knob handle and turn counterclockwise 1 turn to loosen bar. Chain will tighten automatically. NOTE: If chain brake detaches from saw, see TO REPLACE CHAIN BRAKE section.
Oil Cap IMPORTANT POINTS TO REMEMBER Fuel mix cap When pulling the starter rope, do not use the full extent of the rope as this can cause the rope to break. Do not let starter rope snap back. Hold the handle and let the rope rewind slowly. For cold weather starting, start the unit at full choke; allow the engine to warm up before squeezing the throttle trigger. NOTE: Do not cut material with the choke/ fast idle lever at the FULL CHOKE position.
completely (to the OFF CHOKE position) and then following the warm engine starting procedure listed above. Ensure the ON/ STOP switch is in the ON position. Starting could require pulling the starter rope handle many times depending on how badly the unit is flooded. If engine fails to start, refer to the TROUBLESHOOTING TABLE.
Natural conditions that can cause a tree to fall in a particular direction include: S The wind direction and speed. S The lean of the tree. The lean of a tree might not be apparent due to uneven or sloping terrain. Use a plumb or level to determine the direction of tree lean. S Weight and branches on one side. S Surrounding trees and obstacles. Look for decay and rot. If the trunk is rotted, it can snap and fall toward the operator. Make sure there is enough room for the tree to fall.
Using a support stand 2nd Cut Overcutting begins on the top side of the log with the saw against the log. When overcutting use light downward pressure. Overcutting Undercutting 1st Cut Undercutting involves cutting on the underside of the log with top of saw against the log. When undercutting use light upward pressure. Hold saw firmly and maintain control. The saw will tend to push back toward you. 1st Cut 2nd Cut WARNING: Never turn saw upside down to undercut.
S Make your fist cut 1/3 of the way through the bottom of the limb. S Next make a 2nd cut all the way through the limb. Then cut a third overcut leaving a 1 to 2 inch collar from the trunk of the tree. Second cut Third cut Collar First cut Pruning technique SERVICE AND ADJUSTMENTS WARNING: Improper maintenance could result in serious engine damage or in serious injury. WARNING: Disconnect the spark plug before performing maintenance, except for carburetor adjustments.
Replace guide bar when the groove is worn, the guide bar is bent or cracked, or when excess heating or burring of the rails occurs. If replacement is necessary, use only the guide bar specified for your saw in the repair parts list or on the decal located on the chain saw. SPARK PLUG The spark plug should be replaced each year to ensure the engine starts easier and runs better. Ignition timing is fixed and nonadjustable. 1. Loosen 3 screws on cylinder cover. 2. Remove the cylinder cover. 3.
TROUBLESHOOTING TABLE WARNING: Always stop unit and disconnect spark plug before performing all of the recommended remedies below except remedies that require operation of the unit. TROUBLE CAUSE Engine will not start or will run only a few seconds after starting. 1. Ignition switch off. 2. Engine flooded. REMEDY Engine will not idle properly. 1. Idle speed requires adjustment. 2. Carburetor requires adjustment. 1. See “Carburetor Adjustment” in the Service and Adjustments Section. 2.
TECHNICAL DATA SHEET Engine Cylinder volume, cm3 Stroke, mm Idle speed, rpm Recommended max.
STATEMENT OF WARRANTY Husqvarna Outdoor Products provides warranty to the initial purchaser for all products that are sold by an authorised Husqvarna Outdoor Products Dealer. The warranty provides the purchaser with a guarantee against faulty workmanship in manufacture and/or defective components.