
Operation Manual


6
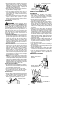
S Keepagood,firmgriponthesawwithboth
hands when the engine is running and
don’tletgo. Afirmgripwillhelpyo ureduce
kickback and maintain control of the saw.
Keep the fingers of your left hand encir-
cling and your left thumb under the front
handlebar.Keepyourrighthandcomplete-
lyaroundtherearhandlewhether yourare
right handedor lefthanded. Keep yourleft
arm straight with the elbow locked.
S Position yourlefthand onthe fronthandle-
bar so it is in a straight line with your right
hand on the rear handle when making
bucking cuts. Never reverseright and left
hand positions for any type of cutting.
S Standwithyourweightevenly balancedon
both feet.
S Stand slightly to the left side of the saw to
keep your body from being in a direct line
with the cutting chain.
S Do not overreach. You could be drawn or
thrown off balance and lose control of the
saw.
S Donotcutaboveshoulderheight. Itisdiffi-
cult to maintain control of saw above
shoulder height.
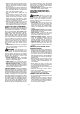
KICKBACK SAFETY FEATURES
WARNING:Thefollowingfeatures are
includedon yoursawtohelpreduce thehazard
of kickback; however , such features will not to-
tally eliminate this dangerous reaction. As a
chain saw user , do not rely only on safety de-
vices. Y ou must follow all safety precautions,
instructions, and maintenancein this manualto
help avoid kickback and other forces which
can result in serious injury .
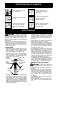
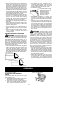
S Reduced--Kickback Guide Bar, designed
with a small radius tip which reduces the
size of the kickback danger zone on the
bar tip.A Reduced--KickbackGuideBar has
been demonstrated to significantly reduce
the number and se riousness of kickbacks.
Small Radius Tip
Reduced Kickback
Symmetrical Guide
Bar
Symmetrical Guide Bar
Large Radius Tip
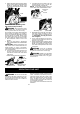
S Low--Kickback Chain, designed with a
contoured depth gauge and guard link
which deflect kickback force and allow
wood to gradually ride into the cutter.
L
ow-
K
ickback Chain
Contoured Depth Gauge
Elongated Guard Link
Deflects Kickback
Force And Allows
Wood To Gradually
Ride Into Cutter
S Handguard, designed to reduce the
chance of your left hand contacting the
chainif yourhandslipsoffthefronthandle-
bar.
S Position of front and rear handlebars, de-
signedwithdistancebetweenhandlesand
“in-line” with each other. The spread and
“in-line” position of the hands provided by
this de sign work together to give balance
and resistance in controlling the pivot of
the saw back toward the operator if kick-
back occurs.
WARNING: DO NOT RELY UPON
ANYOFTHEDEVICESBUILTINTOYOUR
SAW. YOU SHOULD USE THE SAW
PROPERLY AND CAREFULLY TO AVOID
KICKBACK. Reduced--kickback guide bars
and low--kickback saw chains reduce the
chance and magnitude of kickback and are
recomm ended. Your saw has a low kick-
back chain and bar as original equipment.
Repairs onachainbrake shouldbe madeby
an authorized servicing dealer. Take your
unit to the place of purchase if purchased
from a servicing dealer,or to the nearest au-
thorized master service dealer.
S Tipcontact insomecases may cause alight-
ning fast reverse REACTION, kicking the
guide bar up and back toward the operator .
S Pinchingthe saw chainalongthetop ofthe
guide bar may push the guide bar rapidly
back toward the operator.
S Eitherofthesereactions maycauseyouto
lose control of the saw which could result
in serious injury. Do not rely exclusively
uponthesafetydevices builtintoyoursaw.
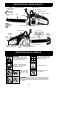
ASSEMBLY
Protective gloves (not provided) should be
worn during assembly .
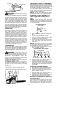
ATTACHING THE BUMPER
SPIKE
The bumper spike may be used as a pivot
when making a cut.
1. Lift adjustment knobhandle and turn coun-
terclockwise to loosen chain brake.
2. Align arrows by pressing tensioning le-
ver down to install position (see illustra-
tion). Remove chain brake from saw.
3. Attach the bumper spike with the two
screws as illustrated.