IBM BladeCenter Deployment Guide IBM® BladeCenter™ Deployment Guide Part 3 - Blades Chris Gillen, IBM Sam Litenatsky, IBM Kevin Conover, IBM Version 3.0, 3/10/2006 http://w3-03.ibm.com/support/techdocs/atsmastr.nsf/WebIndex/WP100564 1 The BladeCenter Deployment Guide is intended as a personal productivity tool. It is not intended to be comprehensive and is provided for guidance only, on an 'as is basis' without warranty of any kind. Please be aware that its contents have not been certified by IBM.
IBM BladeCenter Deployment Guide 2 © 2006 IBM Version 3.0, 3/10/2006 http://w3-03.ibm.com/support/techdocs/atsmastr.nsf/WebIndex/WP100564 The BladeCenter Deployment Guide is intended as a personal productivity tool. It is not intended to be comprehensive and is provided for guidance only, on an 'as is basis' without warranty of any kind. Please be aware that its contents have not been certified by IBM.
IBM BladeCenter Deployment Guide Table of Contents 1 Introduction........................................................................................................................................ 6 1.1 Overview ................................................................................................................................... 6 1.2 BladeCenter Subsystems.......................................................................................................... 6 1.3 Notes ..............
IBM BladeCenter Deployment Guide 7 8 Flash the QLogic HBA BIOS ........................................................................................................... 44 Red Hat Boot Diskette Modification Process .................................................................................. 45 8.1 Modify or Create the Post-install Driver Diskette Image ......................................................... 48 Appendix A. Appendix B. Firmware Versions ..........................................
IBM BladeCenter Deployment Guide Figure 30 linux nofb..................................................................................................................................... 26 Figure 31 Unmount the Diskette Image ...................................................................................................... 26 Figure 32 Boot Failure for RH 3.0 ...............................................................................................................
IBM BladeCenter Deployment Guide 1 Introduction 1.1 Overview The IBM BladeCenter Deployment Guide is intended to present the general steps necessary to BladeCenter™. Its primary focus is to detail the successfully deploy IBM blades in the IBM® steps required for setting up remote boot on IBM Blades. The information provided in this document is based on technical observations. Due to the breadth of content related to this topic, this guide has now been split into 3 parts. 1.
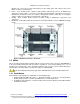
IBM BladeCenter Deployment Guide • • • Module slots 3 and 4 are used for Fibre Channel or other switch types and connect to the Server Blades as well as external devices. Power - Four modular power supplies provide primary and backup power to all BladeCenter subsystems.
IBM BladeCenter Deployment Guide Installation and Configuration 2 Preparatory Steps The BladeCenter Chassis components should be prepared by updating the firmware and assigning the appropriate IP addresses to the management and switch modules. The IP addresses of the various modules as well as the userids and passwords for each will be needed during the installation. A sample worksheet can be found in 1.Appendix A.
IBM BladeCenter Deployment Guide Note: For switch communication through the management module external Ethernet port, the switch module internal network interface and the management module internal and external interfaces must be on the same subnet. 2.2 BladeCenter Management Module To use the Management Module to perform tasks in the coming sections remotely, first do the following: Open a browser and input the IP address of the MM.
IBM BladeCenter Deployment Guide 2. Repeating Keystrokes - in order to remove the repeating keystroke problem, you need to check the "Disable key repeats" box and click Save. Figure 4 Disable key repeats 3. Start a Remote Control of the target blade by clicking on Remote Control under Blade Tasks. Ensure that the media tray and KVM selections are for the target blade) Figure 5 KVM and Media Ownership 10 © 2006 IBM Version 3.0, 3/10/2006 http://w3-03.ibm.com/support/techdocs/atsmastr.
IBM BladeCenter Deployment Guide 4. The Remote Control window is a pop up window. If you have a popup blocker installed, Remote Control will be blocked, so make sure popups are allowed for the management module IP. Note: Remote Control does work with Firefox, so if you are having trouble with the popup blocker in Windows XP SP2, Firefox may be a viable alternative. 5.
IBM BladeCenter Deployment Guide You have logged off the web interface. This window will attempt to close in 5 seconds. If a confirmation dialog is displayed, click "Yes" or "OK". To maintain security, you must also manually close any other web browser windows that might be open. Otherwise, any previously entered user IDs and passwords will remain available in the temporary browser cache. Figure 7 Logoff and Close the Browser Messages 9. Unexpected DLL version number error when starting Remote Control.
IBM BladeCenter Deployment Guide Figure 8 Storage Connection Diagram 2.4.2 Disabling ports on the QLogic switch Here are the steps necessary to disable ports on the QLogic switch. This can be done either via a telnet session or a browser session. 2.4.2.1 Using Telnet 1. Start a telnet session with the IP address of the QLogic Switch Module. 2. After logging in, enter the command ”show port” to view the current status of the ports.
IBM BladeCenter Deployment Guide 3. Enter admin mode by entering “admin start” 4. Disable the target port by entering the command “set port x state offline” where x is the number of the port. For this example, we used “4” 5. Confirm the status by entering “show port”again.
IBM BladeCenter Deployment Guide 3. Right click on the desired port and choose "port properties" from the menu. 4. At the top of port properties put a bullet next to "offline" or "down". 5. Repeat steps 1-4 and reverse step 5 to online the port. Figure 12 Port Properties http://knowledge.storage.ibm.com/servers/storage/support/hbasearch/interop/hbaSearch.
IBM BladeCenter Deployment Guide Blade Configuration and Installation 3 Configuring the Blades for Remote Boot The next few steps require BIOS configuration. To enter the BIOS, follow these steps: 1. Logon to the Management Module and select Power/Restart under Blade Tasks. 2. Select the blade to be restarted, then at the bottom of the page click Restart Blade and “Ok” when prompted. 3. Start a Remote Control of the target blade by clicking on Remote Control under Blade Tasks.
IBM BladeCenter Deployment Guide Figure 14 HS20 Boot Sequence 3. Adjusting the boot sequence for HS40 blades is slightly different. Use the arrow keys to scroll to each startup device, then hit enter and select the appropriate value in the popup window as shown in Figure 15 HS40 Boot Sequence. Figure 15 HS40 Boot Sequence 4. Press ESC to exit out of the BIOS and select the option to save changes. Note: For of HS40 blades, make sure that EFI is at the end of the boot order if present. 5.
IBM BladeCenter Deployment Guide Figure 16 Changing boot order from Management Module for HS20 3.2 Configuring the Qlogic HBA 3.2.1 Acquiring HBA WWPNs (World Wide Port Names) Each HBA has a unique WWPN by which it is identified in a SAN network. Accurate tracking of WWPNs ensures that each server has the proper storage presented to the appropriate location. The recording of the WWPN information is only required once for ESM to perform zoning for the SAN.
IBM BladeCenter Deployment Guide Figure 17 Configuring the QLogic HBA Figure 18 Host Adapter Settings 3.2.2 Configuring the path to the boot LUN The HBA that the server will be booting from will need to be defined in the bios. At this point the HBA’s WWID has been zoned on the backend storage as the owner of the boot LUN.
IBM BladeCenter Deployment Guide Figure 19 Enable Selectable Boot Illustration Figure 20 Bootable LUN address 20 © 2006 IBM Version 3.0, 3/10/2006 http://w3-03.ibm.com/support/techdocs/atsmastr.nsf/WebIndex/WP100564 The BladeCenter Deployment Guide is intended as a personal productivity tool. It is not intended to be comprehensive and is provided for guidance only, on an 'as is basis' without warranty of any kind. Please be aware that its contents have not been certified by IBM.
IBM BladeCenter Deployment Guide Figure 21 Save your changes Critical Note: At this point, only one boot path is configured. During the INITIAL Operating System build, only one boot path should be active. After the initial OS build a secondary path can be added if this is supported by the storage vendor. 3.2.3 Testing the path to the boot LUN The path to the LUN that the server will be booting from can be tested at this point.
IBM BladeCenter Deployment Guide Figure 23 Verify Disk Media Once the HBA configuration steps are completed, during the POST sequence you will notice the following text which indicates that the blade is now booting from the LUN 0 associated to the Fibre Channel Daughter Card. Figure 24 Blade POST with HBA configured 3.
IBM BladeCenter Deployment Guide If, however, the drivers are installed on the second Ethernet Controller in the list first, and then the first Ethernet Controller in the list, the connection names are reversed, and the connection named Local Area Connection is now the one going to switch 2, and the connection named Local Area Connection 2 is now going to switch 1.
IBM BladeCenter Deployment Guide 4 Installation Process for Red Hat Linux 4.1 Red Hat Advanced Server 2.1/3.0 Installation This section is intended to detail the OS installation steps and may reference steps that have been described and completed in previous sections. The steps below assume that the QLogic configuration steps in Section 3.2 have been completed. These steps have been confirmed for Red Hat AS 2.1 Update 4 and Red Hat AS 3.0 Update 3 and above.. Please see Section 4.
IBM BladeCenter Deployment Guide Figure 27 Loading the Remote Diskette c. Power on or restart the target blade. Figure 28 Power On/Restart Blade 5. From this point on, the Red Hat installation proceeds like a standard installation. Note: you must specify “linux nofb”, when installing via BladeCenter Remote Control, otherwise you will see the “No Video Available” screen instead of the Linux installation dialogs. You should also be able to set the correct mode setting with the "vga=0x301" option.
IBM BladeCenter Deployment Guide Figure 29 linux nofb 6. Important: When the installation is complete, unmount the diskette drive before the reboot. Figure 30 Unmount the Diskette Image 7. When loading Linux on an HS40, after unmounting the diskette, it is possible that EFI may replace the “IBM Remote Disk” in the boot order, and the blade may boot into EFI instead of Linux. If this occurs, follow the steps shown on page 17 to reorder the boot sequence. 8.
IBM BladeCenter Deployment Guide 13. Power on the server and enter the QLogic BIOS by pressing CTRL+Q. 14. From the Configurable Boot Settings, set the BOOT Device to the alternate controller's World Wide Name (that you gathered) and the BOOT LUN to 0. 15. From the Basic Settings panel, verify that the BIOS on this adapter is Enabled. 16. Verify that your storage partitioning and host group configuration looks similar.
IBM BladeCenter Deployment Guide Figure 31 Boot Failure for RH 3.0 Attempting a linux rescue does not appear to work; there are no partitions found on /dev/sda. The problem appears to be with the autopartitioning code and/or the partitioning statements in the ks.cfg. If you are stuck and can’t get the second path disabled on the switch, then the following approach should work. The actual partitioning of the drive must be done in the %pre section of the kickstart configuration file, shown in Figure 32.
IBM BladeCenter Deployment Guide [root@fafrin root]# fdisk -l Disk /dev/sda: 18.1 GB, 18158714880 bytes 255 heads, 63 sectors/track, 2207 cylinders Units = cylinders of 16065 * 512 = 8225280 bytes Device Boot Start End Blocks Id System 1 13 104422 83 Linux /dev/sda2 14 1543 12289725 83 Linux /dev/sda3 /dev/sda4 1544 1806 1805 2207 2104515 3229065 82 83 Linux swap Linux /dev/sda1 * Figure 33 fdisk Output Note: If you see this message shown in Figure 34, answer no.
IBM BladeCenter Deployment Guide [root@localhost root]# mount /dev/sda /mnt/floppy [root@localhost root]# ls -al /mnt/floppy total 285 -rwxr-xr-x 1 root root 279887 Jan 6 20:06 basplnx-6.2.1-1.src.i386.rpm [root@localhost root]# [root@localhost root]# cp /mnt/floppy/basplnx-6.2.1-1.src.i386.rpm /tmp [root@localhost root]# [root@localhost root]# cd /tmp [root@localhost tmp]# rpm -ivh basplnx-6.2.1-1.src.i386.
IBM BladeCenter Deployment Guide HS40 from the local media tray will work, but it is recommended that the lowres option be used for the installation of AS2.1. 3. When booting from the remote floppy, the lowres (for RHAS2.1) or the nofb (for RHAS3.0) install mode should function correctly. There have been intermittent instances of no keyboard response. 4.
IBM BladeCenter Deployment Guide One final note on this item: currently the media tray is required for installing Linux on the blades, but should only be needed in rare circumstances after that. Additionally, since there appear to be several combinations of events that will cause the EFI shell boot option to be restored in the boot sequence on a blade (see item 4), it is recommended that boot sequence be confirmed when an HS40 is rebooted until the firmware fix is released.
IBM BladeCenter Deployment Guide procedures in the following sections to configure Red Hat Linux and the X Window System for accurate mouse tracking. Type the commands through the remote console or at the keyboard that is attached to the BladeCenter unit. 1. Providing resolution information to the mouse handler The mouse handler (mousedev) must have the correct resolution information to track the remote mouse cursor correctly.
IBM BladeCenter Deployment Guide 6. Exit the utility. 7. Press Ctrl+Alt+Backspace. The next time you log in to the X Window System, the remote mouse will work correctly. 13. Boot-from-SAN fails with Gatekeeper LUN on EMC backed storage – When installing in a boot-fromSAN configuration on an EMC Symmetrix storage array, the following message appears: “The partition table on device sda was unreachable. To create new partitions it must be initialized.” Or after rebooting, you simply see a blinking cursor.
IBM BladeCenter Deployment Guide If you are installing SLES9 to a local drive on an HS20, watch out for this RETAIN tip: http://www1.ibm.com/support/docview.wss?uid=psg1MIGR-57841. 4.7 RDAC Installation and Configuration Notes on Linux There are two versions of the Linux RDAC. The version (09.00.A5.09)for Linux 2.4 kernels only like Redhat EL 3 and SuSe SLES 8 and RDAC package version 09.01.B5.XX for Linux 2.6 kernel environment. • Make sure you read the README.TXT files for V9.
IBM BladeCenter Deployment Guide There are several well written white papers available that describe the steps required to configure Serial Over LAN for the BladeCenter. The firmware sections of these documents can be skipped as long as you have followed the firmware recommendations in this document. For Linux, you must make the changes to both /etc/inittab and your boot loader configuration file (either lilo.conf or grub.conf) in order to get the full functionality under Linux. 4.8.
IBM BladeCenter Deployment Guide 4.8.3 alt-sysrq One of the reasons you may be configuring SOL is for utilizing the alt-sysrq “magic key sequence”. Enter the command: > sysctl -w kernel.sysrq = 1 This will update that value in /etc/sysctl.conf and also set the value in /proc/sys/kernel/sysrq to 1. 4.8.3.1 SOL using a Linux client 1. First, telnet to the MM and login. Then, enter the command console -T system:blade[x] where x is the target blade number. 2.
IBM BladeCenter Deployment Guide Figure 37 alt-sysrq from PuTTY Note, PuTTY has a nice feature that will log all of your session output to a file. Specify that before opening the telnet session. In certain rare circumstances, the serial data of the 8843 Blade Server may stop flowing. This results in a blank SOL session with only a blinking cursor. When this occurs, simply press the control and q keys (Ctrl+q) at the same time. This key sequence will allow the flow of serial data to resume.
IBM BladeCenter Deployment Guide Here is the link to the instructions from Red Hat that can be used to set up netdump: http://www.redhat.com/support/wpapers/redhat/netdump/setup.html The netdump server from the RHEL3U3 distribution is version 0.6.11-3. Basically, here is what needs to be done at the server: 1) rpm -i netdump-server-0.6.11-3.i386.rpm 2) passwd netdump 3) chkconfig netdump-server on 4) service netdump-server start And at the client 1) netdump client package probably already installed.
IBM BladeCenter Deployment Guide 5 Install Process for Windows 2000 and 2003 Remote Boot 5.1 Operating System Installation 1. Obtain the Fibre Daughter card device driver specified by your storage vendor to support the use of the Qlogic HBA with their storage. Take the installation package and extract files and place the directory structure onto a driver diskette. 2. Boot the blade and access the Windows installation media. 3.
IBM BladeCenter Deployment Guide 8. Type the location of the Ethernet device drivers that you extracted in step 6. Select OK. 9. When the message "System found a driver for device" is displayed, select Next to install the device driver. 10. When you are prompted to restart the blade server, select Yes if you do not have more device drivers to install, or select No if you have another device driver to install. 5.
IBM BladeCenter Deployment Guide 6 Remote Update of the Firmware on an HS20 or HS40 The steps below detail how to update the blade firmware remotely. This process is much quicker than updating the firmware locally using the media tray since the slow diskette reads are replaced by much quicker “virtual floppy” reads from the Management Module. The downside is we are exposed to some of the network related management module quirks we have experienced. 6.1 1.
IBM BladeCenter Deployment Guide Notes: 1. It is necessary to upgrade the BIOS on the HS40 to the 1.44 level and the ISMP to 1.24 if you are installing Linux on the blade. (See Table 5) There is a problem identified in the 1.32 version of the BIOS, related to EFI, which causes processors to be disabled. The only fix for this error is to upgrade the BIOS and ISMP firmware. 2. Occasionally the boot of the first BIOS diskette will fail with old time DOS messages such as “cannot find country.sys.
IBM BladeCenter Deployment Guide 7 Flash the QLogic HBA BIOS Perform the following steps to flash the QLogic HBA BIOS: 1. Create a blank, bootable disk formatted with MS-DOS, PC-DOS, or DR-DOS. 2. Using a text editor, verify that the config.sys and autoexec.bat files are blank and contain no entries. 3. Insert the disk created in step 1 in an appropriate drive.
IBM BladeCenter Deployment Guide 8 Red Hat Boot Diskette Modification Process 1. Copy the Network Boot Diskette (bootnet.img) and Supplemental Driver Diskette (drvnet.img) files from the installation media (CD or ISO) to a temporary staging area. # cp /mnt/cdrom/images/{bootnet.img,drvnet.img} . # ls bootnet.img drvnet.img 2. Create the temporary mount point and two module directories. # mkdir -p mnt/{boot,drv,initrd} # ls mnt boot drv initrd # mkdir modules-boot modules-drv # ls bootnet.img drvnet.
IBM BladeCenter Deployment Guide # ls 2.4.9-e.40BOOT # ls 2.4.9-e.40BOOT/{tg3.o,e1000.o} tg3.o e1000.o 9. Remove device drivers that will not be utilized from the driver modules extracted to the first module directory in step #7. Since the BladeCenter HS20 and BladeCenter HS40 servers do not support 3Com 3c59x, Intel 10/100, AMD PCnet32 or USB-OHCI devices, it is safe to remove the associated device drivers to free much needed space in the image. # cd modules-boot # cd 2.4.9-e.40BOOT/ # ls 2.4.9-e.
IBM BladeCenter Deployment Guide # mv pcitable.new pcitable 14. Remove driver entries from the module-info file that are associated with the device drivers removed in step #9. Remove all stanzas that begin with the name of a removed device driver (3c59x, eepro100, pcnet32, usb-ohci). For example: 3c59x eth "3Com 3c590/3c595/3c90x/3cx980" eepro100 eth "Intel EtherExpress Pro 100B" pcnet32 eth "AMD PCnet32" 15. Remove driver entries from the modules.
IBM BladeCenter Deployment Guide 22. Copy the initrd.img file to the bootnet.img image. # mv initrd.img mnt/boot 23. Unmount the bootnet.img. # umount mnt/boot At this point the bootnet.img file should be ready for use in remote deployments. 8.1 Modify or Create the Post-install Driver Diskette Image 1. Create the supplemental driver disk containing drivers that will be used in the post-install environment.
IBM BladeCenter Deployment Guide fi gunzip -c < /tmp/mnt-$$/modules.cgz | cpio -id for moduleDir in *; do for moduleFile in `find $moduleDir -name "*.o"`; do if [ -d /lib/modules/$moduleDir ]; then targetModuleFiles=`find /lib/modules/$moduleDir -name "$moduleFile"` if [ ."$targetModuleFiles" = .
IBM BladeCenter Deployment Guide Appendix A. Firmware Versions The following tables contain both the minimum versions required deploy on the BladeCenter and its various components, and the current versions at the time this document was published. Please visit the IBM support site for the most current firmware versions for all components. www-306.ibm.com/pc/support/site.wss/document.do?lndocid=MIGR-54597 There is also a URL for registering for proactive emails regarding firmware updates. https://www-1.ibm.
IBM BladeCenter Deployment Guide HS20 BIOS – Model 8843 Version Release Date Build Id Build Date Min Req Most Current 1.03 1.07 2005/04/01 2006/01/20 BWE115AUS BWE122AUS 2005/03/25 2005/12/08 Minimum Req Most Current 1.03 1.14 2004/12/08 2006/01/20 BWBT13A BWBT23A Minimum Req Most Current 1.02 1.
IBM BladeCenter Deployment Guide Release Date 2005/12/22 2005/12/22 Build Id BKBT414C BKBT414C Table 6 LS20 BIOS and BMC Information QLogic HBA Firmware See 7 Flash the QLogic HBA BIOS for instructions on how to update the HBA BIOS. Version Minimum Req Most Current 1.43 1.43 Table 7 QLogic Firmware Information Note: we are now recommending v1.43 for the QLogic BIOS. Old minimum was v1.38. 52 © 2006 IBM Version 3.0, 3/10/2006 http://w3-03.ibm.com/support/techdocs/atsmastr.
IBM BladeCenter Deployment Guide Appendix B.
IBM BladeCenter Deployment Guide Index alt-sysrq............................................................37 anaconda errors ...............................................32 Boot sequence .................................................16 Broadcom drivers Linux installation...........................................29 Windows installation.....................................40 Disk errors ........................................................31 Firmware Levels HS20 ...................................