
user manual


.
,i.. . i':.. . .: . i
NON.SCHEDULED
CE
This sectiori
provides
infonnition for replacement
ofvari'ous
parts
und
.nrnponents
as
necessary.
Before
replaeement
of any
parts
refer
to
the Trgr.rbleshooting Section for
assistance
in
determining
the
cause of the,
problem
and to
verify
that
replaoement
is
required. lf
necessary contact
your
local authorized
service
agency
for
assistance.
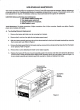
GAUTION:
Before
performing
any maintenanoe:
1. Turn
toaster ON/OFF
switch
OFF.
3:llill,l!1i"3lJil.;.#l!l"iT;"".
4. Allow
toaster
to
cool.
Toots
Neeessary:
Flat
blade
screwdriver, Phillps
screwdriver,
Set of
Allen
wrenches,
Needle nose
pliers,
Ftegular
pliers,
Set.ot sockets
with handle
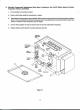
A. Top
Heating Elements Replacement
1.
Remove the
toaster right side cover
by removing
the
6 screws.
2.
Remove the
6 nuts from the
right
side top.heatersupport
panel.
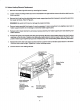
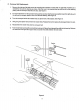
3. Slide
the heater assembly
part
way out and
then disconh€ctthe
2
wires from the
heaterterminals
by
removing
the
2 screws and nuts.
Refer
to Figure 6.
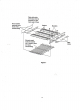
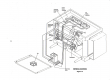
4. Removetheheaterassemblyfromthetoasterandthenremovethebusbar(s)andthemicastripfrorntheheater
to be replaced. Fleferto
Figure
7.
5.
Remove the
2 screws attaching the heater to the
heater
supporls,
6.
Replace the heater
with the new one and reasemble
parts
in
the
reverse order they
were
removed.
Be sure
to
connect wires to heaterterminals
before sliding
heater
assembly
allthe
way into toaster.
Refer
to Figure
7
io
be sure heater assernbly
and element
guard
are
mounted
on
studs and
inserted into
holes.
wires
with
Top
Heating
Element Assembly
in
this
position
Top
Heating
Element
Assembly
Disconnect and
Figure 6