
user manual


B. Bottom
Heating
Elements
Replacement
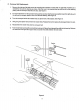
1. Rernove
the toaster
right side cover
by
removing the
6 screws
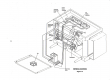
Z.
Loosen
4
motor mounting
screws
and
move motor/shaft
to the
right and then
remove
the drive
chain from the
motor
sprocket.
g.
Remove the
6
nuts from the
right
side bottom
heater support
panel
and the
2 screws
to
remove the
wires from
the
heater terminals.
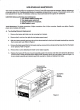
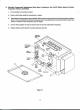
Refer to Figure
8.
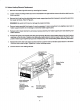
WARNING:
Be careful
not to
bend or damage
the heater
terminals.
4.
Remove
heater assembly
from
toaster. tt may be necessary
to use
a screwdriver
to
pry
slightly
aJ
each
end of
heater
support
bracket.
Do not
damage or bend the
heater
support
panel.
S. Replace
bottom
heater element by removing
2
screws
attaching
it to heater
support
panel
and
attaching
new
heater element.
6.
Reassemble
parts
in
thE
reverse
order they
were
removed.
Be sure to
insert heater
element into
the 2 bracket
openings on
the left side of
toaster
when sliding
the
heatirig
element into the
toaster.
Refer to
Figure
8. Also
position
heater support against spring at end of
shatt
bearing
when
reassembling
heater
assembly
into
toaster.
7 .
Reassemble
drive chain
onto motor
sprocket
and
then
push
the
motor to
the left to
place
tension on
the chain.
The
drive chain
must
be tight. Tighten the 4 motor mounting
screws.
8.
Connect
wires to new
heating element.
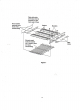
wjrgs
BoJtom
Heqting
Eieinent
A6Sdmbly
Bottom
Heating
Element
nssembly
When reassembling
heater
assembly:
The heater
elements
must be
positioned
between
the bracket
openings.
The heater support
must
be againsl the
bearing spring.
Figure 8
t4