
Install Instructions

6
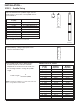
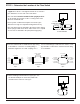
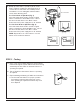
STEP 3 - Connecting the Flow Switch to Pipe
c. Insert the flow switch into the pipe tee. Turn
the flow switch two (2) or three (3) revolutions
clockwise until tight. Do not put excessive force
on cover when turning.
FLOW
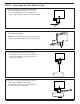
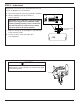
d. Place a 1 3/4” open end box wrench on flow
switch body to tighten to final position.
Final position is with arrow on body aligned in
the same direction as liquid flow.
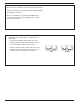
a. Insert the 8/32 x 1/4” flathead screw through
washer and paddle. Attach screw to opposite
side of the paddle arm’s curve and tighten to a
torque of approximately 12-16 lb•in (1.36-1.81 N•m).
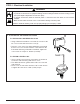
b. Apply pipe sealing compound or Teflon
®
tape to the
flow switch pipe threads.
NOTE: Do not apply sealant to first threads as this
switch is grounded (earthed) via the pipe mounting.