
Install Instructions


3
INSTALLATION
1. INSTALLING THE e-11M CONTROL UNIT
WARNING
To prevent electrical shock, turn off the
electrical power before making electrical
connections.
This LWCO must be installed in series with all
other limit and operating controls installed on
the boiler. After installation, check for proper
operation of all the limit and operating controls,
before leaving the site.
All work must be performed by qualied
personnel trained in the proper application,
installation, and/or systems in accordance with
all applicable codes and ordinances.
Failure to follow this warning could cause
electrical shock, an explosion and/or re, which
could result in property damage, personal injury
or death.
1.1. NEW INSTALLATION
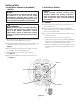
1. Usingaatbladescrewdriverremovetheonescrewthat
secures the LWCO terminal cover, see Figure 1.
2. Usingaatbladescrewdriverloosenthetwoscrews(D);
see Figure 2, but DO NOT REMOVE.
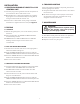
3. Usingaatbladescrewdriverloosenthetwoscrewson
the e-11M control and separate the cover of the control
from the bracket, see Figure 3.
4. Align the e-11M bracket with LWCO, see Figure 4, and
secure it by tightening the two screws.
1.2. INSTALLATION AS A REPLACEMENT
FOR 11M SWITCH
1. Turn off the power to the boiler. Allow boiler to cool to
room temperature.
2. See Figure 2,usingaatbladescrewdriver;remove
the terminal cover (B). Tag and remove wiring from
terminals. Remove screws (D) and housing (C). Remove
four switch mounting screws (E) and 11M switch (F).
Install the Number 11 switch (included with the kit), ‘TOP’
notch up and being certain to align ‘U-shaped’ notch
oftheswitchrockerontheoatmechanismroller(J).
Secure the switch on bracket (H) with screws (E).
3.Usingaatbladescrewdriver,reassemblehousing
(C) with screws (D), see Figure 2, but do not tighten,
(leaving approx. 1/8” gap).
4. Usingaatbladescrewdriverloosenthetwoscrewson
the e-11M control and seperate the cover of the control
from the bracket, see Figure 3.
5. Align the e-11M bracket with LWCO, see Figure 4, and
secure it by tightening the two screws.
Figure 2
Figure 3
Figure 4
Figure 1
F
J
E
D
DC
E
H