
Owner's Manual
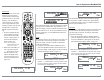

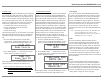

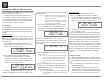
Table Of Contents
- Owners Manual
- Rear Panel Connections
- Tuner Module Installation and Connecting Antennas
- Connection Diagrams
- Remote Control Owners Manual
- Preferred Settings for Use with a PC
- Spec Sheet
- Warranty

32
5. Press the TRIM LEVEL +/-Push-button on the
Remote Control to achive the same relative vol-
ume as the CD Input. In our example the relative
volume level of the Server Input is louder than the
CD Input, so the trim level for the Server Input is
reduced to -2.5 dB. Refer to figure 64.
6. Repeat steps 1 thru 4 until the relative volume is
the same between the CD and SERVER Inputs.
7. Repeat the above steps for the remaining inputs
with component sources connected until they
all have the same relative volume levels. Record
any changes made to the various inputs from the
default settings in the “Input and Power Control
Settings” chart on page 23.
After approximately 5 seconds the Display returns to
indicate the Source Selection and Volume Level.
TONE CONTROL
With the Tone Bypass active, the Bass and Treble
Settings for the currently selected Input Source are
electronically bypassed and the LED above the TONE
BYPASS Push-button will illuminate. When the Tone
Bypass is switched Off, the previous settings for Bass
DQG7UHEOHZLOOEHUHVWRUHGGHIDXOWVHWWLQJ7RDFWL-
vate Tone Bypass perform the following:
1. Select the desired Input by using the direct access
Input Push-button on the Remote Control.
2. Press the TRIM Push-button on the Remote Con-
trol until “TONE CONTROL, _ _ _ _ _ _ : EN-
ABLE” appears on the Front Panel Display. Refer
to figure 65.
and press the VOLume Push-button +/- for the
desired listening level.
2. Repeatedly press the TRIM Push-button on the
Remote Control until “TRIM LEVEL: 0.0dB,
Min Max” appears on the Front Panel Display.
Refer to figure 63.
Note: The CD Input is serving as a reference level
or choose another source frequently listened
to. The Input Source should be set to a refer-
ence Level (Trim) of 0.0dB.
3. Press the SERVER Push-button on the Remote
Control and note if the relative volume is louder
or quieter than the volume level of the CD.
4. Repeatedly press the TRIM Push-button on the
Remote Control until “TRIM LEVEL: 0.0dB,
Min Max” appears on the Front Panel Display.
Refer to figure 63.
The Front Panel Display indicates the Treble changes
in steps from +12dB to -12dB. After approximately
5 seconds the Display returns to indicate the Source
Selection and Volume Level.
TRIM LEVEL
Source Components can have slightly different vol-
ume levels resulting in the need to readjust the MA/
MAC6700 Volume Control when switching between
different sources. The MA/MAC6700 allows the ad-
justment of levels for each of the Source Inputs for the
desired same relative volume. The CD and SERVER
Inputs are used in the following example.
Note: The range of adjustment is ± 6dB. The signal Level
present at the RECORD OUT Jacks is unaffected
by any changes in the Setup Level adjustment. The
level adjustments made are retained in permanent
memory. They can be changed during operation
of the MA/MAC6700 by performing a Trim Level
Procedure.
1. Press the CD Push-button on the Remote Control
Figure 50
How to Operate the MA/MAC6700, con’t
Figure 63
TRIM LEVEL: 0.0 dB
Min || Max
Figure 64
TRIM LEVEL: -2.5 dB
Min |||||| Max