
Owner's Manual
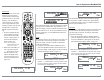
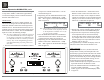


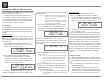
Table Of Contents
- Owners Manual
- Rear Panel Connections
- Tuner Module Installation and Connecting Antennas
- Connection Diagrams
- Remote Control Owners Manual
- Preferred Settings for Use with a PC
- Spec Sheet
- Warranty

40
ing the VOLUME/TUNE Control to select the desired
Preset Number.
Notes: 1. Presets are automatically assigned in or-
der from 1 to 20 unless a different Preset
Number is selected.
2. If the desired Preset Number is already
assigned, the current station will replace
the previously stored station.
3. To enter the station into memory, press and hold
in the VOLUME/TUNE Control until the Front
Panel Display indicates “PRESET STORED”, then
release the Control. Refer to figure TM10.
The just entered Station Preset will be assigned
3UHVHW1XPEHURUWKH3UHVHWQXPEHU\RXVHOHFWHG
and is displayed on the Front Panel Display. Refer to
figure TM11.
4. Assign additional station Presets by performing
steps 2 and 3.
Note: If all 20 Presets are assigned and an attempt
is made to enter another preset station, the
Tuner will return to Preset 1 and will over-
write it or you can select another preset
number.
7RYHULI\WKH6WDWLRQ3UHVHWVMXVWHQWHUHGLQWR
memory, press the PRESET NEXT
or BACK
Push-buttons to cycle through and confirm
your preset assignments.
Note: If the Tuner TRIM Mode is set to “PRESETS”,
the Front Panel VOLUME/TUNE Control may
also be used.
using the UpS or DownT Directional Push-buttons.
Refer to figure TM7 on page 39.
The Signal Strength Indication (to the right of
³67´GLVSOD\HGRQWKH)URQW3DQHO'LVSOD\FDQDVVLVW
in orienting the Antenna for maximum signal. Refer
WRILJXUH70PLQLPXPVLJQDOVWUHQJWKDQG70
PD[LPXPVLJQDOVWUHQJWKRQSDJH
Preset Tuning
The MA/MAC6700 allows for presetting 20 AM and
20 FM Radio Stations into memory for rapid recall
without having to manually tune through unwanted
stations.
Creating Presets
Tune to a station to be entered into memory either by
0DQXDO7XQLQJ67$7,2167XQLQJ0RGHRU$XWR-
PDWLF7XQLQJ6((.7XQLQJ0RGHDQGWKHQSHUIRUP
the follow steps:
1. Press the PRESET Push-button and the Front
Panel Display will indicate there are “No Presets
Stored”. Refer to figure TM8.
2. Press and hold in the the VOLUME/TUNE
Control and Front Panel Display will indicate
“91.5Mhz ST, PRESET 1: AVAILABLE”, which
is the first of 20 Preset Numbers available for as-
signment. Refer to figure TM9.
The Station to be entered into memory may also be
DVVLJQHGWRDGLIIHUHQW3UHVHW1XPEHUE\URWDW-
Operating the TM2 and TM3 Tuner, con’t
Clearing Presets
6. Select the Station Preset to be removed.
7. Press and hold in the Front Panel VOLUME/
TUNE Control until the Front Panel Display indi-
cates “P1 91.5Mhz ST, PRESET CLEARED” then
release the Control. Refer to figure TM12.
8. To clear any additional Station Presets perform
steps 5 through 6 again.
After Preset Stations have been entered into memory,
the VOLUME/TUNE Control may be used to select
Presets by first using the Tuner Control Trim Function
to Select the Front Panel PRESET Tuning Mode. To
select a Preset Station press and then rotate the Front
Panel VOLUME/TUNE Control for the desired sta-
tion. Using the Remote Control, Presets are selectable
with the NEXT
or BACK Push-buttons. Direct
access is also possible by first pressing the PRESET
Push-button followed by entering the number of Preset
using the 1-20 numeric push-buttons on the Remote
Control.
Automatic Tuning
7KH6((.7XQLQJ0RGH$XWRPDWLF7XQLQJVHDUFKHV
the AM or FM Broadcast Bands for available stations.
To use the SEEK Tuning Mode perform the following
steps:
1. Use the TRIM Tuner Control Mode to select the
SEEK Tuning Mode.
2. Press the SEEK Push-buttons to go GRZQRU
XSWKHGLDOWKH7XQHUZLOODXWRPDWLFDOO\VWRS
on the next station. The VOLUME/TUNE Control
may also be used by first pressing it in, then giv-
Figure TM8
91.5 MHz ST |||
NO PRESETS STORED
Figure TM9
91.5 MHz ST |||
PRESET 1: AVAILABLE
Figure TM11
P1 91.5 MHz ST |||
Figure TM10
91.5 MHz ST |||
PRESET STORED
Figure TM12
P1 91.5 MHz ST |||
PRESET CLEARED