IMPORTANT SAFETY INSTRUCTIONS THESE INSTRUCTIONS ARE TO PROTECT YOU AND THE MclNTOSH INSTRUMENT. BE SURE TO FAMILIARIZE YOURSELF WITH THEM. 1. Read all instructions - Read the safety and operating instructions before operating the instrument. 2. Retain Instructions - Retain the safety and operating instructions for future reference. 3. Heed warnings - Adhere to warnings and operating instructions. 4. Follow Instructions - Follow all operating and use instructions.
15. Nonuse Periods - Unplug the power cord from the AC power outlet when left unused for a long period of time. 16. Damage Requiring Service - Service must be performed by qualified service personnel when: A. The power supply cord or the plug has been damaged; or B. Objects have fallen, or liquid has been spilled into the instrument; or C. The instrument has been exposed to rain; or D. The instrument does not appear to operate normally or exhibits a marked change in performance; or E.
Contents INTRODUCTION INSTALLATION HOW TO CONNECT FRONT PANEL CONTROLS OPERATION HELPFUL HINTS PERFORMANCE DATA 3 4, 5 6 Your MCD 7007 Compact Disc Player will give you many years of satisfactory performance. If you have any questions, please contact, CUSTOMER SERVICE 7, 8 9, 10, 11, 12, 13 14, 15 16 Mclntosh Laboratory Inc. 2 Chambers Street Binghamton, New York 13903-9990 Phone: 607-723-3512 Take Advantage of 3 Years of Contract Service. . . Fill in the Application NOW.
The third generation Compact Disc player continues the world-wide Mclntosh reputation for technological advancement as the reason for a new model. Every aspect of performance is improved: focusing and tracking, decoding, error correction, digital filtering, digital to analog conversion (converters are specially selected for matched channel to channel linearity.
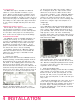
PLAYER LOCATION The MCD 7007 may be installed in a Mclntosh cabinet or custom installed in furniture of your choice. Always provide adequate ventilation. Never place it above heat generating components such as high powered amplifiers. Provide 1½ inches (3 cm) of space above the player to maintain with a cooling air flow. Always use the compact disc player horizontally, out of direct sunlight and away from other heat sources.
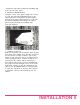
Repeat this procedure to attach the mounting strip to the (eft side of the panel. 6. Attach the PANLOC Brackets Using two screws of the proper length in the A holes on each side, attach the PANLOC brackets to the cabinet panel; the short flange is mounted against the front (face) of the cabinet panel. The screws pass through the PANLOC bracket flange, the cabinet panel, and then through the mounting strips previously mounted. 7.
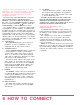
The back cover of this manual folds out to show photographs of the front and rear panels of the MCD 7007. Fold it out to assist you in identifying and locating the connections. The letters refer to the paragraphs that follow. The back panel of the MCD 7007 has connectors labeled FIXED OUTPUT, VARIABLE OUTPUT, REMOTE, a port marked DIGITAL OUTPUT and the AC power cord. The VARIABLE OUTPUT is adjusted by the front panel VOLUME buttons while the FIXED OUTPUT is unaffected by these controls.
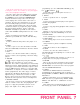
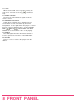
Fold out this manual's back cover to assist you in locating the controls. The numbers on the photographs refer to the paragraphs that follow, The glass upper half of the MCD 7007 front panel contains the CD drawer, the IR REMOTE SENSOR, the REMOTE response LED, the DAMAGED DISC indicator and the message center. The message center displays the current status of the mode of operation, disc time, the CD functions in use and the horizontally displayed volume level indicator.
22. CLEAR When touched will erase from the memory an entry error or break out of an continuous loop. 23. REMOTE SENSOR Receives the coded infrared signals from the remote control. 24. DAMAGED DISC/MUTE Lights when a playing disc is damaged or has errors which are not correctable by electronic interpolation. It also lights when the player is muted by more seriously damaged discs, or when PAUSE, STOP, REV, FF , BACK TRACK and NEXT TRACK are used and when a disc is not playing. 25.
POWER-1. Touch the POWER button to turn the player on. The TRACK, INDEX, TIME, eLAPsed time and VOLUME indicators will light up in the display area. Touch POWER again and the player is turned off and the indicators turn off. LOAD-2. Touch the LOAD button and the LED above this button will illuminate, then after 1 second the drawer will open. If the drawer is obstructed, it will not continue to open. Should this happen remove the obstruction, touch LOAD twice in succession to bring the drawer fully out.
MESSAGE CENTER DISPLAY-5. Disc symbol flashes during loading and starting Track or index symbols flash during programming. Minutes or Seconds symbols flash during programming. Play is in continuous loop between selected points A (start) and B (end). Flashes during programming. Indicates REMaining Total Time or eLAPsed Track Time. The display in the message center presents many different types of information.
is controlled by the preselected program or the continuous loop. SCAN If the SCAN button was used to activate the player the SCAN indicator will light and remain lighted until all tracks have been scanned. REVIEW When the REVIEW button is activated the indicator is lighted and the program is displayed in sequence on the appropriate TRACK, INDEX, and MIN/SEC indicators. REPEAT The REPEAT indicator will light to show that the disc or program will be replayed upon completion.
If you touch NEXT TRACK during play of the last track, the ERROR sign will light as a reminder that there is no next track. Play of the last track continues. LISTENING WITH HEADPHONES-14. With headphones connected to the PHONES jack, you can listen to discs without having to use an amplifier. Adjust the sound level with the LEVEL control. The headphones must have a 0.25 inch (6.3 mm) jack plug and an impedance between 8 and 1000 ohms. -17.
memory from TRACK to INDEX or to TIME. Touch SELECT once and the TRACK indicator will flash on and off which indicates the numeric key pad TRACK selection is connected to the memory input. Touch SELECT twice which causes the INDEX indicator to flash and which connects the numeric key pad INDEX selection to the memory input. Touch SELECT three times and the MINutes flash for programming by any given minute in a track. When SELECT is touched four times programming can be started on the second.
The greatest care has been taken in the manufacture of your Mclntosh Compact Disc player. In case of operational difficulties and to save you unnecessary service calls, here is a list of their possible causes and suggested solutions. Should you need further guidance, contact your dealer. He will be able to advise you. Under no circumstances should you open up the player. To do so can void the service contract. 1. After touching POWER, the track indicator does not light. • Touch the POWER button again.
7. Programming is not working properly. • The disc is dirty or badly scratched. Clean the disc or try programming with a scratch-fee disc. • The microprocessor has not processed the commands properly. Clear the program by touching STOP and store it again; re-start play. • All 20 memory places are already programmed and you have missed the ERROR sign that shows this. Check by touching the REVIEW button to ensure the program memory. 8.
TYPICAL AUDIO PERFORMANCE NUMBER OF CHANNELS 2, left and right FREQUENCY RESPONSE 20-20,000 Hz, +0, -0.3 dB DYNAMIC RANGE 96 dB (114 dB EIA) SIGNAL-TO-NOISE RATIO 107 dB (A) CHANNEL SEPARATION 102 dB (at 1000 Hz) TOTAL HARMONIC DISTORTION 0.0012% (at 1000 Hz) WOW AND FLUTTER Quartz crystal precision SAMPLING RATE 176.4 kHz D/A CONVERSION Quadruple oversampling (176.4 kHz) with digital filter and two 16 bit D/A converters ERROR CORRECTION SYSTEM Cross Interleave Reed Solomon Code (CIRC) AUDIO OUTPUT LEVEL 2.
THE LOCATION OF CONTROLS AND BUTTONS The numbers and letters correspond to the paragraphs on pages 6 thru 13