
Owner's Manual


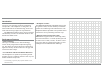


Table Of Contents

8
2. Using a Paper Clip, place the edge of the clip
into the ridge located between the Ear Cup and
the rolled edge of the Ear Pad. Refer to figure
12.
3. While mantaining
contact between
the Clip and Ear
Cup, carefully
twist the Clip
with out scratch-
ing the head-
phones. The Ear
Pad will pop off.
Refer to figures
13 and 14.
4. Orient the tabs
molded into the
rear side of the Replacement Ear Pad with the
matching openings in the Ear Cup. Then press
the Ear Pad into the the Ear Cup until snaps
are heard and the entire Pad is secure to the
Cup.
Operation
To prevent possible damage to the MHP1000 Head-
phones and/or your hearing, it is suggested to first
lower the volume control setting on the Audio or Au-
dio/Video Component before connecting and putting
on the Headphones. Then bring up the volume level to
a comfortable listening level.
It is also suggested not to leave the MHP1000
Headphones connected to an Audio or Audio/Video
Component when Loudspeakers are being driven by
the component in the same room, to prevent possible
damage to the Headphones.
When using the Headphones, orient them to match
up with your Left and Right Ears (by the Headphone
Cable Channel Identification) for the proper acoustic
perspective.
Cleaning
How Replace Ear Cup Pads
The MHP1000 Headphones may be cleaned pe-
riodically using a dry cleaning cloth such as a3M
TM
Scotch-Brite
®
Microfiber Dusting Cloth.
At no time should ordinary household cleaning
products be used to clean the Headphones, as damage
will occur.
To remove small foreign particles such as hair
from the fabric surface located inside of the Ear Cup,
carefully use a Micro Vacuum Cleaner (typically used
to clean computer keyboards, etc.).
If the Ear Pads were to become heavily soiled they
should be replaced. Refer to page 4 for additional in-
formation on ordering replacements and below on how
to replace them.
To replace the MHP1000 Headphones Ear Cup
Pads perform the following steps:
1. Place the rear of the Headphone Ear Cup on a
clean soft flat surface. Disconnect the Cable
from each of the Ear Cups by carefully grasp-
ing the Mini plug on the metal portion of the
plug and pull it away from the Ear Cup.
Figure 12
Figure 13
Figure 14