
Installation Guide


3
Table of Contents
Important Safety Instructions ��������������������������������������� 2
Thank you from all of us at McIntosh ��������������������������� 2
Make a Note ������������������������������������������������������������������ 2
Tools Needed ����������������������������������������������������������������� 3
Parts Included ��������������������������������������������������������������� 3
Ready To Perform ��������������������������������������������������������� 3
Making a Hole ��������������������������������������������������������������� 3
Installing the Frame ������������������������������������������������������ 3
Connecting to Speaker Wire ���������������������������������������� 3
Putting it in the Wall ���������������������������������������������������� 4
Warranty ����������������������������������������������������������������������� 5
Specifications ���������������������������������������������� ������������������ 6
Tools Needed
• #2 Phillips Screwdriver
• Drywall Knife or Saw
• Pencil
• Tape Measure
• Stud nder
• Bubble Level
Parts Included
• Loudspeaker Bafe
• Bafe Box
• Frame
• Frame Gaskets (2)
• Grille
• Cutout Template
• Clamping Pieces (2)
• Fiberglass Packing
• Airtight Electrical Connector
• Frame Screws #10-24 x 3 inch (6)
• Bafe Washers #8 (6)
• Bafe Screws #10-24 x 1-1/2 inch (6)
Ready To Perform
The WS500 In-Wall Loudspeaker System is designed
to provide exceptional performance. This 3-way
loudspeaker features McIntosh’s acclaimed MTM
speaker array and shallow woofer design contained in
a fully enclosed back chamber. The design allows for
expansive sound performance with a shallow footprint
perfect for in-wall mounting.
The WS500 is a versatile loudspeaker and can be
employed in many applications. The use of audio design
specialists is recommended for complex installations to
achieve the highest level of performance. Your McIntosh
Dealer is experienced in all aspects of audio/visual setup.
The Low Prole Micro-Flange Grille is magnetically
held in place. These grilles are ready to be painted if you
wish.
Making a Hole
For new construction, the RK500 rough-in bracket
is recommended. The RK500 is available from your
McIntosh Dealer. If you have installed the RK500 skip
ahead to “Installing the Frame”.
Choose the proper position for the WS500 keeping in
mind acoustical properties, the positions of studs and
the ability to run speaker wire to the WS500. When the
proper location is found:
1. Hold the supplied cutout template against the
wall and align it using a bubble level and tape the
template to the wall.
2. Trace the opening.
3. For dry wall installation, use a drywall knife or
saw to cut a hole. The hole should be 13 1/4 inches
(33.66cm) wide by 22 7/16 inches (56.99cm) in
height.
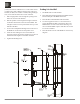
Installing the Frame
The Frame Assembly has two Clamping Pieces
connected to the Frame by Six 3-inch screws (3 each).
The bolt at the end of each screw is there to make sure it
stays connected and need not be moved.
Install the “L” shaped self-adhesive Frame Gaskets to the
rear of the Frame so that the Gaskets will sit between the
Frame and the wall when installed.
With the Clamping Pieces loose, manipulate the frame
into the opening in the wall. The Clamping Pieces can be
moved to allow the frame to t. Once in place, position
the Clamping Pieces against the back of the wallboard on
each side.
When satised that the Frame is level (using a bubble
level), tighten all six screws until the Frame is securely
attached to the wall. Avoid over tightening to prevent
damaging the drywall.
Connecng to Speaker Wire
Prepare Speaker Wires for connection to the WS500.
Remove ½ inch (12.7mm) of insulation from the wire
end and twist the strands together. For runs under 25 feet