
Installation manual


McQuay IM 487-4 95
Check, Test, and Start Procedures
Note:
If desired, you can significantly reduce all MicroTech II
internal control timers by the changing the entry under
keypad menu Setup/Service\Unit Configuration\Timer
Settings\Service= from “0 min” to “X min” where X is
the number of minutes you want the unit to operate with
fast timers.
Power Up
1 Close the unit disconnect switch. With the control system
switch S1 in the OFF position, power should be available
only to the control circuit transformer (TI) and the
compressor crankcase heaters.
2 Turn the Switch S1 to ON. Power should now be supplied
to the control panel, and the LEDs on MCB1 should follow
the normal startup sequence (refer to the “MCB LED
Power-Up Sequence” of IM 696).
Fan Start-up
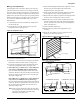
1 Verify all duct isolation dampers are open. Unit mounted
isolation dampers may be mounted in the supply or return
sections.
2 Place the unit into the “Fan Only” mode through the
keypad menu System Summary\System\Ctrl Mode= Fan
Only.
3 Turn Switch S7 to ON. The controller should enter the
“Startup Initial” operating state. If the fan does not run:
a Check fuses F1 and F3.
b Check the manual motor protectors or that the circuit
breakers have not tripped.
c Check the optional phase monitor.
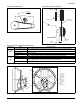
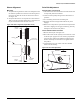
4 If the fans are equipped with optional spring isolators,
check the fan spring mount adjustment. When the fans are
running they should be level. Refer to “RAH spring mount
hold down fasteners” on page 51.
5 Verify the rotation is correct.
6 Verify the DHL safety is opening at a pressure compatible
with duct working pressure limits.
Note: The supply and return fan drives usually are selected for
operation in the drive's midspeed range. The return fan
drives are usually shipped with fixed pitch sheaves that
will provide the selected fan speed; however, the supply
fan drives are usually shipped with variable pitch
sheaves that are adjusted to provide the minimum fan
speed. Both drives should be adjusted for proper airflow
during air balancing. For more information, refer to “Air
Balancing” on page 96.
Economizer Start-up
1 Check whether the outdoor air is suitable for free cooling
by displaying the keypad menu Temperature\OA
Damper\OA Ambient=. “Low” indicates low outdoor air
enthalpy; “High” indicates high outdoor air enthalpy. See
“Enthalpy Control” on page 84 to verify that the enthalpy
changeover control is working properly. You may want to
take temperature and humidity measurements.
2 Verify that switches PS1 and PS2 are at OFF. This prevents
compressor operation during the procedure.
3 At the keypad, set the cooling setpoint low enough so the
controller calls for cooling. Adjust the value in
Temperature\Zone Cooling\Occ Clg Spt= below the
temperature shown in Temperature\Zone Cooling\Control
Temp=. In addition, on DAC units, adjust the value in
Temperature\Discharge Cooling\DAT Clg Spt= below the
temperature shown in Temperature\Discharge
Cooling\Disch Air=.
4 Place the unit into cooling mode through the keypad menu
System Summary\System\Ctrl Mode= Cool Only.
5 Observe the outdoor air dampers:
a If the outdoor enthalpy is low, the control algorithm
should start to modulate the dampers open to maintain
the discharge air setpoint.
b If the outdoor enthalpy is high, the dampers should
maintain their minimum position. Look at menu
Temperature\OA Damper\MinOA Pos=. Change this
entry to another value. Verify that the dampers move to
the new minimum position setpoint.
6 If the unit is equipped with the electromechanical enthalpy
changeover control (Honeywell H205) and the outdoor air
condition is borderline, attempt to change its input to the
MicroTech II controller by turning the switch adjustment to
“A” or “D.” Check enthalpy status in keypad menu
Temperature \ OA Damper \ OA Ambient=. If this reading
is “Low,” go to step 5a. If it is “High,” go to step 5b.
Note: It may not be possible to check the economizer
operation in both low and high enthalpy states on the
same day. If this is the case, repeat this procedure on
another day when the opposite outdoor air enthalpy
conditions exist.
CAUTION
Adjust dampers properly. Improper adjustment can damage the
dampers.
When an economizer is ordered without an actuator, the
linkage requires a 3.14" linear stroke to open it fully. Do not
allow dampers to be driven beyond their normal full closed or
full open position.