
Specifications


6 McQuay IM 846
Operation
Thermostat Menu Functions
The thermostat menu contains nine functions which can be
accessed using controls on the thermostat. Accessing the menu
functions and details of each function are described below.
Menu Function Access
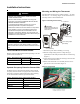
1 Press and hold the UP and DOWN arrow buttons (Figure 5)
for five seconds.
2 The current display clears and the number “1” appears.
3 Press the SYSTEM button to scroll to the next item
number.
4 Use the UP and DOWN buttons to make changes within the
selected number.
Figure 5: Thermostat menu
Menu Functions
1 F/C (Fahrenheit/Celsius) display selection
When this function is selected, the F and C icons appear
and the selected icon flashes. To toggle between F or C,
press the up or down arrow button.
2 Continuous set point display
When this function is selected, the F or C icon, current
digits, and the set point icon appear. If the Continuous set
point display is enabled, the set point icon flashes. To
toggle between continuous display of set point and display
of zone temperature, press the up or down arrow button.
3 FAN off delay
When this function is selected, the FAN, OFF, and digits
appear. The digits represent the number of seconds the fan
stays on after the heating and cooling outputs are turned
off. To increase or decrease the value from 0–255 seconds,
press the up or down arrow button.
4 Range limit low
When this function is selected, the current minimum range
setting, the SET POINT icon. and the LO icon appear. To
increase or decrease the value, press the up or down arrow
button.
5 Range limit high
When this function is selected, the current maximum
temperature range adjustment, SET POINT icon, and LO
icon appear. To increase or decrease the value, press the up
or down arrow button.
6 Set back heat
When this function is selected, the current temperature
range adjustment, the SET BACK icon, and the HEAT icon
appear. To increase or decrease the value, press the up or
down arrow button.
7 Set back cool
When this function is selected, the current Cool setback
value, the SET BACK icon, and the COOL icon appear. To
increase or decrease the value, press the up or down arrow
button.
8 Zone temperature offset
When this function is selected, the numeric ones and tenths
(0.0) appear with a leading minus sign. To increase or
decrease the value +/– 9°F, press the up or down arrow
button. Increments are made in 1°F and 0.5°C.
9 Keypad lockout
When this function is selected, the ON and OFF icons
appear. The enabled icon flashes. OFF is the default. ON
disables the keypad except for entry into the service menu.
To increase or decrease the value, press the up or down
arrow button.
Note – In the event of a power failure, these values are stored
and can be recalled.
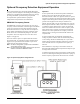
Condensate Overflow Interrupt
The remote probe input can be used with a condensate
overflow switch (CO), either in conjunction with a remote
probe (normally closed CO switch, Figure 6), or with local
sensing (normally open CO switch, Figure 7). When the
condensate switch activates, the thermostat displays a service
wrench icon and disables all outputs.
Figure 6: Remote probe installation
Figure 7: Local sensor installation
Press and
hold both for
5 seconds.
Temperature
adjustment
and
System
Press to step
through selections
(see list).
1 F/C display selecton
2 Continuous set point display
3 Fan off delay
4 Range limit low
5 Range limit high
6 Setback heat
7 Setback cool
8 Zone temperature offset
9 Keypad lockout
Normally
closed
condensat
e
switch
Remote probe
White/Yellow
Circuit common
White/Violet
Normally
open
condensat
e
switch
R
emote pro
b
e
White/Yellow
Circuit common
White/Violet