
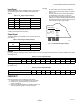
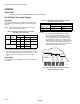
Specifications


IF UNIT HAS AN EX IST ING MAN UAL FRESH
AIR DAMPER
Refer to page 1. Reverse assembly procedure until
damper panel assembly is removed. Assemble motorized
damper assembly (see (F) below). Then reassemble fresh
air damper using motorized damper assembly.
IF UNIT HAS NO EX IST ING MAN UAL FRESH
AIR DAMPER
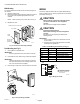
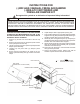
1. Assemble motorized damper panel assembly by
removing the damper slide from damper panel
assembly, then attaching the (F) motorized damper to
the opposite side. Use (6) of the screws from the
damper slide to attach the motorized damper.
2. Remove (4) screws from top cover sides.
3. Remove all screws from top left panel (retain screws
and top left panel for later use).
2
MO TOR IZED DAMPER
FRONT FILTER SUPPORT
FILTER - PERMANENT
(2) REQ'D
RAIN HOOD TOP
MOTORIZED DAMPER
PANEL ASSEMBLY
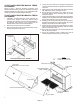
4. Lift top cover and remove top left panel. Plug power
cord for motorized damper into polarized wire harness
connector.
5. Apply power to unit and set minimum damper position
with adjustment wheel on damper motor.
6. Secure the (B) hood sides to the edges of the (A)
motorized damper panel assembly with (6) screws
removed in step 3.
7. Trap (C) filters between (C) front filter support and filter
support on the (A) damper assembly while attaching to
the (B) hood side with (3) screws provided.
8. Attach (D) rain hood (previously the top left panel) to
the (B) hood side with (4) screws each side, (6) screws
between rain hood and front filter support.
9. Attach (E) rain hood top to the same location as upper
edge of (A) damper panel assembly with (6) screws
that were removed in step 3.
10. Secure (E) rain hood top to rain hood and hood side
with (8) screws provided.
11. Secure all remaining screws, making sure that all
weather exposed screw holes use the screws.
DAMPER PANEL
AS SEM BLY
MOTORIZED DAMPER PANEL ASSEMBLY
DAMPER
SLIDE
(DISCARD)
HOOD SIDES
HOOD SIDES
TOP COVER
(REF.)
NOTE:
— CIRCLED LETTER EQUAL
ORDER OF INSTALLATION
A
E
C
B
B
C
D
RAIN HOOD
(PREVIOUSLY TOP LEFT PANEL)
A
F
Page 10