
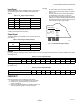
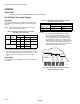
Specifications


INSTRUCTIONS FOR
(-)XRF-HEA1 MANUAL FRESH AIR DAMPER
(-)XRX-AT01 MOTORIZED AND
FRESH AIR DAMPER KIT
WARN ING
THESE INSTRUCTIONS ARE INTENDED AS AN AID TO QUALIFIED, LICENSED SERVICE PERSONNEL FOR
PROPER INSTALLATION, ADJUSTMENT AND OPERATION OF THIS UNIT. READ THESE INSTRUCTIONS
THOROUGHLY BEFORE ATTEMPTING ADJUSTMENT OR OPERATION. FAILURE TO FOLLOW THESE
INSTRUCTIONS CAN RESULT IN IMPROPER INSTALLATION, ADJUSTMENT; SERVICE OR MAINTENANCE,
POSSIBLY RESULTING IN FIRE, ELECTRICAL SHOCK, PROPERTY DAMAGE, PERSONAL INJURY OR DEATH.
Recognize this symbol as an indication of Important Safety Information!
WARN ING
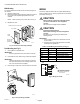
6. Adjust damper slide to appropriate opening now.
7. Trap (C) filters between (C) front filter support and filter
support on the (A) damper assembly while attaching to
the (B) hood side with (3) screws provided.
8. Attach (D) rain hood (previously the top left panel) to
the (B) hood side with (4) screws each side, (6) screws
between rain hood and front filter support.
9. Attach (E) rain hood top to the same location as upper
edge of (A) damper panel assembly with (6) screws
that were removed in step 2.
10. Secure (E) rain hood top to rain hood and hood side
with (8) screws provided.
11. Secure all remaining screws, making sure that all
weather exposed screw holes use the screws.
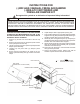
FRONT FILTER SUPPORT
RAIN HOOD
(PREVIOUSLY TOP LEFT PANEL)
HOOD SIDES
FILTER - PERMANENT
(2) REQ'D
RAIN HOOD TOP
DAMPER PANEL ASSEMBLY
NOTE:
— CIRCLED LETTERS EQUAL
ORDER OF INSTALLATION
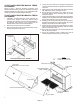
TURN OFF ELECTRIC POWER TO THE UNIT BEFORE
ATTEMPTING ANY MAINTENANCE. FAILURE TO DO
SO CAN CAUSE ELECTRICAL SHOCK RESULTING IN
PERSONAL lNJURY OR DEATH.
1. Remove (4) screws from each side of the unit top
cover.
2. Remove all screws from top left panel (retain screws
and top left panel for later use).
3. Lift top cover high enough to replace top left panel with
damper panel assembly.
4. Replace top left panel with (A) damper panel
assembly.
5. Secure the (B) hood sides to the edges of the (A)
damper panel assembly with (6) screws removed in
step 2.
DAMPER SLIDE
FILTER SUPPORT
A
E
C
B
B
C
D
Page 9