NumaLink-3.
NumaLink-3.0™ Users Guide and Service Manual Part Number 900-000201-001 © Copyright 2004 by Numa, Inc. All Rights Reserved PROPRIETARY RIGHTS NOTICE No part of this material may be reproduced or transmitted in any form or by any means, electronic, mechanical, or otherwise, including photocopying and recording or in connection with any information storage or retrieval system, without the permission in writing from Numa Inc. Numa Inc.
NumaLink-3.0™ Users Guide and Service Manual Table of Contents 1. Introduction ............................................................................................................................................. 3 2. Installation and Getting Started............................................................................................................. 4 2.1 HARDWARE.................................................................................................................................
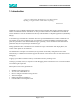
NumaLink-3.0™ Users Guide and Service Manual 1. Introduction “ Since we cannot know all that there is to be known about anything, we ought to know a little about everything.” Blaise Pascal NumaLink-3.0 is an OEM-to-OEM nuclear medicine image translator that supports translation among a number of OEM data formats. NumaLink-3.0 also provides translation to the DICOM 3.0 standard for nuclear medicine as well as communication directly with DICOM 3.0 compliant applications (DICOM by Merge).
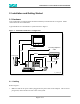
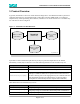
NumaLink-3.0™ Users Guide and Service Manual 2. Installation and Getting Started 2.1 Hardware Your NumaLink-3.0 system hardware should be installed by an authorized service engineer. Please contact Numa for more information. Typical hardware for a NumaLink-3.0 system is shown in Figure 1. Figure 1 – NumaLink-3.
NumaLink-3.0™ Users Guide and Service Manual 2. The monitor cable should be plugged into the video card on the NumaLink computer. This is usually color-coded blue, and has a picture of a monitor next to it. 3. The keyboard and mouse cables are color-coded purple and green, respectively. Plug these into the appropriately labeled outlets on the back of the system. 4. For modem line cabling setup, please refer to section 5.2. 5. Network cables should be plugged into the appropriate network ports.
NumaLink-3.0™ Users Guide and Service Manual 2.2 Software This section applies only if you are installing NumaLink-3.0 software on a system that is not installed and configured by Numa. NumaLink-3.0 can be installed on Windows 98, windows NT 4.0 or Windows 2000. To install NumaLink-3.0 on your system, execute the following image: NumaLink-3.0_.exe 1. Read the welcome window; press “Next”. 2.
NumaLink-3.0™ Users Guide and Service Manual Version: Licensee: Expires: A1 Numa, Inc — INTERNAL USE ONLY, ALL OTHER USE PROHIBITED June 1, 2000 CHECKSUM: ++9GZCZW3J8VWSEQ9QSQNZRZCOOHT5VJPY— Numa license ends If an appropriate license cannot be found, a message is displayed as shown in Figure 3. Contact Numa immediately if you have any problems with your NumaLink-3.0 licenses. Figure 3 – License Error Message NLF_NoLicense: No valid NumaLink-3.0 license found (5) 2.2.3 Removing NumaLink-3.
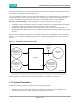
NumaLink-3.0™ Users Guide and Service Manual 3. Product Overview In general, NumaLink-3.0 discovers nuclear medicine image files in one OEM format that are placed in a configured input directory, and translates them to image files in another OEM format in a configured output directory. While performing this translation, it makes use of various directories in a work directory tree. This flow is shown in Figure 4. Figure 4 – NumaLink-3.0 OEM Data Flow NumaLink (nmtrans.
NumaLink-3.0™ Users Guide and Service Manual The entire work directory tree is purged periodically of files that are older than a certain number of days, as specified in the general translator configuration. As a rule, NumaLink-3.0 does not specify how the image files get to the input directory, or what happens to them after they are written to the output directory.
NumaLink-3.0™ Users Guide and Service Manual 2. If one or more input files are found, NumaLink-3.0 schedules a file stability check, sleeps for a file stability delay period and proceeds to step 3. 3. If the input files are stable, NumaLink-3.0 proceeds to step 4; if not, it schedules a directory check, then sleeps and goes to step 1. 4. NumaLink-3.0: a. reads the stable files and maps all information in them to an intermediate translation format; b.
NumaLink-3.0™ Users Guide and Service Manual 4. Configuration To start the NumaLink-3.0 GUI, double-click on the following executable image: \Program Files\Numa\NumaLink\NumaLink.exe 4.1 General Figure 6 shows the NumaLink-3.0 Graphic User Interface (GUI) with its General configuration tab. Each configuration item is described in Table 4-1 – General Configuration Settings .
NumaLink-3.0™ Users Guide and Service Manual Config. File Full path for the NumaLink-3.0 configuration file. The configuration file is the repository of all information provided on the Translations tab (section Error! Reference source not found.). This file is best left under control of the NumaLink-3.0 GUI; in some circumstances, you may need to modify it manually to access features that are not yet supported by the GUI (see section 7).
NumaLink-3.0™ Users Guide and Service Manual Port 104 This information can me modified by editing the file C:\Program Files\Numa\NumaStore\ini\numastore.ini and appropriately editing the following lines: AE_Title=NumaLink_3_0 ListenPort=104 (In a future release, these modifications will be supported directly in the NumaLink-3.0 GUI.) (DICOM by Merge) 4.2 Translations Figure 7 shows the Translations tab, through which you can add, delete and modify translation definitions.
NumaLink-3.0™ Users Guide and Service Manual Figure 7 – Translations Tab Table 4-2 – Translations Settings Item Description Translations A list of currently configured translations. To copy, modify or delete an existing translation, first select the translation from this list Label A descriptive label associated with the translations. (These labels are displayed in the Translations list box.
NumaLink-3.0™ Users Guide and Service Manual Stability delay The number of seconds to wait, after translation input files have been detected, to determine whether they are stable. (See section 3.1 for more information.) Post-translation application An application (executable image, script, etc) that is executed after work is done for this translation. Copy to New Create a new translation, setting its parameters from the selected existing translation.
NumaLink-3.0™ Users Guide and Service Manual Figure 8 – DICOM dialog Table 4-3 – DICOM Settings Item Description Output format (Read only) Output format specified for this translation. Perform DICOM Store If checked, the translation results in a DICOM store request to all remote AEs that are associated with the translation. Otherwise, the translation results in one or more DICOM Part 10 files written to the translation's specified output directory.
NumaLink-3.0™ Users Guide and Service Manual Cancel Quit the dialog without applying changes For more information on DICOM AEs, refer to the following: • NumaLink-3.0 DICOM Conformance Statement C:\Program Files\Numa\Documents\ NumaLink-3.0 Conformance Statement.doc • Digital Imaging and Communications in Medicine (DICOM) 3.0 http://medical.nema.org/dicom.html 4.3 Status Error! Reference source not found. shows the Status tab, which displays the current status of the NumaLink-3.0 translator.
NumaLink-3.0™ Users Guide and Service Manual The Clear Status Window button clears existing messages form the Status window; it does not affect the audit log.
NumaLink-3.0™ Users Guide and Service Manual 5. Technical Support 5.1 Logging and Error Reporting NumaLink-3.0 logs messages that indicate the progress of translations; these messages can also help in understanding and resolving translation problems. You can see the messages in two ways: 1. Messages from the current translation session are shown in the Status tab of the NumaLink-3.0 GUI; see section 4.3. 2.
NumaLink-3.0™ Users Guide and Service Manual TELCO PHONE The phone line should be plugged in here NL_UserMan_005 The pcAnywhere software is setup to automatically start each time the system boots up. You can verify the status of pcAnywhere by locating the clock in the lower right hand corner of the screen. Next to the clock will be a small computer icon, which indicates that pcAnywhere is setup to receive a call; see Figure 11.
NumaLink-3.0™ Users Guide and Service Manual 3. If the systems are powered on, have you rebooted the NumaLink-3.0 system, the source system, and the destination system? (See section 2.1.3.) 4. Have you properly transferred a file from the source system? (See sections 5.4 and 6.) 5.4 Frequently Asked Questions What types of data can I send through my NumaLink-3.0 system? Your NumaLink-3.0 computer only supports raw, unprocessed data.
NumaLink-3.0™ Users Guide and Service Manual How do I know that a study I sent has been translated? You can check the NumaLink-3.0 status window. Figure 13 shows a typical status window after a successful translation. Figure 13 – Example of Successful Translation A study that I sent did not show up on the destination system.
NumaLink-3.0™ Users Guide and Service Manual Reboot the NumaLink-3.0 computer. If the studies still do not come over, reboot the source and destination systems as well. Try to determine if the data comes over to the NumaLink-3.0 system, and also if it leaves the Numa system, but cannot be seen or processed at the destination.
NumaLink-3.0™ Users Guide and Service Manual 6. OEM Setup Information This section provide additional information on configuring and using NumaLink-3.0 with the various OEM systems supported by its translations. 6.1 ADAC Pegasys 6.1.1 NumaLink-3.0 Input Configuration (Pegasys Read) Figure 14 shows a typical configuration to deliver Pegasys files to NumaLink-3.0 for translation. Figure 14 – NumaLink-3.
NumaLink-3.0™ Users Guide and Service Manual Figure 15 – NumaLink-3.0 Pegasys Write Configuration Numa System NumaLink ADAC Pegasys AutoFTP 1 2 2 local disk 3 local disk NL_UserMan_003 1. Completing a translation, NumaLink-3.0 writes Pegasys files to a configured output directory. 2. AutoFTP transfers the Pegasys files to a local directory on the Pegasys system. 3. AutoFTP shells a procedure on the Pegasys to add the transferred file to the Pegasys database. 6.2 GE StarCam 6.2.1 NumaLink-3.
NumaLink-3.0™ Users Guide and Service Manual 1. First open a new workbench on the Odyssey console. 2. Click on the File menu and select Patient Index. 3. From the Clinical Index window, select the patient study you wish to transfer, or click on the Patient Index button to select individual files. 4. Click the Done button when ready. 5. Open the Utilities menu and select Interfile Conversion. 6. Click on the Convert and Send button, then select NUMA from the list. 7.
NumaLink-3.0™ Users Guide and Service Manual 7. Command Line Interface and Configuration File The NumaLink-3.0 translator can be run without the GUI, by making use of its command line interface, which is augmented by an editable configuration file. In this manner, a specific translation can be scripted to execute in response to another system event. The command line interface is fairly straightforward; it is described in section 7.1.
NumaLink-3.0™ Users Guide and Service Manual data 3 – Write; writes intermediate format to output files This argument is mutually exclusive with –b. -e file Error log file specification – specifies a file for writing an error log and supplementary error information. The error log receives any error messages that are generated during translation. The process must have write, file create and directory create access to this directory. If “0” is specified for the path, error messages are not logged.
NumaLink-3.0™ Users Guide and Service Manual (white space) Spaces and tabs are considered white space. All contiguous white space is interpreted as one space. (blank line) A blank line is a line that contains only white space, comments or nothing. Blank lines are ignored. “” Anything surrounded by double quotes is preserved as is (i.e., whit spaces is not compressed, comment delimiters have no effect). Each directive contains a keyword followed by one or more arguments.
NumaLink-3.0™ Users Guide and Service Manual work-path Work path – specifies a working directory that the translator uses for temporary storage, debug output etc for this translation type. The process must have write, file create and directory create access to this directory. Each translation in a configuration files must specify a different work path. Several subdirectories are created in the work path for use by the translator:.
NumaLink-3.0™ Users Guide and Service Manual 7.2.2 The out_remote_ae Directive The out_remote_ae directive allows you to configure remote DICOM Application Entities (AEs) for DICOM write. It must follow a translation directive, and it is associated with the translation directive that immediately precedes it. This directive applies only to translation directives that specify a DICOM format as the output format; otherwise, it is ignored.
NumaLink-3.0™ Users Guide and Service Manual ; nmtrans_config.dat – sample configuration file translate AtoD ADAC c:\trn\ADC_in DICOM c:\trn\DCM_out out_remote_ae numastore remnode 104 "" "" c:\trn\tran1 20 This configuration file will invoke a translation of input files in ADAC Pegasys format to DICOM format, followed by a request to remote AE "numastore" (on node "remnode", listening on port 104) to store the DICOM files. 7.2.