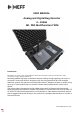
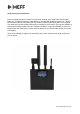
USER MANUAL Analog and Digital Bug Detector 0 – 20GHz M1- PRO Multifunction TSCM Introduction Multifunction analog and digital detector M1-PRO is designed and manufactured in Italy according to high quality standards. Detecting hidden high-tech surveillance devices used by foreign agencies, terrorists or criminals is now more difficult.
M1-PRO detects: • transmission spy devices hidden in the home, car, office or any environment • • • • • • • • GPS-Lojack trackers installed in cars and vehicles sending and receiving SMS from mobile phones, access signals to the Internet from mobile phones suspicious radio signals in the environment hidden wireless cameras mini earphones in transmission Jammers (signal jammers) Spying devices even turned off and not powered Spy devices turned on not transmitting M1-PRO functions: • • • • • • • • • •
Technical features: • • • • • • • • • • • Detection modes to select on the detector: Full Band Detector Analogue and Digital, GPS, Wifi and Magnet.
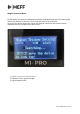
Outer Appearance Detector: 1. (USB1) for probes 2. (ANT1) Detection antenna input from 10 Khz to 20 GHz 3. Jack input for APP 4. (ANT2) WIFI detection antenna input 5. (USB2) for probes 6. Signal Detected Alarm Indicator 7. Detection of all bands from 10Khz to 20GHz 8. 900Mhz / 1800MHz bands detection 9. Wifi detection 10. App activation 11.Mute 12. (Power) On and Off key 13. (Mode) Operating mode key 14. (Range) Button to adjust the sensitivity from Low / High 15.Battery charging LED 16.
Using the Keys on the Detector: Press and hold the power switch for 3 seconds, release your finger after hearing the beep, the "Full Band Detector" light will be on, the default detection mode of 0 – 20GHz full frequency band is activated and the Antenna receiving terminal (ANT1) is activated. Two antennas can be installed arbitrarily according to your needs. Short press (MODE) to switch the working mode, there are 4 modes to switch.
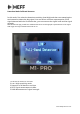
Detection Mode Full Band Detector: In this mode, first select the detection sensitivity (Low/High) and then start sweeping the environment to detect the bug signal. You can have a real-time representation of the signal detected with the 16-element bar, you can measure the signal in dB and the signal strength. With the M1-PRO app you will have additional functions and the graphic representation of the signal with logger and signal measurement also in cm. 1. Indicates the antenna in use ANT 1 2.
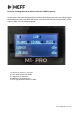
Locators and Bugs Detection Mode in the 900 /1800 frequency: In this mode, first select the detection sensitivity (Low/High) and then start sweeping the environment to detect the 900/1800 signal. You can have real-time measurement of the signal in dbm over the detected power. 1. Indicates the antenna in use ANT 1 2. Low / High sensitivity mode 3. Frequency of detection 4. Indicates signal detection 5. RSSI: Signal measurement in dBm www.meffproduction.
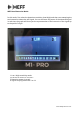
WIFI Band Detection Mode: In this mode, first select the detection sensitivity (Low/High) and then start sweeping the environment to detect the wifi signal. You can measure the power of the detected signal in real time, the graph will show you the representation of the harmonic of the signal up to the point of origin. 1. Low / High sensitivity mode 2. Indicates the antenna in use ANT 2 3. Detection power in graph 4. Signal carrying scale from 1 to 14 www.meffproduction.
Magnet Detection Mode In this mode, first select the detection sensitivity (Low/High) and then start moving the device at a distance of about 5/10 cm from the point to be reclaimed. As soon as the device detects the signal, the magnetic value and return power will be displayed and the 16-segment bar will activate. 1. Indicates the value of the detected magnet 2. Indicates return signal strength 3. Signal Detection Bar www.meffproduction.
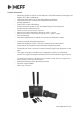
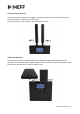
Directional Omini antennas Two man-direction antennas are supplied, capable of detecting the signals present in the environment to be reclaimed in all directions. Screw the antennas into the ANT1 and ANT2 inputs for use. Directional Antenna A directional antenna is provided which can detect the signal following the precise direction. The antenna can be used in both the ANT1 and ANT2 inputs as needed. Screw the antenna into the ANT1 or ANT2 input for use. www.meffproduction.
T1 antenna This antenna forces the locators in stand bye to transmit the signal to be detected. The T1 antenna will saturate the tracker signal in stand by and force it to restart and then transmit the signal. Keep the detector switched off, insert the T1 antenna into the input (as in the photo) and place the detector in the car to be checked for 5/10 minutes. It is advisable to enter the car first, insert the T1 probe and place the detector on the seat, then close the door and move away from the vehicle.
T2 antenna This antenna is used to detect laser and infrared microphones, these devices are very dangerous because they can be installed hundreds of meters outside the environment to be monitored. Insert the T2 antenna in the entrance (as in the photo) and pass the probe uniformly over all the windows of the place to be reclaimed. If the probe detects a spying signal a blue LED on the back of the antenna will light up.
T3 antenna This antenna generates a particular ambient noise which is used to wake up the audio and video bugs in stand by and voice activated, it forces the activation of the transmission of the spy device so as to be easily identified by the detector. Insert the T3 antenna into the input (as in the photo) at this point the antenna is activated automatically and you can start sweeping the environment in order to identify the presence of spy devices. www.meffproduction.
T4 probe This probe allows you to sweep the environment and find audio and video micro-cameras on, off or not powered, it can also identify the black infrared of spy micro-cameras. The probe has a color video monitor with integrated camera from which you can see the black infrared of the hidden micro-cameras. Monitor operation: Once the cable is connected to the central unit, the monitor will turn on.
1. Power key 2. LED activation key 3. Vision monitor for the built-in camera 4. Vision monocle 5. LEDs (RED) 6. Micro camera www.meffproduction.
Thermographic probe This probe uses thermography technology to identify the presence of heat generated by both battery and mains powered spy devices. The thermographic probe must be passed over objects or points with no heat in order to check whether there are any spying electronic devices inside them. Two inspections are recommended: 1. Survey the environment or vehicle with the power still on 2.
Using the MEFF M1-PRO APP: Download APK APP and install it on your Android device. In the package there is a jack cable and a usb type c adapter. The jack cable can be connected directly to the headphone input of any android device, the screen will automatically turn off after 10 seconds and the "LED light on the device will remain on at this point you can open the MEFF M1-PRO app.
In this screen you will see the signal detected in db represented. When the db mark 100 it means that the signal is far from the device, the closer you get the more the db goes down until it reaches zero. You can adjust the sensitivity from 0 to 100 In this screen you can select the detection speed (Fast – Normal) www.meffproduction.
In this screen you will find all the information to use the MEFF M1-PRO APP correctly In this screen you can manually adjust the sensitivity of signal detection www.meffproduction.
In this mode you can view the event history Detector Mode 2: This mode has an innovative function, the possibility of detecting the distance in cm of the signal. Our detector through a new patent is able to measure the distance, this is possible by combining and analyzing the various information received from the M1-PRO. The distance is determined by the propagation time of the transmitted signal and by its power.
To activate the function: Click onDISTANCE In this screen you will see the signal detected in cm shown. You can adjust the sensitivity from 0 to 100 www.meffproduction.
In this screen you can select the detection speed (Fast – Normal) In this screen you will find all the information to use the MEFF M1-PRO APP correctly www.meffproduction.
In this mode you can view the event history with date and measurement in cm of the distance detected In this screen you can manually adjust the sensitivity of signal detection www.meffproduction.