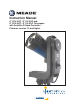
Instruction Manual 6" LS-6 ACF / 6" LS-6 SC and 8" LS-8 ACF / 8" LS-8 SC Telescopes with AutoStar III Hand Controller Firmware version 1.
WARNING! Never use a Meade® LS™ Telescope to look at the Sun! Looking at or near the Sun will cause instant and irreversible damage to your eye. Eye damage is often painless, so there is no warning to the observer that damage has occurred until it is too late. Do not point the telescope at or near the Sun. Do not look through the telescope or Red-Dot Finder as it is moving. Children should always have adult supervision while observing.
CONTENTS Introduction Landmarks . . . . . . . . . . . . . . . . . . . . . . . . . . . . . . .30 Observing Satellites . . . . . . . . . . . . . . . . . . . . . . . .31 Terrestrial Observing . . . . . . . . . . . . . . . . . . . . . . . .32 The most sophisticated and easiest to use telescope ever . . . . . . . . . . . . . . . . . . . . . . . .3 Getting Started Assembling the Telescope and using LightSwitch Assembling the tripod . . . . . . . . . . . . . . . . . . . . . . . .5 Mounting the tripod . . . . .
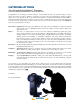
INTRODUCTION The LS-6 and LS-8 LightSwitch® Telescopes The most sophisticated and easiest to use telescopes ever Congratulations on receiving your new LS telescope. You’ll find that this telescope system has all you need to explore the Universe we live in. Meade’s concept was to create a telescope that would be simple enough for anyone to use, yet capable enough for the experienced amateur to stretch their knowledge and skills.
You may want to perform the LS assembly indoors in the light so that you become familiar with the parts and operation before moving the telescope outside into the dark for observing. This Getting Started Guide assumes you are too impatient to read the entire manual first and want to use your new telescope as quickly as possible. Just follow the simple steps below and you will be up and running before you know it. It is best to set up the telescope in twilight or before sunset the first time you use it.
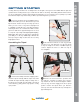
Center Hub Follow the battery polarity (orientation) as indicated by molded icons Thumb-Screw Take the LS Telescope from its packaging and place the entire telescope onto the top of the tripod head. Rotate the telescope head slowly until you feel the scope register on the center hub of the tripod head. Carefully screw the three attachment thumb-screws on the bottom of the plate to the base of the tripod. Hand tighten the screws so the telescope cannot spin or wobble on the tripod head.
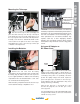
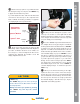
Your Telescope is now Fully Assembled GETTING STARTED Attaching Accessories Now remove the dust cover from the front of the telescope tube. Be careful not to touch the glass lens. Be sure the telescope master power switch is in the off position. Remove the AutoStar III handbox and the coiled interface cable from the packing materials. Plug one end into the HNDBX port of the control panel and plug the other end into the Handbox port on the AutoStar III handbox.
If you have attached a video cable from the Video Out connection on the telescope to the composite video input of a NTSC TV monitor, you will also see graphics accompanying the telescope introduction. Slew Speeds: Speed 9: Fast ' ' Speed 5: Medium ' ' Speed 1: Slow Arrow Keys GETTING STARTED Focus Knob After the telescope powers on, you will hear a brief introductory message. You can press the “MEDIA” key to bypass the introduction if you like.
Now that you have successfully setup and used your LS telescope, it’s time for more information about all the capabilities of this amazing optical system. The first step is to familiarize yourself with the AutoStar III handbox operation. The largest keys on the keypad are the motion control keys. Most of the time, these keys allow you to move, or slew, your telescope both up and down and right and left. Press them now and see how the telescope moves in response to the keys.
The telescope will now start to tell you the story of Andromeda. You can listen to the whole story, or press the “MEDIA” key to skip the story and more menu choices will appear. If you want to go from the menu, “BACK” to the story, just press the “MEDIA” key again to restart the story. Shortcuts! Now lets look at the numeric keypad. Each of the number keys does two things. If the telescope is requesting input, the number keys allow you to enter digits into the telescope.
LS KEY FEATURES LS KEY FEATURES 2& Diagonal Eyepiece Holder Diagonal Prism Telescope Input/Output Panel 1.
Diagonal Thumbscrew Optical Tube Assembly (OTA) Focus Knob Integrated Sensor Module Dust Cover Battery Compartment Red Dot Finder Mini SD Card Slot USB-A for Future Expansion 2! 2@ 2# 2$ 2% 2^ LS KEY FEATURES USB-B connector to PC Video Output Audio Output Electronic Focuser Jack Handbox (HNDBX) Port 12v Power Input Figure 2: LS Right Side 2! 2@ 2# 2$ 2% 2^ Figure 3: LS Front Figure 4: LS Connectors INDEX 12
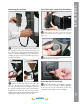
Diagonal Holder: Holds the eyepiece in place. Diagonal Prism: provides a more comfortable right angle viewing position. Slide the diagonal prism directly into the eyepiece holder (Fig. 1, 3). 1.25" Eyepiece Holder Eyepiece Holder Thumb Screw Eyepiece: Place the Super Plössl 26mm eyepiece into the 90° diagonal prism (Fig. 1, 4) and tighten in place with the thumbscrews. The eyepiece magnifies the image collected in the optical tube.
LS KEY FEATURES b. Images from the ECLIPS camera. d. e. 2# 2$ c. Sky maps of the region where your telescope is pointed Astronomer Inside videos and images of the moon, planets, and deep sky objects The Video Output can be toggled on/off with the 9/DISP key. Audio Output: This connection will allow you to pass the telescope’s stereo sound to external speakers, headphones or and external television monitor.
Adjusting the Red-Dot Finder On/Off & Brightness Adjustment Because your telescope has so much magnification, its field of view is very small. This can make it hard to know exactly where your telescope is pointing by simply looking at it. To help you point the telescope quickly and accurately, for terrestrial targets or when not using Auto Alignment and GO TO pointing, the LS has a 1X Red-Dot Viewfinder. The Red-Dot Finder will aid you in pointing your telescope easily.
Meade makes a complete line of accessories to enable you to get the most fun and performance from your LS telescope. No matter what you want to accomplish, we have the equipment to help you get there. Choosing Eyepieces A telescope’s eyepiece magnifies the image formed by the telescope’s main optics. Each eyepiece has a focal length, expressed in millimeters, or “mm.” The smaller the focal length, the higher the magnification.
Series 5000 Ultra Wide Angle OPTIONAL ACCESSORIES The Series 5000 Premium Eyepieces represent the highest level of eyepiece technology. Featuring advanced lens designs with 5, 6 and 7 elements, super fully multi-coated lenses and some of the widest fields of view available, they provide the user with the highest-contrast, pinpoint-sharp images and spectacular wide field views of the heavens.
While the LS telescope will operate with 8 “C” cell batteries, you should consider several other power options that might work better for your situation and save you money. The Meade 3.5 inch LCD monitor integrates fully with the LS telescope. Includes all connectors, dedicated battery pack (up to 20 hours of usage) and integral mounting bracket.
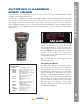
“ENTER” Key “BACK” Key MODE Key “GO TO” Key Arrow Keys AUTOSTAR III HANDBOX AUTOSTAR III HANDBOX Number / Shortcut Keys Scroll Keys “MEDIA” Key Coil Cord Port Coil Cord Figure 5: The AutoStar III Handbox Tour the Cosmos Push of a Button with Just the The AutoStar III hand controller operates the LS telescope with just a few pushes of AutoStar’s buttons.
• Altitude (vertical) and Azimuth (horizontal) coordinates . • Local Time and Local Sidereal Time (LST) • Timer and Alarm Status • Date • Site coordinates • Battery status • Telescope Serial Number • Free Memory remaining in the telescope “ENTER” Key: Selects the option on the second line of the display. When you are looking at descriptive object text, “ENTER” will synchronize the telescope’s coordinates with the object.
Arrow Keys: Slew the telescope in a specific direction (up, down, left, and right), at any one of nine different speeds. Speed selection is explained in “SLEW SPEEDS”, below. The following functions are also available with the Arrow keys: Number Key “1” = 1x Number Key “2” = 2x Number Key “3” = 8x Number Key “4” = 16x Number Key “5” = 0.25°/sec Number Key “6” = 0.50°/sec • Moves the telescope – Use the Up and Down Arrow keys to move the telescope vertically up and down.
“0/Mode” – This key lets you cycle through the telescope’s modes, (See the entry above). Scroll Keys: Accesses options within a selected menu. The menu is displayed on the first line of the screen. Options within the menu are displayed, one at a time, on the second line. Press the Scroll keys to move through the options. Press and hold a Scroll key to move quickly through the options.
AUTOSTAR III MENU TREE AUTOSTAR III MENU TREE Menu Mode Scope Info Mode Sky Map Mode Select Item: Scope Info Select Item: Sky Map (FOV=xx) up/down zooms RA DEC AZ EL Date Local Time LST Battery Near LaT Lon Free Mem Ser. Version Select Item: Guided Tour Solar System Moon Mercury Venus Mars Jupiter Saturn Uranus Neptune Pluto Asteroids Comets Constellation Andromeda ...
When Guided Tours is selected, AutoStar III shows you a list of theme tours that will help you explore the night sky. These tours are pre programmed presentations of objects that are visible for the user’s particular location, time and date. The most popular tour is “Tonight’s Best” that guides the user to the best objects that are currently up in the night sky. This tour is the easiest way to get started exploring the cosmos with your new LS telescope.
• Select – To select a Landmark already in the database (see ADD below), choose the “Select” option and scroll through the list. Press “ENTER” to select a Landmark, then press “GO TO” and the telescope slews to the object. • Add – To add a Landmark, choose the “Add” option. Enter a name for the Landmark. Locate and center the Landmark in the eyepiece, then press “ENTER”. Event Menu The Event menu provides access to dates and times of astronomical events.
highly detailed color image. The setting after “Cont. Deep9” is Cust.Cont. (Custom Contrast). This setting allows you adjust the Contrast AND Brightness to create your own setting. Contrast is controlled using the LEFT/ RIGHT Arrow Keys. Brightness is controlled using the UP/DOWN Arrow Keys. NOTE: to fully utilize these the Custom Contrast setting you will need the use of an external monitor. Otherwise chose one of the thirteen pre-set Contrast curves.
Park Scope is designed for a telescope that has not moved between observing sessions. Align the telescope one time, then use this function to park the telescope. Next time it is powered up, no alignment is required. Pressing “ENTER” causes the telescope to move to its pre-determined Park position. Once parked, the screen prompts to turn off power. • Restore Defaults sets all the settings back to the factory original values. • Hi Precision Slews allows you to turn high precision slews on and off.
• Rev. N/S allows you to reverse the function of the up and down arrow keys. This can be handy when using diagonals. • Rev. E/W allows you to reverse the function of the left and right arrow keys. This can be handy when using diagonals. • Parking Place allows you to set a custom park position. This is convenient for permanently mounted scopes that will be restarted and parked after every use. • Custom Rate allows you to make minor adjustments to the telescopes tracking rate.
Two Star Alt Az Alignment e. “Automatic Alignment: Selecting Star” and “Slewing” display. When it is close to the alignment star “Center Brightest Star: Press “ENTER”” displays. When the telescope slews to the first star, it may not appear in the field of view in the eyepiece. Use the Red Dot Finder (Pg. 12, Fig. 2, 16) to locate the star. The alignment star will be easy to recognize — it will be the brightest star in the area of the sky where the telescope is pointing.
Landmarks One-Star Alignment requires some knowledge of the night sky. LS provides a library of bright stars. One-Star Alignment is identical to Two-Star Alt/Az: Alignment (see TWO-STAR ALT/AZ ALIGNMENT above), except only one star from the database is chosen by the observer for alignment. This menu option allows you to define and store terrestrial objects in the Landmark database. First, a landmark needs to be stored in memory using the “Landmark: Add” option.
9. “Landmark: Add” displays. If you wish to add more landmarks, repeat steps 5 through 7. To view a landmark in the database 1. Make sure the telescope is located and aligned exactly as when the desired landmark was entered into memory. 2. Display the “Landmark: Select” menu option. Press “ENTER”. 3. Use the Scroll keys to scroll through the list of objects you have previously entered. When the desired object displays, press “ENTER” to select the object.
The LS is an excellent high-resolution, terrestrial (land) telescopes. Viewing terrestrial objects requires looking along the Earth’s surface through heat waves. These heat waves often cause degradation of image quality. Lower power eyepieces, like the Super Plössl 26mm eyepiece, magnify these heat waves less than higher power eyepieces. Therefore, lower power eyepieces provide a steadier, higher quality image.
The LS is a precision optical instrument designed to yield a lifetime of rewarding viewing. Given the care and respect due any precision instrument, the LS will rarely, if ever, require factory servicing. Maintenance guidelines include: 1. Avoid cleaning the telescope’s optics: a little dust on the front surface of the telescope’s correcting lens causes virtually no degradation of image quality and should not be considered reason to clean the lens. 2.
Follow these optical system: steps for collimation of the 1. The only adjustments possible, or necessary, on the LS are from the three inner most screws Collimation Screws eyepiece field of view (Fig. 8, 2), in the same direction as the darker shadow is offset in the ring of light. 4. Turn the set screw that you found with the pointing exercise while looking in the eyepiece. You will notice that the star image will move across the field.
A Note About the “Flashlight Test”: If a flashlight or other high-intensity light source is pointed down the main telescope tube, the view (depending upon the observer’s line of sight and the angle of the light) may reveal what appears to be scratches, dark or bright spots, or just generally uneven coatings, giving the appearance of poor quality optics.
Your LS telescope comes with a “Mini SD Card” slot located in the front edge of the fork arm. With a user supplied “Mini SD Card”, or a “Micro SD Card” in a Mini Card Adapter, you can update your telescope firmware or save images made with the ECLIPS CCD. Only use SD Cards bearing the official SD logo. Each card must be properly formatted, using a PC utility or AutoStar Suite, before use in the LS. The card must be formatted with the FAT32 File System.
TRAINING THE DRIVE 11 Perform this procedure if you are experiencing any pointing accuracy problems. Fig. 9 depicts the complete Drive Training procedure. BACK Guided Tour NOTE: Use a terrestrial object, such as a telephone pole or lamp post, to train the drive. Calibrate Azmiuth Drive twice. 12 Press the scroll down key once Complete this exercise once every 3 to 6 months.
CREATING USER OBJECTS and TOURS User Object are catalogs of deep sky objects you can create or import that are not in the LS telescope. You can define your own objects and create your own titles. Tours, similar to the three preloaded guided tours (Tonight’s Best”, “A Star’s Life” and “How Far Is Far”), can also created. You can chose your own theme and objects.
BASIC ASTRONOMY In the early 17th century Italian Scientist Galileo, using a crude telescope considerably smaller than the LS, turned it to look towards the sky instead of distant trees and mountains. What he saw, and what he realized about what he saw, forever changed the way mankind thought of the universe.
Mars is about half the diameter of Earth, and appears through the telescope as a tiny reddish-orange disk. It may be possible to see a hint of white at one of the planet’s Polar ice caps. Approximately every two years, when Mars is closest to Earth in its orbit, additional detail and coloring on the planet’s surface may be visible. Jupiter is the largest planet in our solar system and is 11 times the diameter of Earth. The planet appears as a disk with dark lines stretching across the surface.
Model and Product Number 6"LS-6 ACF # 0610-03-10 Optical System Optical Design Advanced Coma-Free (ACF) Primary Mirror Diameter 6” (152mm) Primary Mirror Material Pyrex® Glass Focal Length, Focal Ratio 1524mm, f/10 Optical Coatings Ultra-High Transmission Coatings (UHTC™) Resolving Power (arc seconds) 0.76 SPECIFICATIONS SPECIFICATIONS Mount Mount Type Aluminum Single-Arm Fork Altazimuth Drives 4.
Model and Product Number 6" LS-6 SC # 0610-03-12 Optical System Optical Design Schmidt Cassegrain (SC) Primary Mirror Diameter 6” (152mm) Primary Mirror Material Pyrex® Glass Focal Length, Focal Ratio 1524mm, f/10 Optical Coatings Ultra-High Transmission Coatings (UHTC™) Resolving Power (arc seconds) 0.76 SPECIFICATIONS SPECIFICATIONS Mount Mount Type Aluminum Single-Arm Fork Altazimuth Drives 4.
Model and Product Number 8"LS-8 ACF # 0810-03-10 Optical System Optical Design Advanced Coma-Free (ACF) Primary Mirror Diameter 8” (203.2mm) Primary Mirror Material Pyrex® Glass Focal Length, Focal Ratio 2000mm, f/10 Optical Coatings Ultra-High Transmission Coatings (UHTC™) Resolving Power (arc seconds) 0.57 SPECIFICATIONS SPECIFICATIONS Mount Mount Type Aluminum Single-Arm Fork Altazimuth Drives 4.
Model and Product Number 8" LS-8 SC # 0810-03-12 Optical System Optical Design Schmidt Cassegrain (SC) Primary Mirror Diameter 8” (203.2mm) Primary Mirror Material Pyrex® Glass Focal Length, Focal Ratio 2000mm, f/10 Optical Coatings Ultra-High Transmission Coatings (UHTC™) Resolving Power (arc seconds) 0.57 SPECIFICATIONS SPECIFICATIONS Mount Mount Type Aluminum Single-Arm Fork Altazimuth Drives 4.
FEDERAL COMMUNICATIONS COMMISSION DECLARATION OF CONFORMITY (DoC) DOC: FCC APPENDIX E: FOR THE FOLLOWING EQUIPMENT: PRODUCT NAME : MEADE LS SERIES TELESCOPE MODEL NO : ETX-LS TRADE NAME : MEADE INSTRUMENTS CORP. IS HERE WITH CONFIRMED AND FOUND TO COMPLY WITH THE REQUIREMENTS OF CFR47 PART 15 REGULATION. THE RESULTS OF ELECTROMAGNETIC EMISSION EVALUATION ARE SHOWN IN THE REPORT NO.: MEADE-0811106, ISSUED ON DECEMBER 10, 2008. THIS DEVICE COMPLIES WITH PART 15 OF THE FCC RULES.
(EU Countries only) Correct Disposal of this Product RECYCLING RECYCLING INFORMATION (Waste Electrical & Electronic Equipment) This marking shown on the product or its literature indicates that it must not be disposed of in unsorted municipal waste at the end of its working life To prevent possible harm to the environment or human health from uncontrolled waste disposal, please separate this from other types of wastes and recycle it as required by law.
MEADE LIMITED WARRANTY Every Meade telescope, spotting scope, and telescope accessory is warranted by Meade Instruments Corporation (“Meade”) to be free of defects in materials and workmanship for a period of ONE YEAR from the date of original purchase in the U.S.A. and Canada. Meade will repair or replace a product, or part thereof, found by Meade to be defective, provided the defective part is returned to Meade, freight-prepaid, with proof of purchase.