Instruction Manual Meade 60EQ-A: 2.4" (60mm) Equatorial Refracting Telescope Meade Instruments Corporation 6001 OAK CANYON, IRVINE, CALIFORNIA 92618-5200 U.S.A. (949) 451-1450 ■ www.meade.
–2– WARNING: NEVER USE A MEADE 60MM REFRACTOR TELESCOPE TO LOOK AT THE SUN! LOOKING AT OR NEAR THE SUN WILL CAUSE INSTANT AND IRREVERSIBLE DAMAGE TO YOUR EYE. EYE DAMAGE IS OFTEN PAINLESS, SO THERE IS NO WARNING TO THE OBSERVER THAT DAMAGE HAS OCCURRED UNTIL IT IS TOO LATE. DO NOT POINT THE TELESCOPE OR ITS VIEWFINDER AT OR NEAR THE SUN. DO NOT LOOK THROUGH THE TELESCOPE OR ITS VIEWFINDER AS IT IS MOVING. CHILDREN SHOULD ALWAYS HAVE ADULT SUPERVISION WHILE OBSERVING.
–3– TABLE OF CONTENTS Standard Equipment . . . . . . . . . . . . . . . . . . . . . . . . . . . . . . . . . . . . . . . . . . . . . 5 Introduction . . . . . . . . . . . . . . . . . . . . . . . . . . . . . . . . . . . . . . . . . . . . . . . . . . . . 6 Unpacking and Assembly . . . . . . . . . . . . . . . . . . . . . . . . . . . . . . . . . . . . . . . . . 6 Aligning the Viewfinder . . . . . . . . . . . . . . . . . . . . . . . . . . . . . . . . . . . . . . . . . . . 7 Balancing the Telescope . . . . . . . .
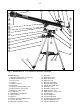
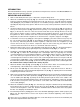
–4– 2) 1( 1* 1& 1^ 1% 1$ 1# 2! 2@ 2# 2$ 2% 2^ 2& 2* 2( 3) 3! 3# 3@ 1@ 1! 1) j i h g b c d ef Fig. 1: Meade 60EQ-A 2.4" Equatorial Refracting Telescope Features in Fig. 1: 1. Adjustable sliding inner leg extension 2. Sliding leg extension lock 3. Accessory tray 4. Leg brace 5. Leg brace support 6. Tripod legs 7. Tripod-to-mount attachment point 8. Right ascension control cable 9. Declination control cable 10. Focuser knob 11. Diagonal mirror thumbscrew 12. Diagonal mirror 13. Eyepiece 14.
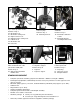
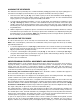
–5– 3( 1* 3^ 4) 2$ 2% 2^ 3$ 3% Fig. 2: Close up of the mount. Features in Fig. 2: 24. 25. 26. 34. 35. 39. 40. Declination lock Declination setting circle Right ascension lock Right Ascension setting circle Latitude circle Declination axis Polar axis 1^ 3& Fig. 3: Attaching the accessory tray. Fig. 4: Attaching the viewfinder. Feature in Fig. 3: Features in Fig. 4: 36. Mounting bolt hole 16. Viewfinder collimation screws 37. Viewfinder bracket mounting thumbscrews e 4! 3* f 3* g 4@ Fig.
–6– INTRODUCTION This manual details the set-up, operation, specifications and optional accessories of the Meade 60EQ-A 2.4" (60mm) Equatorial Refracting Telescope. UNPACKING AND ASSEMBLY 1. Remove and identify the telescope’s components, using the listing above. 2. Attach the 3 aluminum tripod legs (6, Fig. 1) to the base of the altazimuth mount (7, Fig. 1) with the 3 leg braces supports (5, Fig. 1) facing inward. Three bolts each about 2.5"" long, with washers and wing nuts (42, Fig.
–7– ALIGNING THE VIEWFINDER The wide field of view provided by the 5 x 24mm viewfinder (17, Fig. 1) permits easy object sighting prior to observation in the higher-power main telescope. To align the viewfinder, follow this procedure: 1. First remove the dust cap (21, Fig. 1, not visible in photo) from the dew shield/lens shade (22, Fig. 1). Then using the lowest power (25mm) eyepiece, point the main telescope at some well defined land target (e.g. the top of a telephone pole) at least 200 yards distant. 2.
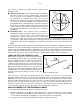
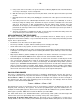
–8– (also known as “M57”) by its Right Ascension (18hr) and its Declination (+33°). ■ North Celestial Pole (Vicinity of Polaris) +90° Déc. ation clin De Star Right Ascension (R.A.): This celestial version of longitude is measured in units of hours (hr), minutes (min), and seconds Celestial Equator (sec) on a 24-hour "clock" (similar to how Earth's time zones are determined by longitude lines).
–9– 3. Determine the latitude of your observing location by checking a road map or atlas. Release the latitude lock (33, Fig. 1) and tilt the telescope mount so that the star “Polaris” is centered in the telescope’s viewfinder eyepiece, then re-tighten the latitude lock. 4. If steps (1) - (3) above were performed with reasonable accuracy, your telescope is now sufficiently wellaligned to the North Celestial Pole for visual observations.
– 10 – a. Using a star chart or star atlas, look up the celestial coordinates (Right Ascension and Declination) of an easy to find object, such as a bright star. b. With the telescope polar aligned as previously described, center the object in the telescope’s field of view. c. Manually turn the R.A. setting circle (27, Fig. 1) to read the R.A. of the object now in the telescopic field. d. The setting circles are now calibrated (the Declination circle is factory pre-calibrated).
– 11 – seen well at a given power. The most often useful higher magnification with any 60mm diameter telescope is in the range of 80 to 120 power. The general rule to follow with any telescope, regarding power: Only use as much magnification as supports a steady, well-defined image. This often varies with the stability of the air being viewed through and is one reason why having various eyepieces is highly desirable. Higher powers are no guaranty of better images; in fact, the opposite is often true.