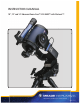
INSTRUCTION MANUAL 10",, 12" and 14" Advanced Coma-Free™ f/8 LX600™ with StarLock™
® The name “Meade,” “AutoStar,”“StarLock” and the Meade logo are trademarks registered with the U.S. Patent and Trademark Office and in principal countries throughout the world. Deep Sky Imager,” “LX600,” and “Tonight’s Best” are trademarks of Meade Instruments Corp. Protected by U.S. Patent: US 6,392,799 and other Patents Pending. © 2013 Meade Instruments Corp.
WARNING! Never use a Meade® LX600 Telescope to look at the Sun! Looking at or near the Sun will cause instant and irreversible damage to your eye. Eye damage is often painless, so there is no warning to the observer that damage has occurred until it is too late. Do not point the telescope at or near the Sun. Do not look through the telescope or Finder Scope as it is moving. Children should always have adult supervision while observing.
CONTENTS Introduction The LX600 Telescope . . . . . . . . . . . . . . . . . . . . . . . . . . . 5 Quick Start . . . . . . . . . . . . . . . . . . . . . . . . . . . . . . . . . . . . . . 6 LX600 Features . . . . . . . . . . . . . . . . . . . . . . . . . . . . . . . . . 10 AutoStar II Features . . . . . . . . . . . . . . . . . . . . . . . . . . . . . 14 Getting Started Parts Listing . . . . . . . . . . . . . . . . . . . . . . . . . . . . . . . . . 17 How To Assemble Your Telescope . . . . . . . . . . . . . .
The LX600 Telescope Advanced Technology for the Astro Imager and Visual Observer Congratulations on receiving your new LX600 telescope. You’ll find that this telescope system has all you need to explore the Universe we live in. Drawing on over 40 years of experience and innovation, Meade Instruments introduces the latest in a long line of advanced astronomical products: the LX600.
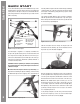
AutoStar #497Quick HANDBOX Start QUICK START It is recommended that you attach the LX600 ACF telescope to the supplied tripod for observing. Perform the telescope and AutoStar II setup indoors in the light so that you become familiar with the parts and operation before moving the telescope outside into the dark for observing. B C D I vertically, with the tripod feet down and with the tripod still fully collapsed.
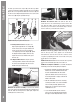
Qucik Start On/Off switch HBX port Lock knobs Figure E. Loosen the leg lock knobs, extend the lower portion of the leg and tighten the knobs (turn to a firm fit). To collapse the tripod (after removing the telescope), rotate the spreader bar 60° from its assembled position, so that one spreader bar arm is located between each adjacent pair of tripod legs. At the base of the tripod is a three-vane extension strut system, with a circular hub at its center (Fig. A, 7). Grasp the tripod head (Fig.
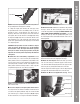
AutoStar #497Quick HANDBOX Start the dust cap from the rear cell port (A) of the telescope (Note: Telescope not shown for clarity). Thread the microfocuser adapter (B) into the rear cell port thread. Slide the microfocuser (C) over the microfocuser adapter and tighten the three hex screws on the microfocuser (K) using the provided hex keys. 훿 훾 훽 I Attach the StarLock cable. The StarLock cable has a small connector on one end and a larger connector on the other end.
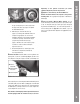
Depending on the optional accessories you attach, additional weights may need to be purchased. C 1# Tighten, to a firm feel only, the RA and DEC locks. 1$ Press the Power Switch on the computer control panel to the ON position. The copyright message lights on AutoStar II’s LCD display. RA lock DEC C lock Figure J. The RA and DEC locks. the top of a telephone pole or street sign. Center the object in the telescope eyepiece. Re-tighten the RA and DEC clutches. 4.
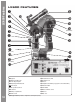
AutoStar LX600 #497 HANDBOX Features LX600 FEATURES B C D E F G H I J 1) 1! 1@ 3! 3( 2$ 1( 1* 1& 1^ (Not shown) 1$ 1# (Not shown) hown)) (Not shown) 훽 훿 훾 B Eyepiece C Eyepiece thumbscrew D 1.
2) 2! 2@ 2% 3^ LX600 Features 2( 3) 2# 2^ 2& 2* 3& 1% 3( 3% 1( Optical tube (see page 10) 2) DEC setting circle 2! Viewfinder collimation screws 2@ 8 x 50 viewfinder 2# GPS receiver 2$ Tube adapters (see page 10) 2% Counterweight(s) 2^ Counterweight hex screw 2& Counterweight rail 3* 2* AutoStar II handbox 2( StarLock assembly 3) StarLock dovetail bracket 3! StarLock retaining bolts (see page 10) 3@ Threaded rod 3# Spreader bar 3$ T-handle tension knob 3% X-Wedge (see Appendix F) 3^ Fork Arm Jumper
AutoStar LX600 #497 HANDBOX Features LX600 FEATURES The Meade LX600 ACF models are extremely versatile, highperformance telescopes for imaging and visual use. With pushbutton controls, precision GPS alignment, true-level and North electronic sensors, StarLock automatic guiding and ultraprecise pointing, automatic tracking of celestial objects, and a library of 145,000+ objects in the AutoStar II database, the LX600 ACF models offer unmatched state-of-the-art performance.
H. Auxillary Autoguider Port: If you wish to use an add-on autoguider in place of the integrated StarLock, plug the autoguider cable into this port. See the instruction sheet that came with your autoguider for more information. the telescope eyepiece. 2# GPS Receiver: Receives information transmitted from Global Positioning System satellites. See page 24 for more information.
AutoStar #497IIHANDBOX AutoStar Features AUTOSTAR II FEATURES 1! Library Number of Objects New General Catalog (NGC) ........................ 7,840 Index Catalog (IC)........................................5,386 B Messier Catalog (M)........................................110 Caldwell Catalog ............................................ 109 C D F E Named Objects ..............................................227 Herschel Catalog ...........................................
an option in a menu. The ENTER key is similar to the RETURN or ENTER key on a computer. See NAVIGATING AUTOSTAR II, page 30 and AutoStar II Menu Tree, page 29. d MODE Key: Press to return to the previous menu or data level. The top menu level is “Select Item”. The MODE key is similar to the ESCAPE key on a computer. Additionally, use the Arrow keys to to move the cursor across the display: Use the Right or Left Arrow key (Fig. 2, 5) to move the cursor from one number to the next in the display.
AutoStar #497IIHANDBOX AutoStar Features the directions that scroll on the second line. When satisfied with the Help provided, press MODE to return to the original screen and continue with the chosen procedure. Tip: When an astronomical term appears in [brackets], press ENTER for a definition or more detailed information. Press MODE to return to the scrolling AutoStar II Help display.
Parts Listing replace the covers.) 3. Plug in the AutoStar II handbox: Be certain that the power switch on the computer control panel (Fig. 1, 13A) is in the OFF position. Plug the coil cord of the AutoStar II handbox into the HBX port (Fig. 1, 13F). Getting the telescope ready for first light requires only a few minutes.
AutoStar #497 HANDBOX Getting Started handbox into the holder: Slide one side of the handbox into the holder and then firmly press the other side of the handbox into the holder until it snaps in place. Adjust the tilt of of the holder by loosening the lock knob and then moving the holder clamp to the desired angle. Retighten the lock knob. GPS receiver Collimation screws Viewfinder eyepiece 9. Mounting and Adjusting the Viewfinder.
11. Attach the DEC jumper cable. LX600 features split fork arms. In order to make electric connection between the two portions you must install the jumper cables on the left and right sides. . Choosing an Eyepiece A telescope’s eyepiece magnifies the image formed by the telescope’s main optics. Each eyepiece has a focal length, expressed in millimeters, or “mm”. The smaller the focal length, the higher the magnification.
AutoStar #497 Observing HANDBOX OBSERVIING Observing Using AutoStar II’s Arrow Keys Number Key 2= 2x = 2 x sidereal (0.5 arc-min/sec or 0.008°/sec) Number Key 3= 8x = 8 x sidereal (2 arc-min/sec or 0.033°/sec) 2. Verify that AutoStar II is properly connected to your telescope. See Quick Start, page 6. Number Key 4= 16x = 16 x sidereal (4 arc-min/sec or 0.067°/sec) 3. Flip the telescope power switch to the ON position. Number Key 5= 64x = 64 x sidereal (16 arc-min/sec or 0.
The AutoStar II database is organized in levels for quick and easy navigation. ■ Press ENTER (Pg. 10, Fig. 2, 2) to go deeper into AutoStar II’s menu levels. ■ Press MODE (Fig. 2, 3) to move back toward the top menu level. ■ Press the Scroll keys (Fig. 2, 7) to move up and down through the options available for each level. ■ Press the Arrow keys (Fig. 2, 5) to enter characters and digits. The Arrow keys are also used to move the telescope. ■ Use the Number keys (Fig. 2, 6) to enter digits.
AutoStar #497 Observing HANDBOX Note: Press any key to abort the GPS fix. You will then be prompted to enter the time, date and location. Important Note: It is recommended that you do not attempt a GPS fix indoors. It is also recommended that you CALIBRATE SENSORS the first time your telescope takes a GPS fix. See page 33 for more information. e. Once the level, tilt and North are detected, the telescope will “Go To” two alignment stars.
One-star Polar Alignment Setup the telescope facing true North with the tripod level. Use the altitude adjustment knob on the X-Wedge to set your latitude. Make sure the telescope is set to Polar mode in the Autostar Setup/Telescope/Mount Menu (See page 32). Turn on the power to the telescope and when the AutoStar II handbox displays "Press 0 to Align, Mode for Menu", press "0". The AutoStar II will ask you to place the telescope in the polar home position.
AutoStar #497 Observing HANDBOX Calibrate Home The Global Positioning System The Global Positioning System (GPS) is comprised of 24 satellites orbiting the Earth that are constantly transmitting their precise position and time. The system provides highly accurate, worldwide positioning and navigation information for any number of applications. GPS receivers on the Earth acquire signals from three to twelve satellites to determine the precise latitude, longitude, and time of the receiver.
• Turn StarLock guiding on and off. Enable and disable StarLock High Precision Pointing • Monitor StarLock corrections • Set Different Guide Speeds Key to StarLock Indicator Lamps On the back surface of the StarLock assembly, between the two (2) receptacles is a single red LED indicator lamp. Below is a guide showing what the lamp blink patterns are indicating: • No illumination: StarLock is turned off, does not have power or is idle awaiting commands.
AutoStar #497IIHANDBOX AutoStar Handbox 26 Press ENTER to display information about the object. Press GO TO to move the telescope to the object. 5. Press MODE to return to the Tour list. Press the Scroll keys to scroll through the list. Press ENTER when you find the next object you wish to observe. 6. Press and hold down MODE for two seconds to leave the Guided Tour menu. Other Guided Tours are available, such as “How Far is Far” and “A Star’s Life”.
1! B Two-line LCD display C ENTER key B D MODE key E GO TO key F Arrow keys G Number keys C D F E G I h J 1! AutoStar II Operation AUTOSTAR II OPERATION H Scroll keys I ? key J Coil cord port 1) Coil cord 1! Utility light Figure 7: The AutoStar II handbox through the options in the opposite order. Note that this capability is a quick way to get to an option that is near the bottom of the list. The following example demonstrates this capability.
AutoStar #497II HANDBOX AutoStar Operation Some options are choices that select the next menu level down. The Scroll keys move up and down within the list of available options, showing one option at a time. Tip: When multiple choices are available within a menu option, the current option is usually displayed first and highlighted by a right pointing arrow (>). When the desired option is displayed on the second line, press the ENTER key to choose that option and move down one menu level.
Solar System Mercury Etc. Moon Asteroids Comets Constellations Andromeda Etc. Deep Sky Named Object Galaxies Nebulae Planetary Neb. Etc. Star Named Hipparcos Catalog SAO Catalog Etc. Satellite Select Add Delete Edit User Objects Select Add Delete Edit Landmarks Select Add Delete Identify Browse Start Search Edit Parameters Select Item: Object Moon Overview Landing Sites Apollo 11 Etc. Craters Abbot Etc. Mountains Mons Bradley Etc. Mare, Lakes Lacus Aestatis Etc. Valley, Rills Rima Agatharchid Etc.
AutoStar #497II HANDBOX AutoStar Operation 9. Press the Up or Down Arrow key. Notice that a letter of the alphabet displays. Continue to press one of the Arrow keys until the first letter of your name displays. 10. Use the Right Arrow key to move to the next position so you can choose the second letter of your name. Continue to use the Arrow keys to enter your full name. 11. Press ENTER when you are finished. Your name is now entered into AutoStar II’s memory. 12.
showers, such as the Perseids, the Leonids, etc. Also lists the dates of the showers and when they reach maximum. Identify: An exciting feature for an observer who wants to scan the night sky and start exploring. After the telescope has been properly aligned, use the Autostar II Arrow keys to move about in the sky. Then follow this procedure: Note: Meteors are fast moving objects that cover large areas of the sky and are usually best observed with the naked eye.
AutoStar #497II HANDBOX AutoStar Operation Utilities Menu The Utilities menu provides access to several extra features within Autostar II, including a countdown timer and an alarm. The Utilities functions include: • Suggest: Autostar II calculates and suggests the best eyepiece for viewing, based on the telescope and the object being viewed. Brightest Star: Gives you a choice of Autostar displaying “CTR Bright Star” or identifying the star by name during alignment.
• Park Position: After aligning your telescope, select this menu and power down the telescope. The alignment settings—North, time, alignment stars—are stored in Autostar II’s memory and are remembered after you power off the telescope. When you power on the telescope, “Automatic Alignment” displays after the start up routine. Press MODE (do not press ENTER). The telescope remembers its alignment and you can continue viewing or performing other operations without aligning the telescope again.
AutoStar #497II HANDBOX AutoStar Operation select N & S, North only, South only, and off. • Reverse L/R: Reverses the functions of the Left and Right Arrow keys for controlling the telescope’s motion (i.e., the Right key moves the telescope to the left). • Reverse U/D: Reverses the functions of the Up and Down Arrow keys for controlling the telescope’s motion (i.e., the Up key moves the telescope down).
Your telescope receives the precise time when it syncs with the GPS. Precise time is important in aligning your telescope so that it can accurately locate celestial objects. AutoStar II receives time data in the Universal Time format. However, if you wish to display the correct time in your local time zone, use the Daylight Saving menu (see above) to turn the Daylight Saving option on or off.
AutoStar #497II HANDBOX AutoStar Operation Important Note: If your download fails in the middle of the download attempt (e.g., your PC crashes), turn off the telescope. Turn the telescope back on and as soon the AutoStar II display lights up, press “999”. Then attempt the download again. Statistics: Provides basic statistical data about Autostar II, including: • Characters Free: Displays how much room is available in user-defined object memory.
Before trying out the examples in this section, familiarize yourself with the basic operations of AutoStar II described earlier in this manual. The following examples assume that you have a basic knowledge of AutoStar II and understand how to scroll to a desired menu or menu option, and how to enter numbers and text. It also assumes that you have initialized and aligned your telescope.
AutoStar #497IIHANDBOX Advanced AutoStar Features Alaska Hawaii -9 Hours -10 Hours. 10. After entering the shift, press ENTER. “Edit Time Zone” displays. 11. Press MODE. “Site: Edit” displays. 12. Using the Arrow keys, scroll to “Site: Select”. The site you have just edited displays. Press ENTER to select the site. Creating User Objects In this procedure, you will enter coordinates of celestial objects that do not appear in any of the AutoStar II libraries.
2. Use the Scroll keys to scroll through the list of satellites. 3. Select a satellite from the list and press ENTER. 4. “Calculating...” and then “Tracking...” displays. If the satellite is going to make a pass, “Located” displays. 5. Use the Scroll keys to display data about the pass: aos — acquisition of signal and los — loss of signal. If you subtract the aos from the los, you can calculate how long the satellite will be visible. Location information also displays. 6.
AutoStar #497IIHANDBOX Advanced AutoStar Features 5. Press the Scroll Up key twice and “Object: Landmarks” displays. Press ENTER. “Landmark: Select” displays. 6. Press the Scroll Down key once. “Landmark: Add” displays. Press ENTER. 7. “Landmark Name” displays. Using Arrow keys, enter a name for the landmark you wish to add to the database. When finished, press ENTER. 8. “Center Landmark. Press Enter” displays.
3 2' “This Globular Cluster is 10,000 light years away...” Browse This menu allows you to search the libraries for objects with certain parameters, much like a search engine. “Edit Parameters” lets you set various parameters for the search, and “Start Search” activates the search. A typical search might be performed as follows: 1. Select “Browse” from the Object menu. Press ENTER. “Browse: Start Search” displays. 2. Press one of the Scroll Keys and “Browse: Edit Parameters” displays. Press Enter. 3.
AutoStar #497IIHANDBOX Advanced AutoStar Features move the telescope until the star is visible and centered in the eyepiece. Press ENTER. Repeat the procedure for the second alignment star. Note: See WHICH ONE’S THE ALIGNMENT STAR, page 23, for some important tips concerning alignments stars and using your viewfinder. When the procedure is performed correctly, “Alignment Successful” displays. If AutoStar does not display this message, perform this procedure again.
The LX600 with StarLock is specially equipped to perform an Automatic Drift Alignment. In the Autostar Setup menu, select “Drift Align” and the LX600 will guide you through a quick Automatic drift alignment procedure. This method is substantially quicker than the manual drift alignment method. During the Automatic Drift Alignment Procedure, LX600 will slew to a Southern star and Starlock will begin monitoring the stars’ drift on its CCD chip.
AutoStar #497 HANDBOX Optional Accessories OPTIONAL ACCESSORIES A wide assortment of professional Meade accessories is available for the LX600 telescope models. The premium quality of these accessories is well-suited to the quality of the instrument itself. To find out more information about these and other exciting Meade accessories visit Meade’s website at www.meade.com.
Optional Accessories using StarLock’s narrow-field camera. Wide-field photos of the Milky Way showing remarkable detail and clarity can be taken. Dew Shields: In moist climates, water particles suspended in the atmosphere may condense on the front surface of the telescope’s correcting plate. This dew formation may be inhibited to a significant extent by the addition of a dew shield, essentially an extension tube attaching to the front-cell of the telescope. #905 Variable Polarizer (1.
AutoStar #497 HANDBOX Maintenance MAINTENANCE LX600 ACF telescopes are precision optical instruments designed to yield a lifetime of rewarding applications. Given the care and respect due any precision instrument, your LX600 ACF will rarely, if ever, require factory servicing. Maintenance guidelines include a.
Caution: Do not force the three collimation screws past their normal travel and do not loosen them more than two full turns in a counterclockwise direction or the secondary mirror may come loose from its support. You will find that the adjustments are very sensitive, usually requiring only one-half turn or less to produce the desired result. b.
AutoStar #497 HANDBOX Maintenance the appearance of poor quality optics. These effects are only seen when a high intensity light is transmitted through lenses or reflected off the mirrors, and can be seen on any high quality optical system, including giant research telescopes. Meade Customer Service The optical quality of a telescope cannot be judged by the “flashlight test;" the true test of optical quality can only be conducted through careful star testing.
AutoStar II System Specifications Processors ...................................................................10 processors arranged in a Distributed Intelligent Network Architecture to facilitate parallel task management (U.S. Patent 6,304,376) Flash Memory .............................................................3.5MB, reloadable Database ......................................................................145,000 objects AutoStar II Handbox Specifications Keypad ...................................
AutoStar #497 HANDBOX Specifi cations 12" f/8 LX600 ACF Specifications Optical design ..............................................................Advanced Coma-Free Clear aperture ..............................................................305mm (12") Focal length .................................................................2438mm Focal ratio (photographic speed) ................................f/8 Resolving power ..........................................................0.38 arc sec Coatings .....
Appendix A APPENDIX A: TRAINING THE DRIVE Train the telescope motors using AutoStar II. Perform this procedure if you are experiencing any pointing accuracy problems. Fig. 18 depicts the complete Drive Training procedure. Note: Use a terrestrial object, such as a telephone pole or lamp post, to train the drive. Complete this exercise once every 3 to 6 months to maintain the highest level of telescope pointing accuracy. • Fig. 18. Training the drive procedure.
AutoStar #497Appendix HANDBOX B APPENDIX B: STARLOCK UTILITY The StarLock Utility program provides the ability to: • Install Firmware Updates • Monitor StarLock Tracking Performance Meade is constantly working to improve the performance of the product and it is common for new features or performance improvements in the software to be developed. Use the StarLock Utility to update your Starlock firmware.
Appendix B Updating The Utility program also has the ability to load new firmware into the StarLock. The firmware release code must first be downloaded from Meade’s website. It should be put in an easily located directory such as your desktop. The file will be named “StarLock_Vxy.Ldr”. To update the firmware, establish a serial connection with the StarLock by getting images to download by pressing the FOCUS button.
AutoStar #497Appendix HANDBOX C and Set Dec Rate to 33%. Exit the StarLock menu by pressing MODE. Wait for the StarLock light to come on continuously to indicate that it has locked up on the star. At this point, simply go the hand box menus and select Setup/Telescope/RA PEC/ Train and press ENTER. The StarLock will lock onto the current star and watch it for one worm revolution, about 6.4 minutes, and calibrate your drive’s PEC. For even better PEC training, add one or more cycle’s worth of data.
With the removal of eight (8) boltss the OTA is easily separated from the telescope. This detachable OTA is a departure from the original design LX200 series design that preceded your LX600. This feature facilities easier assembly as the telescope can be broken down into two, easier to lift units. This feature is most useful when assembling the larger 12”/14” models and when mounting the LX600 onto the X-Wedge. cables.
AutoStar #497Appendix HANDBOX D Rotate fork arms so that the RA lock points upward will be pointing upward to easily accept the hanger screw as it slips down. If you have not already done so, lock the DEC axis. Orient the OTA so that when you lift it the “hanger” screw will be positioned so that OTA will hang from it when you place it and slide the OTA fork arm plates on the base’s fork arm plates. Once you have placed the OTA on the base you can begin to thread on the eight (8) screws.
Equatorial Alignment In equatorial (or “polar”) alignment, the telescope is oriented so that the horizontal and vertical axes of the telescope are lined up with the celestial coordinate system. Important Note: The “Telescope: Mount”option of the Setup menu is set to “Alt-az” as the default mount by the factory.
AutoStar #497Appendix HANDBOXE Setting Circles Setting circles included with the LX600 ACF models permit the location of faint celestial objects not easily found by direct visual observation. The RA circle (Pg. 10, Fig. 1, 11 and Fig. 20) is located on the top surface of the telescope’s drive base. The Declination circle (Fig. 21) is located at the top of the fork tine. With the telescope pointed at the North Celestial Pole, the DEC circle should read 90° (understood to mean +90°).
Appendix E are acceptable. Do not allow undue attention to precise polar alignment of the telescope to interfere with your basic enjoyment of the instrument. Fig. 23. Locating Polaris Polaris is simple. Most people recognize the “Big Dipper”. The Big Dipper has two stars that point the way to Polaris (Fig. 23). Once Polaris is found, it is a straightforward procedure to obtain a rough polar alignment. Fig. 22. Optional X-Wedge for equatorial mode.
AutoStar #497Appendix HANDBOXE field. On the left fork arm, loosen the large smooth knob centered in the setting circle. With the knob loose rotate the setting circle until it aligns with 89.2 degrees with the pointer. While holding it in place, tighten the large smooth knob. so that center tick mark on fork arm base (Fig. 24, A) aligns with the tick mark on the base (Fig. 24, B). Lock the RA. e. Press ENTER. The telescope slews to Polaris.
Two-Star Polar Alignment Polar Two-Star Alignment requires some knowledge of the night sky. AutoStar II provides a library of bright stars and two stars from this library are chosen by the observer for alignment. First, choose “Polar” from the “Setup: Telescope: Mount” menu. The rest of the procedure is almost identical to the (Alt-az) Two Star Alt-az Alignment, page 42, except the telescope will be placed into the Polar home position before beginning the night sky alignment.
AutoStar #497Appendix HANDBOXF APPENDIX F: X-WEDGE INSTALLATION The Meade X-Wedge is designed for use with the Meade Giant Field Tripod. B Hex wrenches (3) C Center mounting F 5/16" hex bolt (1) and washer (1) B C 1! 1) screws (3) and washers (3) E 3/8" hex screws (3) and washers (3) D Threaded rod cap (1) and threaded rod sleeve insert (1) G Tangent arm (1) and connecting 8-32 hex screws (2) J D E F G I H Figure A. Hardware kit for the X-Wedge.
Appendix F Azimuth thrust bar pin Figure E. The azimuth thrust bar pin positioned in the tangent arm. 3. Place the wedge on the tripod head, sliding the azimuth thrust bar pin into the tangent arm slot (Fig. E). Figure G. X-Wedge with threaded rod cap and 5/16" hex screws secured. 65°, unthread the lock screw with the supplied hex key wrench and move the screw to the optional mounting hole. 4. Push the tripod threaded rod (Fig.
AutoStar #497Appendix HANDBOXF base. The desired hole is located at the curved end of the telescope drive base (see Fig. I). Be sure to leave approx, 3/4" of the screw exposed to allow for clearance of the wedge tilt plate. tighten all three 3/8" hex screws at this time. Do not overtighten. 2. Grasp the two fork arms of the telescope firmly, with the control panel toward the floor, place the telescope onto the wedge tilt plate (Fig.
NOTE: East Magnetic Declination means Magnetic North is to the right (East) of the True North position and West Magnetic Declination means Magnetic North is left (West) of the True North position. For example, Fig. N shows the correct setting for 13.5° East Declination which covers Irvine, CA. The compass scale markings range from 0 to 360 degrees azimuth so for East Magnetic Declinations add the East Magnetic Declination value from 0 to obtain the correct reference mark on the compass face. b.
AutoStar #497Appendix HANDBOXF Figure O. Magnetic declination map of North America.
Latitude Chart for Major Cities of the World To aid in the polar alignment procedure (see page 57), latitudes of major cities around the world are listed below. To determine the latitude of an observing site not listed on the chart, locate the city closest to your site.
Assembly Appendix H APPENDIX H: MANUAL DRIFT ALIGNMENT How to manually Drift Align the LX600 Telescope (Northern Hemisphere). The LX600 with StarLock is specially equipped to perform an Automatic Drift Alignment. In the Autostar Setup/Align menu, select “Drift Alignment” and the LX600 will guide you through a quick Automatic drift alignment procedure. This method is substantially quicker than the manual drift alignment method.
The Moon option of the Object menu allows you to observe the moon in a way never possible before. You will be able locate many specific features of the lunar surface, including hundreds of craters, mare, valleys, and mountains. One special feature allows you to view all six Apollo landing sites.
AutoStar #497Appendix HANDBOXJ APPENDIX J: ADVANCED COMA-FREE OPTICS (2) (2) Ray (2) Ray (1) (2) (1) Focal Plane Secondary Mirror Secondary Baffle Primary Baffle Tube Field Stops Primary Mirror Unlike Schmidt-Cassegrain systems, Meade’s Advanced ComaFree (ACF) optical system provides razor-sharp pin-point star images all the way to the very edge of the field of view. This aplanatic (coma-free) optical system brings the highest level of performance to the amateur astronomer.
(EU Countries only) Correct Disposal of this Product (Waste Electrical & Electronic Equipment) This marking shown on the product or its literature indicates that it must not be disposed of in unsorted municipal waste at the end of its working life To prevent possible harm to the environment or human health from uncontrolled waste disposal, please separate this from other types of wastes and recycle it as required by law.
MEADE LIMITED WARRANTY Every Meade telescope, spotting scope, and telescope accessory is warranted by Meade Instruments Corp. (“Meade”) to be free of defects in materials and workmanship for a period of ONE YEAR from the date of original purchase in the U.S.A. and Canada. Meade will repair or replace a product, or part thereof, found by Meade to be defective, provided the defective part is returned to Meade, freightprepaid, with proof of purchase.