
Operating instructions

I. Introduction
Meade CaptureView is an 8 x 30mm full-featured binocular integrated with a
digital camera that requires no film to take pictures. For best results, please
follow these written operating instructions to capture and download
pictures.
1. Fully functional binoculars.
2. Take pictures and view them on your PC.
3. Transfer pictures to your PC for easy printing, editing, enhancing,
and manipulating.
4. E-mail pictures to your friends and family.
5. LCD display panel indicates capture status for ease in selecting and
performing desired operations.
Important Note:
Failure to remove batteries will result in lost pictures and dead batteries after
several days of CaptureView storage. The batteries will drain even after down-
loading pictures and deleting them from CaptureView's memory. Please re-
move the batteries when not using the camera.
II. How to Use Y our Binocular
To enhance your viewing enjoyment, please take a moment to familiarize
yourself with your new binocular:
Adjustment of Eye Relief for Eyeglass W earers
For best results when viewing an object while wearing eyeglasses, fold down the
rubber eyecups and place them against your glasses.
Adjusting the Eyepieces
The distance between your eyes is usually different than the distance between
another person’s eyes. This distance is known as the interpupillary distance, or
IPD. Adjustment to your IPD is important to the proper use of your CaptureView:
1. Hold CaptureView up to your face in the normal viewing position, using
both hands to hold each barrel firmly.
2. Pull the barrels apart or push the barrels together until you see a single
circular field with both of your eyes. ( Fig. 2 )
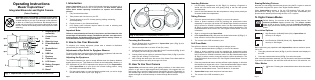
Operating Instructions
Meade
®
CaptureV iew
TM
Integrated B inocular a nd D igital C amera
(Patent Pending)
1. Diopter Knob (on
underside)
2. Center Focus
Knob
3. Objective L ens
4. Power/Mode But-
ton
5. Shutter/Select
Button
6. USB Port
7. Eyepiece
8. Camera Lens
9. LCD Screen
10. Battery Compart-
ment Lid
1 1 . Barrel
Page 1
W ARNING! Never u se a Meade
®
b inocular to l ook a t the
Sun! Looking at or near the Sun will cause instant and irre-
versible damage to your eye. Eye damage is often painless,
so there is no warning to the observer that damage has oc-
curred until it is too late. Do not point the binocular at or near
the Sun. Children should always have adult supervision while
observing.
Fig. 1: CaptureView Integrated Digital Camera and Binocular.
Page 2
Focusing the Binocular
1. Set the Diopter Knob on underside of CaptureView (see 1, F ig. 1) at its
center point between + and -.
2. Choose an object that is at least 16 feet (5m.) away.
3. Looking with just your left eye, rotate the Center Focus Knob (2,
Fig. 1) until
the object you are viewing is in best focus.
4. Looking with just your right eye, rotate the Diopter Knob (1, Fig. 1) until the
object you are viewing is in best focus.
5. Now, looking with both eyes, with a turn of the Center Focus Knob both far
and near objects can easily be brought into focus.
III. How T o Use Y our Camera
CaptureView performs best under good lighting conditions. It also takes some
practice to get used to high-magnification photography. We suggest that you
take some time to practice capturing and downloading pictures. Depending on
the available light and your distance from the object, captured images may not
appear as bright or centered exactly as viewed through the binoculars.
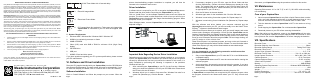
Fig. 2: Adjustment of Interpupillary Distance (IPD).
Inserting Batteries
1. Lift the battery compartment lid ( 10, Fig. 1 ) by inserting a fingernail or
similar tool into the lid latch, and gently pulling to the rear and upward
simultaneously.
2. Insert 2 AAA-size batteries into the compartment, noting correct polarity as
illustrated inside the compartment.
T aking Pictures
1. Press the power/mode button (4, Fig. 1) to turn on the camera.
2. Select a picture resolution mode by pressing the power/mode button
repeatedly to reveal the VHI screen for 640x480 high resolution mode and
the LO screen for 320x240 resolution mode. Use the shutter/select button
( 5, Fig. 1) to select a mode; a beep will sound to confirm the selection. The
mode selected will show on the LCD. See “Digital Camera Modes” for more
information.
3. Sight on a target through CaptureView.
4. Hold CaptureView
steady and press the shutter/select button (5, Fig. 1). A
beep sounds to confirm that a picture was taken.
5. The counter in the LCD increases by one.
Self-T imer Mode
The self-timer allows a 10 second delay before taking a picture.
1. Press the power/mode button (4,
Fig. 1) to turn on the camera.
2. Select a picture resolution mode by pressing the power/mode button
repeatedly to reveal the VHI screen for 640x480 high resolution mode and
the LO screen for 320x240 resolution mode. Use the shutter/select button
(
5,
Fig. 1) to select a mode; a beep will sound to confirm the selection. The
mode selected will show on the LCD. See “Digital Camera Modes” for more
information.
3. Press the power/mode button until the self-timer option displays. It will show
the resolution you chose and a clock. Press the shutter/select button to select
the self-timer mode. The clock and resolution now show on the LCD.
4. Press the shutter/select button. The LCD blinks for 10 seconds.
5. CaptureView beeps when the picture has been taken.
6. The counter in the LCD increases by one.
Page 3 Page 4
Erasing/Deleting Pictures
Note that you can always erase the last picture using the E0 1 option or erase all
the pictures using the EAL option. See “Digital Camera Modes.”
When CaptureView’s memory is full, the LCD displays FULL and you are
prevented from taking any more pictures until you have downloaded your
pictures and/or erased pictures using the EAL or E0 1 options.
IV . Digital Camera Modes
Default Setting. You must be at this screen to take pictures. Your
selected resolution displays (bottom left). The picture counter
starts at 000 as shown. Please note that the battery l ife i ndicator
(lower right) shows black shading top and bottom when receiving full
power.
Resolution Options
1. High Resolution (640x480) Mode (VHI). CaptureView will
store up to 45 images.
2. Low Resolution (320x240) Mode (LO). CaptureView will
store up to 100 images.
Before performing any operations with CaptureView, select a resolution option,
VHI or LO:
1. Press the power/mode button (4,
Fig. 1) until the desired mode displays in
the LCD.
2. Press the shutter/select button (5,
Fig. 1) to select the mode.
After a resolution has been selected, you may choose the self-timer mode. Note:
If you are in VHI resolution, the self-timer mode will also be in VHI resolution, etc.
Other Modes
1. Off screen. Pressing the shutter/select button shuts the camera
off.
Page 5