PROFESSIONAL WEATHER STATION TE827W USER MANUAL 1
Table of Contents 3 4 5 5 5 6 8 9 9 10 11 13 13 13 15 15 17 18 18 19 19 20 21 21 23 24 24 25 Introduction Standard Package Contents Installation Before you begin Thermo-Hygrometer Sensor Rain Gauge Anemometer (wind sensor) Main Unit Battery installation Buttons and Controls Navigating through the modes Customizing your Weather Station Using Different Weather Modes Pressure and Weather Forecast Mode Clock and Alarm Mode Manual Settings Temperature and Humidity Mode Rain Mode Wind Mode Maintenance Troublesho
INTRODUCTION Thank you for selecting a Meade Instruments Semi-professional weather station! This compact and easy-to-use product features a wide variety of time and weather data, such as precise atomic time, perpetual calendar, air temperature, relative humidity, barometric pressure, wind speed and direction, rainfall, and etc.
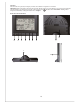
STANDARD PACKAGE CONTENTS Components Picture Main Unit AC/DC 7.
INSTALLATION The Meade Instruments Semi-professional weather station (TE827NLW) operates at 433MHz radio frequency, so no wire installation is required between the main unit (receiver) and the remote weather sensors (transmitters). The remote weather sensors include a thermo-hygrometer (temperature and humidity) sensor, anemometer (wind sensor) and a rain gauge (rain sensor).
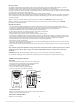
C. RESET Resets all readings D. CHANNEL SWITCH Selects the desired transmission channel from 1 to 3 E. WALL-MOUNT RECESSED OPENING Attaches the remote sensor to the wall Note: Install the batteries and select the channel before mounting the sensor. Battery installation • Remove the screws from the battery compartment with a small Phillips screwdriver. • Set the channel 1 through 3. The switch is located in the battery compartment. Channel 1 is typically selected if only one remote sensor is being used.
G D H E I F D. Funnel-shaped top with battery compartment Contains battery compartment and rainfall counting electronics E. Battery compartment Holds two AA-size batteries F. Screws Secure battery compartment cover G. Built-in leveler Allows leveling rain gauge on uneven surfaces H. Bucket see-saw mechanism Collects the rainfall in one of its containers and self-empties once full I.
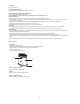
ANEMOMETER (WIND SENSOR) FEATURES • Wind speed and wind direction measurement • Remote wind speed and wind direction data transmission to the main unit via 433 MHz signal • Operating range 100 feet (30 meters) • Wall or pole mount A B D C A. WIND VANE Measures wind direction B. WIND CUPS Measures wind speed C. ANEMOMETER BASE • Holds battery compartment • Allows mounting the anemometer vertically D. ANEMOMETER ARM Keeps anemometer assembly together E G F H E.
Battery installation • Remove four (4) screws from the battery compartment with a small Phillips screwdriver. • Open the battery compartment and install 2 “AA” size alkaline batteries (not included) matching the polarities shown. • Replace the battery compartment door and secure the screws. Aligning • Point the wind direction vane to the North (use a compass or map if necessary). • Press “SET” opening located inside battery compartment with a paper clip or similar tool.
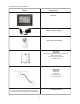
Operation Once the main unit is powered, the display will show all available LCD segments for a moment. IMPORTANT: All of the display functions will be locked, allowing setting your local altitude or sea level pressure parameters. The locked display will show the pressure and weather forecast icon and abbreviation “hPa/ mBar” flashing, indoor temperature and humidity readings and default time “12:00pm”.
A. UP ? - Mode Selection: selects the next available mode counter-clockwise - When programming: increases parameters B. DOWN ? - Mode Selection: selects the next available mode clockwise - When programming: decreases parameters C. SET - Rotates display for current mode - Press and hold: to enter the programming mode - Locks in: set parameters D. CHANNEL - Manually selects the channel # for receiving temperature and humidity sensor data - Enables the temperature and humidity channel auto-scan mode E.
Clock and Alarms Window Displays: • US Atomic Time clock with time and calendar • Single alarm, weekday alarm and ice warning alarm (pre-alarm) Temperature and Humidity Window Temperature & Humidity are automatic features and requires no adjustments. IN or internal sensors reside within the main unit. Readings for CH1, Ch2 or Ch3 are provided by external sensor transmitters.
Wind Window Displays: • Wind Chill temperature • Temperature at anemometer • Wind direction • Wind speed • Wind gust speed • Alert for wind speed and wind gust speed (User Adjustable setting) • Remote anemometer battery status CUSTOMIZING YOUR WEATHER STATION It is required to program: • The pressure parameters during Initial Setup (See Pressure and Weather Forecast Mode P.15) • The time, the date and the weekday language (Clock and Alarm Mode: P.17) Optional: • The time alarms (Clock and Alarm Mode: P.
Changing the Sea Level Pressure and Altitude Unit • Press SET until the local pressure with the word “SEA LEVEL” is displayed. • Press and hold MEMORY until the pressure unit is flashing. • Set the sea level pressure units by pressing the UP? or DOWN ? buttons to adjust the pressure value. • Press MEMORY to confirm your selection. • Press SET button until the local altitude value will be displayed • Press and hold MEMORY until the altitude unit is flashing.
Note: The weather forecast accuracy is approximately 70%. Display shows forecasted, not current conditions. The SUNNY icon indicates clear weather, even when displayed during the night-time. Understanding the Moon Phase Diagram FULL LAST NEW FIRST CLOCK AND ALARM MODE Manual Settings The main unit can be manually set to display the time, calendar or UTC time. There are three time alarms available on the main unit: Weekday alarm (W), Single alarm (S) and Ice Warning Alarm (Pre-Al).
Programming Time Alarms • In the Clock and Alarm Mode, press the ALARM/CHART selecting the desired alarm. • Press and hold ALARM/CHART button until the hour digit will flash • Set the alarm hour using the UP ? or DOWN. Press and hold either button for quick digit advance. • Press ALARM/CHART to confirm selection. • Set the alarm minutes using UP? or DOWN. Press and hold either button for quick digit advance. • Press ALARM/CHART to confirm selection.
TEMPERATURE AND HUMIDITY MODE The weather station supports up to 3 remote thermo-hygrometers corresponding to a separate channel of the temperature and relative humidity display. The temperature can be displayed in Celsius (ºC) or Fahrenheit (ºF). The main unit carries the temperature and humidity sensor and uses this indoors data to calculate an indoors comfort level - Wet, Comfort or Dry. A temperature alert function is available for each channel.
All Remote Sensor Signals Search Activation The main unit can be manually activated to search for the signals from all remote sensors. Press and hold DOWN button to enable the search. RAIN MODE The main unit records the total amount of the rainfall for the last hour, 24 hours, past day, past week and the past month. The rainfall can be displayed in mm or inches. There is a daily rainfall alert that can be programmed in the unit if the daily rainfall exceeds a pre-programmed limit.
Enabling or Disabling the Wind Alerts In the Wind Mode press the ALARM/CHART to recall a current wind speed, a wind speed alert with the “ALARM HI” displayed or gust alert with the “GUST ALARM HI” displayed. If the alert is disabled, “OFF” will be displayed; otherwise the alert value is shown. When a wind alert is displayed, press the UP ? or DOWN ? to activate or deactivate it. Wind Alerts programming • In the Wind Mode, press ALARM/CHART to select the desired alarm.
PRECAUTIONS This product is engineered to give you years of satisfactory service if handled carefully. Here are a few precautions: • Do not immerse the units in water. • Do not clean the units with abrasive or corrosive materials. They may scratch the plastic parts and corrode the electronic circuits. • Do not subject the product to excessive force, shock, dust, temperature, or humidity, which may result in malfunctions, shorter lifespan, damaged batteries, and damaged parts.
Appendix - City Codes City codes are used for presetting setting Latitude and Longitude. These codes affect time zones and DST settings. US and Canadian Cities City Code Atlanta, Ga. Austin, Tex. Baltimore, Md. Birmingham, Ala. Boston, Mass. Calgary, Alba., Can. Chicago, IL Cincinnati, Ohio Cleveland, Ohio Columbus, Ohio Dallas, Tex. Denver, Colo. Detroit, Mich. El Paso, Tex. Houston, Tex. Indianapolis, Ind. Jacksonville, Fla. Las Vegas, Nev. Los Angeles, Calif. Seattle, Wash. St. Louis, Mo. Tampa, Fla.
City Code Kinshasa, Congo Kuala Lumpur, Malaysia La Paz, Bolivia Lima, Peru Lisbon, Portugal Liverpool, England London, England Lyon, France Madrid, Spain Manila, Philippines Marseille, France Melbourne, Australia Mexico City, Mexico Milan, Italy Montevideo, Uruguay Moscow, Russia FIH KUL LPB LIM LIS LPL LON LYO MAD MNL MRS MEL MEX MIL MVD MOW Zone Offset 1 8 -4 -5 0 0 0 1 1 8 1 10 -6 1 -3 3 DST Munich, Germany Nairobi, Kenya Nanjing (Nanking), China Naples, Italy New Delhi, India Odessa, Ukraine Osak
Specifications Radio Frequency: 433 MHz RF Reception range: 100-328 feet (30 -100 m) Barometric Pressure Measuring Range: 14.75 inHg to 32.44 inHg (500 Hpa to 1100Hpa); (374.5 mmHg to 823.8 mmHg) Resolution: 0.003 inHg (0.1 Hpa, 0.08 mmHg) Accuracy: 0.015 inHg (5 Hpa; 0.38 mmHg) Sampling interval: 20 minutes Altitude Compensation Range: -657 ft to 16404 ft (-200m to +5000 m) Temperature (Indoor) Operating Range: 14.2°F to 140°F (-9.9°C to 60°C) Resolution: 0.2°F (0.
Weight (without batteries) Main unit: 8.15oz (231g) Remote Thermo-Hygrometer: 2.29oz (65g) Remote Anemometer: 11.12oz (315g) Remote Rain gauge: 10.24oz (290g) Dimensions Main unit: 7.31 (L) x 5.39 (H) x 1.26 (D) inches / 185.8 (L) x 136.9 (H) x 32 (D) mm Remote Thermo - Hygrometer: 2.37 (L) x 4 (H) x 1 (D) inches / 60 (L) x 101 (H) x 25 (D) mm Remote Anemometer: 19.16 (L) x 19.16 (H) x 15.35 (D) inches / 486.6 (L) x 486.6 (H) x 390 (D)mm Remote Rain gauge: 6.49 (L) x 6.89 (H) x 4.
STANDARD WARRANTY INFORMATION This product is warranted by Meade Instruments Corp. (MIC) to be free of defects in materials and workmanship for a period of ONE YEAR from date of original retail purchase in the U.S.A. MIC will repair or replace the product, or part thereof, found upon inspection by MIC to be defective, provided the defective part or product is returned to MIC, freight prepaid, with proof of purchase. This warranty applies to the original purchaser only and is non-transferable.
Meade Instruments Corp. 27 Hubble Irvine, CA 92618 U.S.A. ©2011 Meade Instruments Corp. All Rights Reserved. All user manual contents and information are subject to change.