Instruction Manual LX70 Series German Equatorial Telescopes 1
WARNING! Never use a Meade® LX70™ Telescope to look at the Sun! Looking at or near the Sun will cause instant and irreversible damage to your eye. Eye damage is often painless, so there is no warning to the observer that damage has occurred until it is too late. Do not point the telescope at or near the Sun. Children should always have adult supervision while observing. ® The name “Meade” and the Meade logo are trademarks registered with the U.S.
Table of Contents LX70 Key Features. . . . . . . . . . . . . . . . . . . . . . . . . . . . . . . . . . . . . . . . . . . . . . . . . . . . . . . . . . . . . . . . . . . . . . . . . .4 Getting Started . . . . . . . . . . . . . . . . . . . . . . . . . . . . . . . . . . . . . . . . . . . . . . . . . . . . . . . . . . . . . . . . . . . . . . . . . . . . .7 Unpacking and Assembly. . . . . . . . . . . . . . . . . . . . . . . . . . . . . . . . . . . . . . . . . . . . . . . . . . . . . . . . . . . . . . . . . . . .
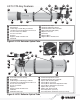
LX70 Mount Key Features 24 18 17 20 23 21 22 5 6 Mount Close-up 14 19 13 24 16 9 7 8 10 15 6 5 11 17 4 12 DEC Axis 3 2 RA Axis RA & DEC Axes 1 LX70 Telescope 1 2 3 4 5 6 7 8 9 10 11 12 Tripod Leg Lock Knob Tripod Spreader Lock Knob Tripod Spreader Mount Locking Knob and Shaft Azimuth Adjustment Knob Latitude Adjustment Knob North Tripod Leg Latitude Scale Counterweight Shaft Counterweight Shaft Safety Nut Counterweight Counterweight Locking Knob 13 14 15 16 17 18 19 20 21 22 23 24 F
34 LX70 OTA Key Features 25 27 37 28 34 35 33 31 36 32 40 38 39 25 26 27 28 29 30 31 32 33 26 29 30 Front Dust Cover (not shown) Dovetail Rail Cradle Ring & Cradle Ring Lock Knobs 1/4-20 Accessory Mounting Screw with Lock Focuser and Focuser Wheel Focuser Lock Knob Eyepiece Eyepiece Holder Thumbscrews Viewfinder 34 35 36 37 38 39 40 41 41 Viewfinder Dust Caps Viewfinder Adjustment Screws Viewfinder Bracket with Lock Knob Optical Tube Assembly (OTA) Objective Lens Cell Dewshield Diagonal Mi
LX70 OTA Key Features 34 33 35 37 31 25 36 29 41 32 40 41 26 25 26 29 31 32 33 34 Front Dust Cover (not shown) Dovetail Rail Focuser Knob (not shown) Eyepiece Eyepiece Holder Thumbscrews Viewfinder Viewfinder Dust Caps 49 Viewfinder Adjustment Screws Viewfinder Bracket with Lock Knob Optical Tube Assembly (OTA) Diagonal Mirror Diagonal Mirror Thumbscrews Extension Tube 35 36 37 40 41 49 Figure 4: LX70 Maksutov Optical Tube 6
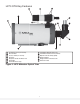
Getting Started shaft with the flat side facing up. Loosely thread on the Tripod Spreader Lock Knob and washer The Meade LX70 series models are versatile, high-resolution telescopes. They offer unmatched mechanical and optical performance that reveal nature in an ever-expanding level of detail. Observe the feather structure of an eagle from 50 yards or study the rings of the planet Saturn from a distance of 800 million miles.
5. Attach the counterweight shaft: Locate the counterweight shaft (Fig. 1, #9) and thread down the Locking Nut (Fig. 1, #13) until it stops. Next, thread the counterweight shaft into the threaded hole on the front side of the mount, When the pointer points at your latitude, tighten both screws until they make contact with the mount. At your observing site, set up the telescope assembly so that the tripod leg below the counterweight shaft, labeled “N”, (FIG.
terweight lock knob so the pin is not obstructing the hole. Unscrew the safety cap (Fig. 1, #10) from the shaft. Holding the counterweight firmly in one hand, slip the counterweight to approximately the midpoint of the counterweight shaft. Tighten the counterweight lock knob(Fig. 1, #12) to a firm feel. Replace the safety cap. Note: If the counterweight ever slips, the safety cap prevents the counterweight from sliding entirely off the shaft.
when you have finished observing. Back off the 4, #31) into the diagonal mirror. Tighten the eyeeyepiece thumbscrews (Fig 3, #32) and insert piece holder thumbscrews(Fig. 4, #32) to a firm the supplied eyepiece( Fig 3. #31) into the eye- feel to secure the eyepiece. piece holder. Tighten the holder thumbscrews to a firm feel to secure the eyepiece. Balancing the Telescope Note: Some models require an extension tube In order for the telescope to be stable on the (if included) be used to reach focus.
1. Firmly hold the counterweight shaft secure so it cannot swing freely. Loosen the R.A. lock(Fig. 1, #17). The optical tube now moves freely about the R.A. axis. Rotate the telescope so that the counterweight shaft (Fig. 1, #9) is parallel (horizontal) to the ground(see Fig. #26). the wide-field viewfinder, then look into the eyepiece of the main telescope for a detailed view. To align the viewfinder, perform steps 1 through 7 during the daytime; perform step 8 at night. Focus Lock ring 2.
outlined above. With this alignment performed, objects first located in the wide-field viewfinder will also appear in the telescope’s eyepiece. ditions cannot reasonably support. Keep in mind that a smaller, but bright and well-resolved image is far superior to one that is larger, but dim and poorly resolved. Choosing an Eyepiece Powers above 400X should be employed only under the steadiest atmospheric conditions.
en the R.A. and Dec. locks. Tracking Objects Once centered, an object can be focused by turning one of the knobs of the focusing mechanism. Notice that when observing astronomical objects, the field of view begins to slowly drift across the eyepiece field. This motion is caused by the rotation of the Earth on its axis. Objects appear to move through the field more rapidly at higher powers. See TRACKING OBJECTS for detailed information on how you can counteract the drift in the field of view.
Locating the Celestial Pole In the northern Hemisphere, find the North Star Polaris by facing North. To get basic bearings at an observing location, take note of where the Sun rises (East) and sets (West) each day. After the site is dark, face North by pointing your left shoulder toward where the Sun set. To precisely point at the pole, find the North Star (Polaris) by using the Big Dipper as a guide (See figure below). In the southern Hemisphere, you align the mount to the southern celestial pole.
Maintenance Inspecting the Optics General Maintenance A Note about the Flashlight Test: If a flashlight or other high-intensity light source is pointed down the main telescope tube, the view (depending upon the observer’s line of sight and the angle of the light) may reveal what appears to be scratches, dark or bright spots, or just generally uneven coatings, giving the appearance of poor quality optics.
ly unthreaded to the point where the secondary mirror-holder (Fig. 35, #3) can rotate about its axis parallel to the main tube. Grasp the secondary mirror-holder (avoid touching the mirror surface!) with your hand and rotate it until, looking through the drawtube, you can see the primary mirror centered as well as possible in the reflection of the secondary mirror. With the rotation of the secondary mirror-holder at this best-possible position, thread in the three secondary collimation screws (Fig.
4 2 1 5 3 6 Figure 34 Newtonian Reflector (section view) 2 3 2 1 3 2 Figure 35 Figure 36 1 2 2 4 3 5 1 Figure 37 Figure 38 1 1 2 4 2 3 3 Figure 39 Figure 40 17
OPTIONAL ACCESSORIES A wide assortment of professional Meade accessories is available for the LX70 Series telescope models. The premium quality of these accessories is well-suited to the quality of the instrument itself. Consult the Meade Website (www.meade.com) for complete details on these and other accessories. #905 Variable Polarizer (1.25”): The #905 system includes 2 Polarizer filters mounted in a specially-machined cell, for glare-reduction in observing the Moon.
APPENDIX A: Celestial Coordinates A celestial coordinate system was created that maps an imaginary sphere surrounding the Earth upon which all stars appear to be placed. This mapping system is similar to the system of latitude and longitude on Earth surface maps. In mapping the surface of the Earth, lines of longitude are drawn between the North and South Poles and lines of latitude are drawn in an EastWest direction, parallel to the Earth’s equator.
APPENDIX B: Setting Circles the objects DEC coordinate is aligned with the 0 registration mark. If the procedure has been followed carefully, the bright star should now be in the center of the telescope eyepiece and setting circles showing the bright star coordinates. To use the setting circles to locate an object not easily found by direct visual observation: Insert a low-power eyepiece, such as a 26mm, into the focuser assembly.
APPENDIX C: Latitude Chart Latitude Chart for Major Cities of the World To aid in the polar alignment procedure, latitudes of major cities around the world are listed below. To determine the latitude of an observing site not listed on the chart, locate the city closest to your site or locate your site on the internet. Then follow the procedure below: Northern hemisphere observers (N): If the site is over 70 miles (110 km) north of the listed city, add one degree for every 70 miles.
served during its crescent or half phase when Sunlight strikes the Moon’s surface at an angle. It casts shadows and adds a sense of depth to the view. No shadows are seen during a full Moon, causing the overly bright Moon to appear flat and rather uninteresting through the telescope. Be sure to use a neutral Moon filter when observing the Moon. Not only does it protect your eyes from the bright glare of the Moon, but it also helps enhance contrast, providing a more dramatic image.
coloring on the planet’s surface may be visible. Jupiter is the largest planet in our solar system and is eleven times the diameter of Earth. The planet appears as a disk with dark lines stretching across the surface. These lines are cloud bands in the atmosphere. Four of Jupiter’s moons (Io, Europa, Ganymede, and Calisto) can be seen as “star-like” points of light when using even the lowest magnification.
Meade Customer Service If you have a question concerning your LX70-Series telescope, contact the Meade Instruments Customer Service Department at: Telephone: (800) 626-3233. Customer Service hours are 7:00 AM to 5:00 PM, Pacific Time, Monday through Friday.
OBSERVATION LOG 25
OBSERVATION LOG 26
OBSERVATION LOG 27
© 2014 Meade Instruments Corp. reserves the right to change product specifications or to discontinue products without notice.