
Instruction Manual


AutoStar #497 HANDBOX
X-Wedge Instruction Manual
3
end of the telescope drive base (see Fig. I). Be
sure to leave approx, 3/4" of the screw exposed
to allow for clearance of the wedge tilt plate.
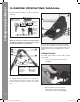
2. Grasp the two fork arms of the telescope firmly,
with the control panel toward the floor, place the
telescope onto the wedge tilt plate (Fig. A, 1) by
sliding the mounting screw on the telescope base
into the slot at the top tilt plate (Fig. J).
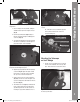
3. Insert the center mounting bolt (Fig. K) through
the center of the underside of the tilt plate and
into the underside of the drive base. Firmly
tighten the bolt. Do not overtighten.
Note: It is important to insert the center mounting bolt into the
wedge-telescope assembly. The center mounting bolt insures the
precise pointing accuracy of the X-Wedge.
4. Insert the two remaining 3/8" hex screws
through the underside of the tilt plate (Fig. L)
and into the underside of the drive base. Firmly
tighten all three 3/8" hex screws at this time. Do
Figure J. The telescope drive base placed on the
X-Wedge tilt plate.
not overtighten.
The telescope is now fully mounted onto the wedge and field
tripod. Adjustments in wedge latitude angle and/or azimuth
orientation may be made with the telescope in place.
Setting the Observing Latitude
Look up the latitude of the desired observing site (most road
maps show latitude lines). Then, loosen the latitude lock screws
(Fig. C, 3) and rotate the fine latitude control knob (Fig. C, 9)
while reading the latitude scale (Fig. C, 5). The latitude pointer
is a vernier scale (Fig. C, 4) which will allow the tilt angle to be
set to within 0.25°. When the tilt plate is aligned with the desired
latitude, tighten the latitude locking screws.
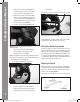
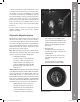
Aligning on Polaris
Begin aligning the telescope by locating Polaris. Finding Polaris
is simple. Most people recognize the “Big Dipper. The Big Dipper
has two stars that point the way. Polaris is the last star in the
“handle” of the Little Dipper (Fig. M).
Once you have located Polaris in the sky, orient your telescope
Figure K. Attaching the center mounting bolt.
Figure L. Use the provided hex wrench to secure the three 3/8"
hex screws into the telescope drive base.
Fig. M. Locating Polaris
55-12003_07028_XWedge_InstructionManual.indd 3 8/8/2012 11:07:52 AM