
Instruction Manual


4
X-Wedge Instruction Manual
so that the control panel faces north (towards Polaris). You may
need to pick-up and rotate the telescope on its tripod to achieve
this orientation. The telescope and X-Wedge are now pointing
very near to the celestial north. Loosen the DEC lock, rotate the
OTA so that it is 90 degrees to the base (pointing towards Polaris)
and then relock the DEC. If you were to have performed this
maneuver perfectly, you would be able to see Polaris through the
finder scope (make sure that you aligned the finderscope to the
OTA). If you cannot, rotate the entire telescope/tripod assembly
until you can.
You are now ready to perform one of the AutoStar equatorial
alignment procedures. Consult your telescope’s instruction
manual for exact details.
Aligning the Magnetic Compass
With the aid of the magnetic compass, a telescope can be polar
aligned in locations where the view of Polaris is obstructed or
even before the skies get dark. The compass face has an angular
scale from 0 to 360 degrees which will be useful in adjusting for
the local angle of Magnetic Declination—the difference between
Magnetic North (which the compass shows) and true north
(where the telescope should be pointed).
Note: Magnetic Declination should not be confused with the
astronomical term “Declination” which, when used with “Right
Ascension,” describes the celestial coordinate system.
1. Setting Magnetic Declination:
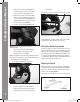
a. In order to obtain an accurate reading using
the compass, you first need to determine the
Magnetic Declination of the observing area by
referring to the Magnetic Declination Map (Fig
O). Locate this value on the compass face for
future reference.
NOTE: East Magnetic Declination means True North is to the right
of the Magnetic North position and West Magnetic Declination
means True North is left of the Magnetic North position. For
example, Fig. O shows the correct setting for 13.5° East
Declination which covers Irvine, CA. The compass scale markings
range from 0 to 360 degrees azimuth so for East Magnetic
Declinations subtract the East Magnetic Declination value from
360 to obtain the correct reference mark on the compass face.
b. While holding the compass, rotate it so the
red compass arrow points in the direction of
Magnetic North. The arrow should be directly
over the "N" marking on the compass face.
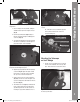
c. Now place the compass onto the flat base
of the X-Wedge as shown in Fig N. Verify the
compass is still pointing toward Magnetic North
and the bubble level is properly centered. If the
bubble is not centered, adjust the tripod legs
until centered.
2. Finding True North:
The magnetic compass is now ready for use.
Follow these simple steps for a quick and easy
azimuth alignment.
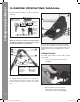
a. Slightly loosen the three 5/16" hex screws
in the wedge floor to allow for rotation of the
X-Wedge.
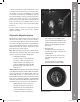
b. Using the Azimuth Control Knob (Fig C,
6), manually adjust the X-wedge around the
Figure O. Compass bearing adjusted for Irvine, CA's
magnetic declination.
Figure N. Compass level placed on the X-Wedge.
55-12003_07028_XWedge_InstructionManual.indd 4 8/8/2012 11:07:52 AM