
User manual


GC220 Instruction Manual
1
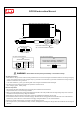
PINNO.
1,4
2,3
DCoutputconnector(standard)
R7B(standard)
AD1(optional)
R7B
(KYCONKPP-4Sorequivalent)
OUTPUT
+V
-V
2
3
1
1
2
4
3
4
WARNING: Pleasemakesurethepolarityofthebatteryisconnectedcorrectly!
DCoutputconnector(optional)
[housing: Anderson1327FP(red),1327G6FP(black)
contacts: Anderson261G2(45A)orequivalent]
AD1
Red(+V) Black(-V)
R7B: UL246416AWGx4C1000 50mm
AD1:SJT/SJTW14AWGx2C1000 50mm
:
1.Makesurethechargerisshutoffandchoosingsuitablewirestoconnectthechargerandbatteriesbasedontheratingofcharging
current. Thepolaritymustbecorrect:chargeroutput(+)shouldbeconnectedtothe(+)terminalofbatteriesandchargeroutput(-)
shouldbeconnectedtothe(-)terminal.
Innotimesshouldthe(+)and(-)beshorttogetherorthechargerandbatterieswillbedamaged.
2.Connectthe ACinputandcheckwhethertheoperationofLEDiscorrect.
(red:charging;green:batteryisfull)
AssemblyProcedure
1.Thechargershouldbeassembledintheplacewithgoodventilationandlowmoisture.
Exposuretotherainorsnowisstrictlyprohibited.
2.Wiresconnectingbetweenthechargerandbatteriesshouldbeasshortaspossiblesincethehighvoltagedroponthewireswill
increasethetimerequiredto fullychargethebatteries.
3.Makesurethechargingvoltageandchargingcurrentaresuitableforthebatteriesyouareusing.
4.Ifthebatteriesneedtoconnectinseriesforcharging,oldbatteriesarenotsuggestedtobeusedwithnewonesorthelifetimeof
batteriesmayreducebecauseoftheunbalancechargingvoltagedistributiononnewandoldbatteries.
5.Pleaseturnoffthechargerbeforeconnectingordisconnectingthewires.
6.Thechargerhasa2-yearworldwidewarranty,however,damagesfrommisusingthechargerwillnotbeincludedinthecoverageof
warranty.
NotesOnOperation:
POWERLED
ACFG
-Vconnectedto ACFG