
User manual


Page6
TV OUTPUT SETTINGS
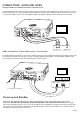
Connect the Mede8er to your TV by one of the connection options as shown on page 4 and change the
input option on your TV to match the option you selected. If you do not get to see the Mede8er GUI on your
TV you will need to toggle the Mede8er TV output until you get a picture.
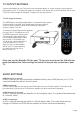
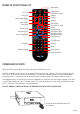
TV SYS Toggle Procedure
The MED250X has two video output options ie Composite Video (yellow)
RCA connectors and HDMI. Each output option also offers different
screen resolution settings and these will need to be adjusted to
match the type of TV used.
To change the Video Output on the Mede8er
just press the TV SYS button or the TV
SYSTEM button on the remote and it
will change the Video Output to the
next available output option. If after
pressing the TV SYS button you
still do not get a picture then after a
short pause press the TV SYS
again until you see the Mede8er
GUI on your TV. Keep repeating
this procedure until you see a
picture on your TV.
AUDIO SETTINGS
HDMI Downmix (2 channel)
Use this setting if you are connecting the Mede8er directly to the HDMI input on your TV. The
sound will be downmixed to 2 channel stereo.
HDMI Passthrough
Use this setting if you are connecting to the HDMI input of a Home Theatre Amplifier. The audio will be
passed through as Bitstream or LPCM and the amplifier will do the multichannel decoding.
SPDIF Downmix (2 channel)
Use this setting to connect to a Amplifier via Toslink optical cable. The sound will be downmixed
to 2 channel stereo.
SPDIF Passthrough
Use this setting to connect to amplifier via Toslink optical cable. The sound will be passed
through as Bitstream or LPCM and the amplifier will do the multichannel decoding.
Once you see the Mede8er GUI on your TV then you must enter the Video Setup
mode and adjust the Video settings to match the screen size resolution of your
TV.