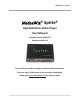
MedeaWiz® Sprite® . MedeaWiz® Sprite® High Definition Video Player User Manual Firmware version 20200115 Manual version 3.00 Parts of this manual do not apply to earlier versions of firmware. Find your Sprite’s FW version in the on-screen Setup Menu. Please go to www.MedeaWiz.com for other versions.
MedeaWiz® Sprite® . Table of Contents Introduction .................................................................................................................................................. 2 What’s in the box .......................................................................................................................................... 3 Sprite® Quick Start Guide..............................................................................................................................
MedeaWiz® Sprite® . Introduction The MedeaWiz® Sprite® is a High Definition digital video repeater capable of HD 1080p HDMI output. It has a direct trigger input and a 2-way communications serial port. The Sprite® will play a video or audio file in a circular loop, repeating when power is applied. It will play a different video or audio file on a trigger input or serial command, and then return to the looping file. The Sprite® has no black space when looping or changing files.
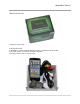
MedeaWiz® Sprite® . What’s in the box The Sprite® comes with 1) IR remote control 2) AC adaptor, universal 100 to 240 Volt AC input, regulated 5 Volt DC output 3) AV cable, 3.5mm 4 pole to RCA red, white and yellow 4) I/O plug, 3.
MedeaWiz® Sprite® . Sprite® Quick Start Guide The MedeaWiz® Sprite® ships with the Video Output set to HDMI at 720p and the Control Mode set to “Trigger Low No Interrupt” to use a pushbutton trigger. Most users can simply connect their HDMI monitor and install their SD memory card, with files named in the same way as the earlier model MedeaWiz players. Example 1: You have one file that you need to run in a loop when power is turned on: Name the file 000.
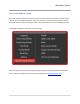
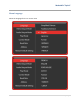
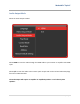
MedeaWiz® Sprite® . On-Screen Menu for Setup Press the “Setup” button on the remote control to enter the on-screen menu. Use the orange “Arrow” keys to navigate, the green “Enter” key to make a selection, and the yellow “Return” key to go back one level. Pressing the “Return” key twice will exit the menu and begin file play. The Top Menu page will show your current settings Note the above menu picture is showing the factory default settings for firmware 20200115.
MedeaWiz® Sprite® .
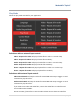
MedeaWiz® Sprite® . Video Output Mode Select the video output needed to match your monitor. Select NTSC to use the Composite video output from the 3.5 mm yellow AV jack using the yellow RCA plug from the included AV cable. Select PAL for Composite video output from the 3.5 mm yellow AV jack for some areas other than the Americas that use PAL video files and monitors. The HDMI selections will route the video to the HDMI connector only.
MedeaWiz® Sprite® . Audio Output Mode Select the audio output needed. Select HDMI to route the audio through the HDMI cable to your monitor or amplifier with HDMI input. Select A/V to route the audio to the 3.5mm 4 pole AV jack and use the red and white RCA plugs from the included AV cable. The audio output will require an amplifier or amplified speakers. It can’t directly drive speakers.
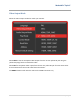
MedeaWiz® Sprite® . Play Mode Select the play mode needed for your application Selections with no external input control: Video – Repeat all in order will play all video files in order in a circular loop. Video – Repeat all random will play all video files randomly. Audio – Repeat all in order will play all audio files in order in a circular loop. Audio – Repeat all random will play all audio files randomly. Photo – Repeat all in order will play all photo files in order in a circular loop.
MedeaWiz® Sprite® . Control Mode Select the external Control Mode for your application Serial Control is to use a Hydra® input expander or external show control device or micro controller like a PIC, Atmel, Arduino, Raspberry Pi, or etc. using serial communications. To use a pushbutton or other single trigger input to play file 001, select an option below: Trigger Low No Interrupt When triggered, file 001 will play to the end with no interruption.
MedeaWiz® Sprite® . Baud Rate Select the baud rate for the serial port. Only applies if the setting Control Mode is set to Serial Control. The baud rate is the speed of the serial communication and should match the settings on your external controller. The default is 9600 bps. The Hydra® input expander accessory is programmed to work with the Sprite at 9600 baud.
MedeaWiz® Sprite® . Address Mode Select an address, if desired, for serial communications. Only applies if the setting Control Mode is set to Serial Control. Do not use addressing If you are using a single Sprite® on the serial communications line, or using a Hydra® input expander, in most cases you should choose the Do not use addressing option. Address set to 0xE1, 0xE2, 0xE3, 0xE4, 0xE5 If the Sprite® is set to an Address, then the Sprite® will only follow commands preceded by the correct address.
MedeaWiz® Sprite® . Restore Default Settings Reset the Sprite® back to the factory settings Select Restore Default Setting and press the green Enter key on the remote control. Then when the pop-up window appears, select “Yes” and press “Enter” to reset the Sprite® to the factory settings.
MedeaWiz® Sprite® . Firmware Version Displays the currently installed firmware version We may provide other versions of the firmware in the future. Check at http://www.MedeaWiz.com for updates.
MedeaWiz® Sprite® . Firmware Revisions History Video quality is equal for all versions. Each new revision has only added control features. There is no need to update unless you require a new control feature.
MedeaWiz® Sprite® . Firmware Upgrade How to upgrade the Sprite® firmware We may release upgraded firmware in the future. Please check http://www.medeawiz.com/ for updates. 1) Copy the new .img firmware file to a USB drive or SD card. Use an empty USB drive or SD card, or one with your video files on it. Do not use one that contains items not intended for the Sprite®. 2) Unplug the power to the Sprite®. Insert the USB drive or SD card into the Sprite®. Plug in the power.
MedeaWiz® Sprite® . Wiring Connections Rear Panel Left to right 1) Power input. Regulated 5 Volts DC only. Center positive. 2) AV output. Composite video, stereo audio left and right 3) HDMI High Definition video with audio 4) Control Input / Output.
MedeaWiz® Sprite® . External Control – Wiring a Pushbutton to the I/O Port Using a pushbutton or other dry contacts The Control Mode should be set to Trigger Low No Interrupt or Trigger Low with Interrupt. The screw terminal adaptor shown above on the right is included with the Sprite®. Note that the numbers near the screws match to the numbers on the plug at the left, which is used in examples later in this manual. You can trigger multiple Sprites from one pushbutton.
MedeaWiz® Sprite® . External Control - Wiring for Serial Communications to the I/O Port The Sprite® can be controlled by a Show Control or micro controller like a Basic Stamp, PIC, Atmel, Arduino, Raspberry Pi, or etc. using serial communications at 3.3V or 5V levels. Note that RS232 levels from a PC or PLC serial port will require a level translator like the MAX3232 series. Do not allow negative voltage below ground to be applied to the Sprite®.
MedeaWiz® Sprite® . PLC Output Interfacing The Sprite® can be controlled from a Programmable Logic Controller using “dry contacts” like a push button, or a voltage output. The sinking output above is the preferred method if dry contacts are not available. The Sprite® has an internal 10K pullup so the Sourcing output requires a low resistance from Output to Common to pull the Sprite’s internal voltage down to a “LOW”. The 1K* shown is an example and can vary depending on the +V voltage.
MedeaWiz® Sprite® . Motion Sensor Wiring There are many possibilities to add a motion sensor to the Sprite®. Small PIR motion sensors are available that use 5 Volt power and have a TTL voltage output. These can be powered directly from the Sprite’s I/O port. Set the Sprite’s Control Mode to “Trigger High No Interrupt” Wiring a 5 Volt motion sensor We offer the MSA-B Stealth motion sensor for a plug-and-play solution.
MedeaWiz® Sprite® . Schematic of I/O on the Sprite circuit board The Sprite is designed to work with 3 to 5 Volt TTL level serial data. Do not allow negative voltage to be applied to the inputs. A negative voltage applied at the input / output will damage the Sprite and void the warranty. Many serial devices including computers, PLC controls, building lighting controls like AMX and Crestron and etc. have standard RS232 that will drive the output up to negative 12 volts.
MedeaWiz® Sprite® . Using the Hydra® interface with the Sprite® The Hydra® input / output expander adds more trigger inputs and outputs to the Sprite® The Hydra® was designed specifically for the Sprite® and is Plug-and-Play Set the Sprite: Control Mode to Serial Control Baud Rate to 9600 Wire your pushbuttons to the Hydra screw terminals. Plug the Hydra® into the Sprite® with the included cable.
MedeaWiz® Sprite® . Serial Port Control from your Show Controller or Micro-processor For simple file playing, the serial codes are the same as the codes for the earlier MedeaWiz® models. You must have a file named 000. Name others 001, 002, etc. Set the Play Mode to Video Control Mode for video files, or Audio Control Mode for audio files. Set the Control Mode to Serial Control. Set the Baud Rate to match your external controller. The serial communications is on the 3.
MedeaWiz® Sprite® . Serial Port Control Multi-Drop Addressing Wiring Multiple Sprites may be connected to a single serial control bus. You can use one serial output from your controller to control multiple Sprites. Connect all of the Grounds together and connect all of the RX Inputs together, and to your controller’s TX output. Set an address on each Sprite® and it will only respond to commands from your controller preceded by that same address.
MedeaWiz® Sprite® . Serial Port Control Commands For firmware version 20180704 or later Code Definition Remarks 0x00 Play file 000.xxx Play files 000.xxx up to 0x01 Play file 001.xxx file 200.xxx by sending a \\ single byte \\ 0xC8 Play file 200.
MedeaWiz® Sprite® .
MedeaWiz® Sprite® . Further explanation of some serial commands 0xCB Request the total number of files on the SD card. The Sprite® will send a feedback byte telling the number of files on the SD card. The Sprite® feedback will be CB,CB,xx where xx is the number of files in Hexadecimal. 0xD0 to 0xDF Sets the Video Output Mode to the desired rate 0xE1 to 0xE5 Address numbers for the Sprite®.
MedeaWiz® Sprite® . IR Remote Control We use a generic remote control that is used for various models of video repeaters and DVD players. Not all buttons / functions will respond, and some are only valid in certain modes. Most of our Customers will only use the remote for initial setup of the Sprite®. This is an IR control, and needs to be pointed directly at the front of the Sprite®. The Sprite® may respond to some other device’s IR remote in unwanted ways.
MedeaWiz® Sprite® . Power Supply The Sprite® is one of the most energy efficient “green” video repeaters available today. Using only 5 Volt DC power at an average of 400 mA, it takes only about 2 Watts to run. The Sprite® requires a regulated 5 Volt DC power supply, which is included. The power connection takes a barrel plug with 1.35mm ID and 3.5mm OD, center Positive. Use of a wrong power supply will void the warranty.
MedeaWiz® Sprite® . Supported Video Formats MedeaWiz® DV-S1 Sprite® Specification CPU F10 Card Reader SD / MMC up to 32GB USB Host 1x USB2.0 ; supports external hard disk up to 2TB Audio Mp3(all max bitrate:320kbps) wma(standard/pro max bitrate:384kbps) Ogg(Q1-Q10 500kbs) flac(lever0-8 max bitrate:1.60mbps) APE( max bitrate: 950kbps) AAC(max bitrate 448kbps) AC3 (AC3 only 640kbps) DTS(Dts only 3.84Mbps) Video WMV(VC-1,WMV7, WMV8 max bitrate: 40Mbs)) VOB(MPG2 max bitrate: 45Mbps) PMP( Xvid, H.
MedeaWiz® Sprite® . Trouble FAQ My video has a glitch or green area when looping or triggered This often happens if your video bit rate is too low. We suggest a bit rate of 20,000Kbps (20Mbps) or higher. Do not compress the files. Let the bit rate be high at the normal setting. Refer to the chart on page 31 for maximum bit rates for the CODEC used. The file’s pixel size should be 1920 x 1080 for the 1080p or 1080i settings, and 1280 x 720 for the 720 settings.
MedeaWiz® Sprite® . The Sprite® will not play 4K video files. Files with pixel sizes of 3840 x 2160 or 4096 x 2160 are 4K. Please convert the files down to 1920 x 1080 sizes using video editing software. No video output on my monitor If you do not see any video or Setup Menu displayed: Verify the blue power LED is on. Try pressing the HDMI or AV keys on the remote to switch the outputs. Verify the monitor is set to the input used.
MedeaWiz® Sprite® . We suggest you use numbers only to test your files as a starting point, then add the longer names if you want them. Can I synchronize 2 or more Sprites to play together? The Sprite® has no way to Genlock or synchronize with any external device or another Sprite at frame accuracy. You can start trigger files on 2 or more Sprites with a single pushbutton or serial control.
MedeaWiz® Sprite® . Support We do our very best to answer your calls and emails in a timely manner. We generally return calls and emails within 2 hours or less during business hours. We do monitor emails in the evenings and weekends and will try to respond outside of business hours. Please read the entire manual. If we have a good manual then we will get fewer calls. Let us know where we can improve to help others in the future.
MedeaWiz® Sprite® . Custom Orders For large quantity orders we can offer: Custom firmware Sprite® player without accessories Sprite® circuit board only to enclose in your OEM design Please email sales@MedeaWiz.com for a quote.