
User's Manual


5
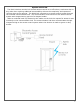
C. Testing the Lock with the Access Control System
With the hub connected to power and the access control system, test the lock with a known
good credential to confirm it will open as desired when installed.
D. Mounting the Lock
Before You Begin please verify the following:
You have the proper Cam for the door hardware being used
Verify the rotation of the lock matches the hardware on the door
Step 1: The M100 installs in a similar fashion to a mechanical mortise lock, and requires the same
adjustments to function properly with the mortise hardware. The following steps outline the mechanical
installation only.
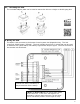
Removal of Existing Cylinder
a) Remove the door-edge trim by removing the retaining screws and gently prying the trim plate loose
(Fig. 1).
b) Loosen the cylinder clamp screw far enough to allow the existing cylinder to be removed (Fig. 2).
c) Using a key partially inserted, rotate the mortise cylinder counter-clockwise to remove it. Also
remove any trim rings if they are used (Fig. 3).
Fig. 1
Fig. 2 Fig. 3
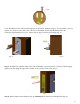
Step 2: Verify that the cam on the M100 is the same style as was on the cylinder that was just removed. If the
removed cylinder is a Medeco brand, the cam can be interchanged onto the M100 (Fig. 4).
Installing the M100