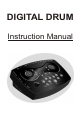
DIGITAL DRUM Instruction Manual
Congratulations! Thank you for purchasing this digital drum module. The drum module has been developed to act and play like a drum set but with greater ease. Before you use the instrument, we recommend you to read through this manual. Taking Care of Your Digital Drum Set Location Handling and Transport Do not expose the unit to the following conditions to avoid deformation, discoloration, or more serious damage. Direct sunlight. High temperature (near a heat source, or in a car during the day time).
Contents Panel Controls - Front Panel - Rear Panel - Side Panel Setup - Connect the pads and the pedal - Connect an audio equipment - Connect a CD player, etc.
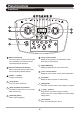
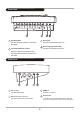
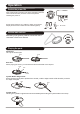
Panel Controls Front Panel 5 8 9 10 11 4 12 13 3 Master volume knob [ song / volume ] button Control the volume of phone and line output. Display the song number, accompaniment volume, Turn it clockwise to increase the volume drum volume, local/ external. and anticlockwise to decrease it. 3-digit LED display Pad select buttons and indicators Display the parameters of current menu mode. Select current pad. When you press them, the corresponding indicator lights up.
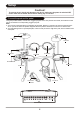
Rear Panel Pad input jacks Aux.in jack Connect with pads, cymbals, hi-hat control, Connect with external sound source. kick trigger. Power supply jack ( DC in 9V) Line output jacks (R, L/mono) Connect an AC adaptor to this jack. made up of right channel output and left channel output which is also used as mono line output. Side Panel Power switch USB Port Turn the power on/off. Connect to computer. MIDI IN and OUT connector Phones jack Connect with external sound module.
Setup Caution! To prevent electric shock and damage to the device, make sure the power is switched OFF on the drum and all related device before making any connection. Connect the pads and the pedal Using the provided cables, connect each Trigger input jack on the rear panel of the module, and make sure each pad is connected to its corresponding Trigger input jack. Note: 1. The voice of hi-hat pad hitting is controlled by hi-hat pedal.
Connect an audio equipment Amplifier 1. When you want to listen to the voices with an amplifier, connect amplifiers with the Output L/MONO and R jacks on the rear panel. (For monaural playback, use the L/MONO jack; for stereo playback, connect both L/MONO and R jacks.) 2. The volume is adjusted with the VOLUME knob. Connect a CD player, etc.(Aux. In jack) 1. The audio output of a CD player, or other audio source, to connect with the AUX IN jack on the rear panel can be mixed with the sound of the drum.
MIDI and USB MIDI stands for Musical Instrument Digital Interface, this is a world-wide standard communication interface that enables electronic musical instruments and computers (of all brands) to communicate with each other so that instructions and other data can pass between them. This exchange of information makes it possible to create a system of MIDI instruments and devices that offer far greater versatility and control than is available with isolated instruments.
Operation Switch the power ON After confirming all connection have been completed, rotate the volume knob to the left ( minimum volume level) before switching the power on. Set the power switch to "on" position to switch on the power. Display shows the kit's number and its indicator lights up. Kit indicator Set the main volume While hitting a pad, gradually rotate the volume knob until a comfortable volume level is reached. Playing the pads Head shot Hit only the head of pad.
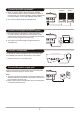
Play with a metronome Beat indicator There are two types of sounds: Click ( Bell and click sounds) and Vocal Counting (one, two, three, four...) 1. Press the [ click ] button to start the metronome. The beat indicator is flashing and click sound begins to play. 2. Press the [ click ] button a second time, clicking voice will be switched to vocal counting. 3. Press the [ click ] button again to stop the metronome. While the metronome is playing, the display shows the current time signature.
Play a Song Select a song This drum module has a total of 50 preset songs. Note: The preset song setting is 001 after you slide on power. Song Number Accompaniment Volume Drum Volume Song indicator Local/External Selection External Song Selected 1. Press [ song / volume ] button. The song indicator lights and the current song's number appears. 2. Press [ + ] or [ - ] buttons to select one of the song and listen to it. Song numbers 001 - 050 are preset songs.
Tap tempo Song source function In song source selection page, the LED will show the current selected song source. There're two choices: local machine (50 song included, default setting) or external sequencer. Song playing and metronome clicking will be stopped immediately when song source switching. Local machine 1. Press [ + ] and [ - ] buttons to select the song source. Song playing will stop immediately when switching song source. 2.
Play with a click voice 1. Press the [ click ] button to start the metronome. It will be played with tempo. 2. Press the [click] second time to switch to the Vocal Counting. 3. Press the [click] the third time to stop the metronome. Note: The click voice will not stop automatically once the song finished until you press the [ click ] button. Use the lighting guide function The lighting guide function provides you a valuable lesson to practice or learn the drum kit with playing the preset song. 1.
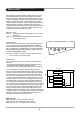
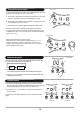
Create a User Drum Kit Set a drum voice Voice indicator The unit comes with 307 high quality percussion sounds that you can assign to any of the drum pad, 3 cymbals, hi-hat control and bass drum. This way you can create your own drum kit that consists of the voice you want. (Reference voice list : page 20) The kit number 021-050 is use for saving your own drum kit. Voice Number Volume Pan Tuning 1. Press [ voice ] button. The voice indicator lights and the display shows the voice number of this pad.
Adjust the pan of the pad 1. Press the [ voice ] button until the LED display shows : "PXX". (XX = Pan value, -8 to 8). The pad button indicator lights and display shows the current value of lighting pad. 2. Press the [ PAD ] button or hit the percussion pad you want to adjust. 3. Press the [ + ] or [ - ] buttons to adjust the level of the current pad. 4. Repeat step 2 and 3 to adjust the level of other pad. Note: P-8 (left) -- 0 (center) -- P8 (right) Adjust the tuning of the pad 1.
Utility Press [ utility ] button will enter utility menu and switch all utility menu pages in turn. Gain Rim Sensitivity Crosstalk Curve Splash Seneitivity Pad sensitivity You can adjust the sensitivity(gain) of the inputs from pads. 1. Press the [ utility ] button until the display shows: "EXX", the pad sensitivity value is indicated. (XX=gain level value, 01 to 16) 2. Press [ pad ] button or hit the pad you want to set. The pad indicator light . 3.
Crosstalk 1. Press the [ utility ] button until display shows: "oXX", the crosstalk value is indicated. (XX=crosstalk value, 01 to 16). 2. Press [ pad ] button or hit the pad you want to set. The pad indicator light . 3. Press [ + ] or [ - ] buttons to adjust the setting. This effect can be eliminated by setting this parameter to a higher value on the pad that is sounding inadvertently. 4. Repeat step 2 and 3 for to set the voice for another pad or bass drum.
Local Local control on is the default function mode, display shows: "LoN". The internal link between pad triggers and sound generator will be broken when local control is turned off, display show: "LoF". In local control off mode, the sound module will receive MIDI messages via MIDI input only. But the functions of panel preview, clicking and song player are still available in this mode.
Specifications Drum Pad: 4 drum pads , 3 cymbal pads ,1 hi-hat control pedal , 1 kick trigger Voices: 307 voices Drum kits: 20 preset kits, 30 user kits Song: 50 preset songs Controls: MIDI IN / OUT, POWER SWITCH, USB, PHONES, START/STOP, SAVE, KIT, VOICE/VOLUME, SONG/VOLUME, DRUM OFF, CLICK, HI-HAT, CRASH, RIDE, HI-HAT CONTROL, SNARE, TOM 1, TOM 2, TOM3, KICK, VOLUME, + / -, TEMPO + / - Display: LED display Connections: Hi-hat control Hi-hat Crash Ride Snare Tom 1 Tom 2 Tom 3 Kick Output (R &
Voice List No.
Drum Kit List No. 001 002 003 004 005 006 007 Name Fusion Standard Room Rock Hiphop Electronic Cartoon 021 022 023 024 025 026 027 028 029 030 M-box Step Industry Lowfi Metal Pop-rock Fusion Standard Room Rock No. 008 009 010 011 012 013 014 031 032 033 034 035 036 037 038 039 040 Name House Jazz Brush 1969songo 1971s 1976disco 909 Hiphop Electronic Cartoon House Jazz Brush 1969songo 1971s 1976disco 909 No.
Percussion Set List Standard 27 28 29 30 31 32 33 34 35 36 37 38 39 40 41 42 43 44 45 46 47 48 49 50 51 52 53 54 55 56 57 58 59 60 61 62 63 64 65 66 67 68 69 70 71 72 73 74 75 76 77 78 79 80 81 82 83 84 85 86 87 D#1 E1 F1 F#1 G1 G#1 A1 A#1 B1 C2 C#2 D2 D#2 E2 F2 F#2 G2 G#2 A2 A#2 B2 C3 C#3 D3 D#3 E3 F3 F#3 G3 G#3 A3 A#3 B3 C4 C#4 D4 D#4 E4 F4 F#4 G4 G#4 A4 A#4 B4 C5 C#5 D5 D#5 E5 F5 F#5 G5 G#5 A5 A#5 B5 C6 C#6 D6 D#6 High Q Slap Scratch Push Scratch Pull Sticks Square Click Metronome Click Metronome Bell
MIDI Implementation Chart After Touch Pitch Bend Control 0 Change 1 5 6 7 10 11 64 65 66 67 80 81 91 93 120 121 123 Transmitted 10 ch X X X ************** 0-127 ************** O 99H , V= 1-127 O (99H.
DD506 _G04