ELECTRONIC KEYBOARD 100 95 75 25 5 0 AW_M15_Manual_G05_111206 2011 12 6 14:47:39
INFORMATION FOR YOUR SAFETY! THE FCC REGULATION WARNING (for USA) This equipment has been tested and found to comply with the limits for a Class B digital device, pursuant to Part 15 of the FCC Rules. These limits are designed to provide reasonable protection against harmful interference in a residential installation.
Contents Panel & Display Description Front Panel..................................................................4 Rear Panel...................................................................4 Display.........................................................................5 Setup Power Supply...............................................................6 Tempo........................................................................12 Auto Bass Chord.......................................................
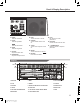
Panel & Display Description Front Panel 1 9 14 10 11 12 13 6 7 8 15 2 3 4 17 16 1. MASTER VOLUME Adjust the master volume. 10. TEMPO Adjust the current tempo. 2. START/STOP Start or stop playing the song in Song Mode. Start or stop playing the style in Style Mode. 11. CHORD DICT. Enter the Chord Dictionary. 3. SYNC START Turn the SYNC START on and off. 31 5 4. INTRO/ENDING Play the Intro or Ending. 5. FILL A/MAIN A Play the Fill-in, and change to MAIN A. 6.
Panel & Display Description 30 29 18 19 20 22 21 23 24 25 26 27 28 18. VOICE Enter the Voice Mode. 23. DUAL Turn the Voice R2 on and off. 19. STYLE Enter the Style Mode. 24. SUSTAIN Turn the Sustain effect on and off. 29. DATA DIAL Increase and decrease the value. 25. TOUCH Turn the Touch response on and off. 30. +,-,NUMBER KEYS Select the number or adjust the parameters. DEMO Enter the Demo Mode. 20. SONG Enter the Song Mode. 28. PLAY Play back the recorded performance. 26.
Setup This section contains information about setting up your instrument and preparing to play. Please go through this section carefully before turning the power on. Power Supply You can power the unit either by batteries or by power adaptor. Follow the instructions described below. Using Batteries 6 pieces of AA size (SUM-3 or Lr6) or equivalent alkaline batteries must first be installed into the battery compartment. 1. Open the battery compartment cover located on the bottom cabinet of the unit. 2.
Connections Connecting a Footswitch The sustain function lets you produce a natural sustain as you play by pressing a footswitch. Plug an optional footswitch into this jack and use it to switch sustain on and off. DC IN Connecting a pair of Headphones A standard pair of stereo headphones can be connected to the PHONES jack for private practice or late-night playing. The internal stereo speaker system is automatically shut off when a pair of head phones is plugged into this jack.
Playing the Demos The instrument features 100 demo songs. 1. Press the [STYLE] and [VOICE] buttons simultaneously to start playing the demo. 2. Select a demo song. Use the data dial, the number keys, the [+] button or the [-] button to select the desired demo song. Adjust the volume with the [MASTER VOLUME] knob. Press the [STYLE] and [VOICE] buttons simultaneously again or press the [START/STOP] button to stop playing and exit the demo mode.
Playing the Voices 2. Play the voices. VOICE Two different voices are sounded simultaneously in a layer. The number of the dual voice will be displayed on the LCD. R2 Strings2 3. Selecting a voice for VOICE R2. When the number of the dual voice is displayed, you can select a voice for Voice R2. Use the data dial, the number keys, the [+] button or the [-] button.
Playing the Voices Transpose Transpose function allows the overall pitch of the instrument to be transposed up or down by a maximum of 6 semitone increments. 1. Press the [TRANSPOSE + ] or [TRANSPOSE - ] button. The LCD show that the transpose value ranging from -6 to 6. 2. Use the data dial, the [TRANSPOSE + ] button or the [TRANSPOSE - ] button to change the transpose value. 3. Press the [TRANSPOSE + ] and [TRANSPOSE - ] buttons simultaneously to reset the transpose to 0.
Playing the Styles The instrument features 200 styles in a variety of different musical genres. Try selecting some of the different styles (Refer to Style List) and play with the auto accompaniment. Selecting a style 1. Press the [STYLE] button. Enter the STYLE mode. LCD shows “STYLE”, the style number and the style name. STYLE 8Beat1 STYLE 8Beat1 STYLE 8Beat1 2. Use the data dial, the number keys, the [+] button, the [-] button to select the style you want to play. 3.
Playing the Styles Sync Start While the style is not playing, press the [SYNC] button. The black dots below the tempo and the metronome flash, indicating the standby mode of the keyboard. 1. If the A.B.C. is OFF, pressing any key will automatically begins to play the style (rhythm track). 2. If the A.B.C. is ON, pressing any key in the left-hand range of the keyboard will automatically begins to play the style (all tracks). Fade In/Out Fade In The Fade In produces smooth fade-ins when starting the Style.
Playing the Styles Auto Bass Chord 1. Press the [A.B.C.] button, LCD show “A.B.C.”. The 19 keys on the STYLE left of the keyboard are called accompaniment keys. The accompaniment keys you pressed determine the type of chords that you played. 8Beat1 2. Press the accompaniment keys, the corresponding chord will display on LCD. 3. Split Point Set Hold down [A.B.C.] button will enter in Split Point Set mode, LCD show “Split Pt” and the split point key number.
Playing the Styles One Touch Setting One Touch Setting is a powerful and convenient function that lets you instantly recognize virtually all auto-accompaniment-related panel settings with the touch of a single button. 1. Press the [O.T.S.] button to turns on the One Touch Setting for current style. LCD show O.T.S. 1. 2. Press one of the [ONE TOUCH SETTING] buttons [M1]-[M4]. Voice match the selected style can be instantly recalled with just a single button press. 3. A.B.C.
Memory There are 4 memories (M1-M4). 1. While holding the [STORE] button, press one of the MEMORY buttons: [M1] - [M4] to register the panel settings. The new settings will replace the previous memory data. LCD show “Mem Stor”. The settings include the number of voice, the number of style, tempo, beat value, sustain effect, etc. VOICE R1 VOICE R1 Mem Stor 2. Press one of the MEMORY buttons: [M1] - [M4] to recall the panel settings.
Metronome Turning on the Metronome Press the [METRO] button to turn on the metronome. Press the [METRO] button again to turn off the metronome. Press the [TEMPO+] / [TEMPO-] button to change the tempo of the metronome. Selecting the Beat Hold down [METRO] button will enter in Beat Set Mode. LCD show “Beat” and beat value. Press number keys(0 and 2-9), and release the [METRO] button, new beat value is saved. The default value is 4.
Playing the Songs The instrument features 100 songs (Refer to Song List). Each song can be practiced in LESSON mode. Listening to the Songs 1. Press the [SONG] button to enter the song mode. It will play all songs circularly. Press the [SONG] button again, it will stop the song and exit the song mode. 2. In song mode, use the data dial, the number keys and [+] or [-] button to select a song. 3. Once you start playing a song by pressing [START/STOP] button, it will play current song repeatedly.
Recording and Playback You can record your performance (up to 500 notes), and the accompaniment. 1. Press the [RECORD] button, the record flag appears on the left of LCD, the beat flashes. 2. Play the notes you want to record or press the [START/STOP] button to start recording. If you want to record your performance accompanied with the style, please turn on the A.B.C, and play the chords on the left of the keyboard. RECORD 3. Press the [RECORD] button again to stop recording.
MIDI Functions By using the MIDI functions you can expand your musical possibilities. This section explains what MIDI is, and what it can do, as well as how you can use MIDI on your instrument. What's MIDI? MIDI is an acronym that stands for Musical Instrument Digital Interface, which allows electronic musical instruments to communicate with each other, by sending and receiving compatible Note, Control Change, Program Change and various other types of MIDI data, or messages.
Trouble Shooting Problem Possible Cause and Solution The speakers produce a “pop” sound whenever the power is turned ON or OFF. This is normal and is no cause for alarm. No sound results when the keyboard is played. Make sure the master volume is set at appropriate levels. When using a mobile phone, noise is produced. Using a mobile phone in close proximity to the instrument may produce interference. To prevent this, turn off the mobile phone or use it further away from the instrument.
Voice List No Name PIANO LCD Name 58 Xylophone Xylophon 115 Mute Pick Bass PickBsM 59 Tubular Bells 1 TubuBel1 116 Pick & Finger Bass Pk&FgBs Tubular Bells 2 TubuBel2 117 Pick Bass & Clean Guitar PBs&ClGt 1 Acoustic Grand Piano GrandPno 60 2 Piano Dark GrandPnD 61 Tubular Bells 3 TubuBel3 118 Detuned Pick Bass DetPkBs 3 Octave Piano 1 OctPno1 62 Dulcimer Dulcimer 119 Fretless Bass 1 Fretles1 4 Octave Piano 2 OctPno2 ORGAN 120 Fretless Bass 2 Fretles2 5 Piano &
Voice List 172 Trumpet 2 Trumpet2 LEAD 270 Banjo 2 Banjo2 173 Dark Trumpet TrumpetD 222 Square Lead 1 SquarLd1 271 Shamisen 1 Shamisn1 174 Wah Trumpet TrumpetW 223 Square Lead 2 SquarLd2 272 Shamisen 2 Shamisn2 175 Trombone 1 Trmbone1 224 Square Lead 3 SquarLd3 273 Koto 1 Koto1 176 Trombone 2 Trmbone2 225 Lead Sine SineLead 274 Koto 2 Koto2 177 Tuba 1 Tuba1 226 Slow Square Lead SawLead 275 Kalimba 1 Kalimba1 178 Tuba 2 Tuba2 227 Thick Square ThickSq 276 Kalimba 2 Kali
Style List 56 Ragtime Ragtime 111 16 Beat Shuffle 1 16BtShf1 57 Dixieland Dixeland 112 Ballad 1 Ballad1 8Beat1 58 Quick Step QuickStp 113 Slow Ballad 1 SlowBld1 8 Beat 2 8Beat2 COUNTRY 1 114 16 Beat Ballad 1 16BtBld1 3 8 Beat 3 8Beat3 59 Country 1 Country1 115 Unplugged 1 Unplug1 4 8 Beat 4 8Beat4 60 Country 2 Country2 5 60’s 8 Beat 60's8Bt 61 Pop Country PopCntry 116 Rock 1 Rock1 6 8 Beat Ballad 8BtBld 62 Country Rock CtryRock 117 Pop Rock 1 PopRock1
Style List 166 Country Shuffle 1 CtryShf1 178 Jazz Samba 1 JzSamba1 167 Country Boogie 1 C.Bogie1 179 Reggae 1 Reggae1 168 Country Blues 1 C.Blues1 180 Pop Reggae 1 P.
Song List No. Name LCD Name BEAT & POP 1 No.
Chord List Chord Name/[Abbreviation] Normal Voicing Chord (C) Display Major [M] 1-3-5 C C Major seventh [M7] 1-3-(5)-7 CM7 CM7 Major add ninth [Madd9] 1-2-3-5 CMadd9 CM(9) Seventh [7] 1-3-(5)-b7 C7 C7 Seventh thirteenth[7 13] 1-3-(5)-6-b7 or 2-3-5-6-b7 C7 13 C7(13) Minor seventh flatted fifth[m7b5] 1-b3-b5-b7 Cm7b5 Cm7b5 Major sixth [6] 1-(3)-5-6 C6 C6 Minor [m] 1-b3-5 Cm Cm Minor seventh [m7] 1-b3-(5)-b7 Cm7 Cm7 Minor major ninth [mM7] 1-b3-(5)-7 CmM7 CmM7 Minor
1 18 114 100 95 75 25 5 0 27 AW_M15_Manual_G05_111206 2011 12 6 14:47:49
100 95 75 25 5 0 M15_G05 AW_M15_Manual_G05_111206 2011 12 6 14:47:49