DIGITAL GRAND PIANO 100 95 75 25 5 0 aw_GRAND1000_Manual_G06_120912Part1 2012 9 12 12:35:39
INFORMATION FOR YOUR SAFETY! THE FCC REGULATION WARNING (for USA) This equipment has been tested and found to comply with the limits for a Class B digital device, pursuant to Part 15 of the FCC Rules. These limits are designed to provide reasonable protection against harmful interference in a residential installation.
Contents Introduction Panel & Display Description Front Panel..........................................................6 Rear Panel..........................................................7 Main Display........................................................8 Setup Part List...............................................................9 Setup Guide......................................................10 Connections Power Supply....................................................
Contents Advanced Use Voice Song Playing Various Voices......................................26 Keyboard Parts....................................................26 Playing a single Voice (Right1)................................26 Playing Two or Three Voices Simultaneously (R 1, 2, 3)26 Playing Different Voices with the Left and Right Hands.27 Setting the touch sensitivity of the keyboard.....27 Changing Pitch..................................................28 Master Tuning...............................
Contents Appendices Troubleshooting............................................70 Specification..................................................70 Introduction Appendices Voice List...........................................................71 Style List............................................................77 Song List...........................................................78 Demo List..........................................................78 Chord List..........................................
Panel & Display Description Front Panel 2 MASTER VOLUME 3 MUSIC VOLUME REVERB CHORUS VOLUME PAN ATTACK RELEASE CUTOFF RESONANCE ASSIGN 1 ASSIGN 2 ASSIGN 3 ASSIGN 4 SCORE MAX SONG SELECT MAX 4 SELECT TEMPO TAP A.B.C. O.T.S. LINK AUTO FILL IN FADE IN / OUT 15 16 17 18 METRO.
Panel & Display Description 33 30 VOICE MODE PIANO MODE GLOBAL SETTING USB DISK PART ON/OFF LEFT RIGHT 1 E.PIANO ORGAN RIGHT 2 RIGHT 3 26 27 28 29 32 DEMO VOICE PIANO ACCORDION & GUITAR & BASS HARMONICA 1 2 3 4 5 6 7 8 STRINGS & ENSEMBLE 31 BRASS & FLUTE & SAXOPHONE WOODWIND LEAD & PAD FX & EFFECTS ETHNIC & PERCUSSIVE & COMBINED DRUM PERFORMANCE MEMORY BANK FREEZE STORE M1 M3 M2 M4 M5 M6 O.T.S. TRANSPOSE OCTAVE 41 42 EXIT 34 36 37 38 35 40 39 O.T.S. 33.
Panel & Display Description Main Display 6 1 2 4 3 A C B 5 1. Voice Display voice name and octave data of each part. (Right1, Right2, Right3, Left) How to select the voice for each part? For example: 1. Pressing anywhere in the R1 display area makes the R1 part selected. 2. Pressing again will call up the Voice Selection display. Now, you can select the voice for R1. 2. Style&Song Display the currently selected style name, for example “8Beat Ballad”.
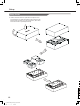
Setup This section contains information about setting up your instrument and preparing to play. Please go through this section carefully before turning the power on. Part List Before you proceeding to assemble the stand, get a Philip's screwdriver (not supplied). Make sure you have the following parts, which are supplied into package.
Setup Setup Guide A. Please reverse the carton to upside down and place it in the horizontal before you initial assembly the piano. Make sure the bottom surface of carton is up. Then open the box, take off the foams which used for protected piano body.
Setup B. Put the left leg component(C) on the left of piano body. Find the sunken hole on the leg component and correspond the hole on the piano body. Then place a washer into this sunken hole, Use Wrench (J) to tighten 4 pieces of hexagonal bolt (2 on each side) by clockwise turn. Please see below illustrator for you detail reference.
Setup C. Use screws(H) to tighten the two copper poles (I) onto the back of Pedal component(A).Make sure the direction of the placement is correct before screwing. D. Then reserved the Pedal component with two copper poles(I), and use the hexagonal bolt(G) to tightly settled it with the piano body according finished assembly in left leg component, fix the other side of copper Pole onto the piano body (E). The assembly are finished.
Setup E. Reverse the piano after finished assembly. Please carefully reverse the piano avoid touched floor cause damaged or broke any leg components or pedal component. Then moved the carton box and all package goods. You can enjoy play the piano now.
Connections Power Supply 1. Connect the AC power cable to AC power inlet on the underside of the piano body. 2. Plug the AC power cable into an AC outlet. 3. Turn the power ON. The LCD on the panel will light up. Note: When the keyboard is not in use or in the time of thunderstorm, please disconnect the power for safety purpose. Connecting a pair of Headphones There are two headphones jacks on the left underneath the piano body. 1.
Connections Connecting a Microphone You can connect an external microphone to MIC IN jack. Adjust the input volume of the microphone by using MIC VOLUME knob. USB AUX.IN MIC MIC VOL L AUX. OUT L/MONO R Note: Turn the volume switch counter-clockwise to reach the minimum volume level when connecting or disconnecting a microphone. Connecting a Computer You can simply connect the computer with USB cable via the USB connector.
Basic Operations Selection Operation There are some selection interfaces: voice selection, style selection, song selection, performance selection, etc. How to select the file in these selection interfaces? 1 2 2 4 For example: 1. Location of data Preset: Location where pre-programmed (preset) data is stored. User: Location where recorded or edited data is saved. USB: Location where data on USB storage device is saved. 3 2.
Basic Operations Setting Operation There are three types on parameter setting. 1. ON/OFF (as in the picture: On/Off ) Press this “ON/OFF” button to switch the keyboard touch response ON (orange font display) or OFF (gray font display). 2. LIST (as in the picture: Curve Normal ) Press this “Normal” button, all available parameters would be listed. You can choose any one of 3 ways below: 1. Press your desired parameter on LCD to select it. 2. Use the DATA DIAL to select your desired parameter. 3.
Playing the Demos The instrument features 9 wonderful demos. Please refer to DEMO LIST. Press the [VOICE MODE] and [PIANO MODE] buttons simultaneously to start playing the demo. VOICE MODE PIANO MODE DEMO Select your desired demo Press the Demo name on LCD or use the DATA DIAL, the [+] or the [-] button to select your desired demo. Pause the demo Press the [PAUSE] button to pause the demo playing or continue playing the demo. PAUSE Stop the demo Press the [PLAY/STOP] button to stop the demo playback.
Playing Voices The instrument features exceptionally realistic 672 voices, including piano, guitar, strings, brass and many more. Please refer to Voice List. Turn the R1 PART on PART ON/OFF Press the PART ON/OFF [RIGHT 1] button to turn the R1 part on. LEFT You can play different voices simultaneously or play different voices with the left and right hands. First, turn on the corresponding part. RIGHT 1 RIGHT 2 RIGHT 3 Select a Voice for R1 PART 1.There are 2 methods to select the voice category.
Playing with a Style The instrument features 240 styles in a variety of different musical genres. Try selecting some of the different styles (Refer to Style List) and play with the auto accompaniment. Select a style STYLE SELECT 1. There are 2 methods to call up the Style Selection display. Press the [STYLE SELECT] button. Press STYLE Name on the Main Display. 2. Press one of the style categories NAME on the Style Selection display to select the style category. 3.
Playing Songs The instrument features 10 songs. Select a Song SONG SELECT 1. There are 2 methods to call up the Song Selection display. Press the [SONG SELECT] button. Press Song Name on the Main Display. 2. Press the song NAME to select the desired song on the current page display. You can also select the user song, details see Song. Playback a Song 1. Press the [PLAY/STOP] button to start playback the selected song. The LED of [PLAY/STOP] will light up.
Record Your Performance to MIDI 1. Press the [METRO] and [RECORD SONG] buttons simultaneously to call up the Recording Display. A blank song (“New Song”) is called up for recording. The LED of [RECORD SONG] is flashing that means it is in the recording standby mode. METRO. RECORD SONG NEW SONG 2. Press the [PLAY/STOP] button or play the keyboard to start recording. The LED of [RECORD SONG] will light up. METRO. NEW SONG PLAY/ STOP 3.
Recording Your Performance as Audio You can record your performance as CD quality audio file to a USB device. 1. Please connect your USB storage device drive to the keyboard. RECORD AUDIO RECORD AUDIO RECORD AUDIO RECORD AUDIO 2. Press the [RECORD AUDIO] button to start recording your performance. The LED of [RECORD AUDIO] will light up. 3. Press the [RECORD AUDIO] button again to stop recording your performance and call up soft keyboard display. The LED of [RECORD AUDIO] will be turned off. 3.
Using a USB Storage Device By connecting a USB storage device to your instrument, you can save data you’ve created to the connected device, as well as read data from the connected device. Compatible USB device Recommended Brand: KINGSTON, SANDISK, SONY, LEXAR, TRANSCEND Format: FAT 16/32 Capacity: 1G,2G,4G,8G,16G,32G USB DISK Using the USB device 1. Connect the USB storage device to the USB port. 2. Press the [USB DISK] button to display the folders and files under the root directory of USB device.
Downloading Data from the Computer Connect a standard USB cable between the rear-panel of the USB jack of the instrument and the USB jack on your computer. USB MIDI IN OUT THRU MIC Power on the instrument first, and then open the GrandSuit software in your computer. The GrandSuit has been connect successfully with the instrument as shown. You can download SMF MIDI files to the keyboard as user songs or upload the user songs.
Voice The instrument has a huge selection of various musical instrument voices which you can play. Try out the different voices referring to the voice list in the appendix. Playing Various Voices PART ON/OFF The instrument allows you to play several different voices together in a layer, or play one voice with your left hand while you play a different voice (or even three layered voices!) with your right.
Voice Playing Different Voices with the Left and Right Hands PART ON/OFF LEFT RIGHT 1 RIGHT 2 RIGHT 3 You can combine these four parts to create a rich, ensemble sound. 1. Make sure one or more right hand parts are turned on. Right 1 Part 2. Press the PART ON/OFF [LEFT] button to turn it on. Right 2 Part Left Part Right 3 Part 3. Select a voice for LEFT. Press one of the VOICE buttons to call up the voice selection display for the Left part.
Voice Changing Pitch Pressing the [GLOBAL SETTING] button will call up the Global Setting display quickly. Pressing “Keyboard” on the Global Setting display will call up the Tune Setting display. GLOBAL SETTING Master Tuning The Master Tuning function sets the overall pitch of the instrument. 1. Press the Master Tune “440.0Hz” button on the Tune Setting display to call up a pop-up box showing the adjustable range of parameter. 2.
Voice Octave Shifts the pitch of the specified voice or track up or down by octaves. A setting of “0” produces normal pitch. You can adjust the range of the pitch change in octaves for each keyboard part (R1, R2, R3, L). Method1: 1. Press the R1 “0” button on the Tune Setting display to call up a pop-up box showing the adjustable range of octave. 2. Press the “+” or “-“ button or use the DATA DIAL, the [+] or the [-] button to adjust the data. OCTAVE Method2: 1.
Voice Select Preset Scale Types 1. Press the Recall “Pure Major” on the Scale Tune Setting display to call up a pop-up box showing the scale types. 2. Press the scale name on pop-up box or use the DATA DIAL, the [+] or the [-] button to select your desired scale type. Pure Major & Pure Minor These tunings preserve the pure mathematical intervals of each scale, especially for triad chords (root, third, fifth). You can hear this best in actual vocal harmonies – such as choirs and a cappella singing.
Voice Adjusting the Volume of Voices In the mixer interface, you can adjust the levels and stereo position (pan) of each voice. 1. Press the [MIXER] button to call up the Mixer display. MIXER 2. Press “Master” to call up the relevant setting display. 3. Press R1 “120” button in the volume box to call up a pop-up box showing the adjustable range of volume. 4. Press the “+” or “-“ button or use the DATA DIAL, the [+] or the [-] button to adjust the data. 5.
Voice Arpeggiator The arpeggiator is a function that automatically generates arpeggios (playing the notes of the chord individually, with a constant tempo). You can make settings for the arpeggiator used in the voice. There are more than 70 internal Arp patterns you can select. You can also select your original Arp patterns that are made by GrandSuit software on PC and saved to USB Storage Device. Press the “Arpeggiator ...” button on the Effect display to call up the Arpeggiator Setting display.
Voice 5. Latch Press the “LATCH” button to switch this function ON or OFF. ON: The arpeggio will continue playing after you remove your hand from the keyboard. OFF: The arpeggio will stop when you remove your hand from the keyboard. 6. Key Sound Press the “KEY SOUND” button to switch this function ON or OFF. ON: The notes you played will be sounded, in addition to being sounded as part of the arpeggio. OFF: Only the arpeggiated notes will be heard. 7.
Voice 9. Velocity Specifies the velocity of the notes in the arpeggio. Press the Type “Key” button to call up a pop-up box showing the velocity types. Key: Each note will sound with the velocity value at which it was actually played. You can also set the range of the velocity. “Min”and “Max”. If the velocity value is not in the range of the specified velocity, the arpeggio pattern will not play. Value: Each note will sound with the specified velocity values.
Voice Harmony Split Point If you turn the harmony on, it automatically adds harmony parts to the notes you play with your right hand—immediately giving you a more full and professional sound. In this example, harmony notes in the scale of C major (the chord played in the left hand) are automatically added to the notes played in the Chord section right-hand range of the keyboard. Chord section Press the “Harmony...” button on the Effect display to call up the Harmony Setting display.
Voice Global Effect Reverb and Chorus Reverb: You can create a reverb effect that makes you sound like you are playing in places like a concert hall, or live in a club. Chorus: You can add a chorus effect that makes your playing sound as though multiple parts were being played together at the same time. You can select the reverb type and adjust the master reverb level and the channel reverb level. You can also select chorus type and adjust the master chorus level and the channel chorus level.
Voice EQ The instrument possesses a four-band digital equalizer function. Frequency Bands (4 bands) Low Low-Mid High-Mid High You can adjust the FREQ (center frequency) of every band and adjust the gain (amplitude change) in each of the four frequency bands within a range of -12 to 0 to +12 decibels [dB]. Turn On/Off Global EQ and Adjust the Parameter 1. Press the “EFFECT” button on main display to call up the Effect display. 2. Press the “Global Effect” button on the Effect display to turn on Global EQ.
Voice Editable Parameters Common Default Volume MONO/POLY Portamento Time Left Octave Right Octave Adjusts the volume of the current edited voice. Determines whether the edited voice is played monophonically or polyphonically. Portamento is a function that creates a smooth transition in pitch from the first note played on the keyboard to the next. Shifts the octave range of the edited voice up or down in octaves. When the edited voice is used as the LEFT part, this parameter is available.
Voice Saving the Edited Voice Press the “COMPARE” on the editing display to compare the sound of the edited voice with the original voice. If you are satisfied with your edited voice, please press the “SAVE” on the editing display to call up soft keyboard display. Name the edited voice and press “OK” to save it as a user voice on the USER Voice selection display. Saving, Deleting or Renaming the User Voice 1.
Style The instrument has a huge selection of various musical genre styles which you can play. Try out the different styles referring to the style list in the appendix. Selecting Various Styles Press the [STYLE SELECT] button or press STYLE NAME on the Main Display to call up the Style Selection display. STYLE SELECT Press one of the style categories NAME on the Style Selection display to select the style category. Press the cursor button on LCD to select your desired style page.
Style 1. Select your desired style. A.B.C. A.B.C. 2. Press the [A.B.C] button to turn auto accompaniment on. 3. Press the [SYNC START] button to turn SYNC START on. SYNC STOP SYNC START SYNC STOP SYNC START 4. Play a chord with your left hand to start the auto accompaniment. 5. Press the [START/STOP] button or press any of the [ENDING] button to stop the auto accompaniment.
Style Muting the tracks of a style MIXER 1. Press the [MIXER] button to call up the Mixer Display. 2. Press “Style” tab to call up the relevant style setting display. 3. Press the “S” button to set the channel to SOLO (orange font display). You listen to only one instrument of this track. Press the “S” button again to cancel SOLO (gray font display). 4. Press the “M” button to mute the channel (orange font display). You can listen to the playback of the style except this track.
Style Selecting a Chord Fingering Type Style playback can be controlled by the chords you play in the chord section of the keyboard. There are two types of fingering. Holding down [A.B.C] button will call up the Chord Setting display. Press the Fingering type name to select your desired Chord Fingering type. Press “Full Range” to turn it on (orange font display). Detect chords in the entire key range.
Style Single Finger Single-finger accompaniment makes it simple to produce beautifully orchestrated accompaniment using major, seventh, minor and minorseventh chord by pressing a minimum number of keys on the auto accompaniment section of the keyboard. Multi Finger The Fingered type recognizes the various chord types (Details See the chord list) and can be looked up using the Chord Dictionary function.
Style Operations for Style Playback Style Variations While you play, you can automatically add specially created intros and endings, as well as variations in the rhythm/chord patterns, for more dynamic, professional-sounding performances. INTRO This is used for the beginning of the song. Each preset style features two different intros. When the intro finished playing, accompaniment shifts to the Main section. Press one of the INTRO [A]–[B] buttons before starting style playback.
Style FADE IN The Fade In produces smooth fade-ins when starting the Style. Press the [FADE IN/OUT] button when Style playback is stopped, the LED of the [FADE IN/OUT] button will light up. When the Fade In is finished, the LED of the [FADE IN/OUT] button will light off. FADE IN / OUT FADE IN / OUT FADE OUT The Fade Out produces smooth fade-outs when stopping the Style. Press the [FADE IN/OUT] button during Style playback, the LED of the [FADE IN/OUT] button will light up.
Style One Touch Setting One Touch Setting is a powerful and convenient function that lets you instantly recognize virtually all Auto-accompaniment-related panel settings with the touch of a single button. M1 M3 M2 M4 M5 M6 O.T.S. 1. Press the [O.T.S.] button to turns on the One Touch Setting for the current style. The LED of the [O.T.S.] button will light up. O.T.S. 2. Press one of the [ONE TOUCH SETTING] buttons [M1]-[M4], the relevant LED will light up, A.B.
Song The instrument can play back the following Song types. Preset Songs Songs in the Song Selection PRESET display. Try out the different songs referring to the song list in the appendix. Your Own Recorded Songs These are MIDI Songs which you’ve recorded and saved to the USER display. These are Audio Songs which you’ve recorded and saved to the USB display.
Song REWIND and FAST FORWARD Pressing the [REW] or [FF] button automatically calls up a pop-up window showing the current measure number in the current display. RW FF Press the [REW] or [FF] button to move back or forth. Pressing and holding either button lets you continuously move back or forth. Adjusting the Volume of the Song Press the [MIXER] button to call up the Mixer Display.
Song 7. Press the “S” button to set the channel to SOLO. You listen to only one instrument of this track. Press the “S” button again to cancel SOLO. 8. Press the “M” button to mute the channel. You can listen to the playback of the song except this track. Press the “M” button again to cancel MUTE. 9. Press the [EXIT] button to exit the Mixer Display. Displaying Music Notation (Score) You can view the music notation of the selected Song. 1. Select a Song. 2.
Song LEFT CH RIGHT CH Determines which MIDI channel in the Song data is used for the left-hand part. Note: This setting returns to Auto when a different song is selected. Determines which MIDI channel in the Song data is used for the right-hand part. Note: This setting returns to Auto when a different song is selected. Auto: The MIDI channels in the Song data for the right- and lefthand parts are assigned automatically.
Piano Mode The instrument possesses a piano mode for piano player specially. In this mode, you can select various piano voice and different ambience for your performance. You can also adjust brightness, pitch, velocity curve, envelope, EQ of the selected piano voice. You can turn on/off the metronome and adjust the parameter of the metronome in this mode. Entering the Piano Mode Press the [PIANO MODE] button to enter the piano mode and call up the Piano Setting display. 1.
Piano Mode Touch 1. Press the “Touch” icon on piano setting display to call up the velocity curve selection display. 2. Press the relevant icon to select your desired velocity curve. 3. Press the “close” button icon to return to piano setting display. Metronome 1. Press the “Metronome” icon on piano setting display to call up the Metronome Setting display. 2. Same operations as Global Setting-Utility-Metronome adjustment. 3. Press the “close” button icon to return to piano setting display. Envelope 1.
Song Recording You can record your own performances to MIDI and save them to the User tab display. You can record your own performances as Audios and save them to an external storage device. MIDI Recording Two different MIDI recording methods are available: Quick Recording which lets you record performance conveniently and quickly, Multi track Recording which lets you record several different parts to multiple channels. You can also edit Songs after they’ve been recorded. RECORD SONG METRO.
Song Recording 4. Stop recording ENDING 1 ENDING 2 Press the “STOP” button on the Record Display or press the [RECORD SONG] button. The LED of [RECORD SONG] will go out. If you are recording style, press the [ENDING] button, when the Ending is finished, the recording would also stop automatically. 5. Save recording data. When the soft keyboard is called up, please enter the new name and press “OK” to save the new user song. Note: The recorded song data will be lost without executing the save operation.
Song Recording Editing the Recorded MIDI Song Press the “Edit” tab on the Recording Display or press the “Edit” button on the User Song Selection Display to call up the Song Editing Display. Press the Volume “100” button to call up a pop-up box showing the adjustable range of volume values. Use the DATA DIAL, the [+] or the [-] button to adjust the volume. Press the Pan “0” button to call up a pop-up box showing the adjustable range of pan values.
Song Recording Audio Recording Audio recording will record your performance into a CD quality WAV file to your USB storage drive. The following sounds can be recorded. Keyboard parts (R1, R2, R3, L), MIDI Song parts, Style parts Input from another audio device, such as a CD player, MP3 player or other audio inputs via the [AUX IN] jack. 1. Connect your USB storage device to the instrument. Press the [RECORD AUDIO] button to start recording your performance. The LED of [RECORD AUDIO] will light up.
Global Setting Press the [Global Setting] button to call up the Global Setting display. The relevant LED will light up. GLOBAL SETTING Keyboard Pressing “Keyboard” on the Global Setting display will call up the Keyboard Setting display. You can adjust the master tune, transpose, Octave and switch scale tune on or off, etc. Details see Voice-Changing Pitch. Pressing “Chord” tab on the Keyboard Setting display will call up the Chord Setting display. Details see Style-Selecting a Chord Fingering Type.
Global Setting Press Voice Link “ON” to turn it on (orange font display). When this function is ON, if the song is changed when playing preset songs, the voice R1 is changed according to the melody of selected song automatically. EXIT Press the [EXIT] button to exit to Global Setting display. Controllers Pressing “Controller” on the Global Setting display or pressing “Controller” on Main Display will call up the Controller Setting display.
Global Setting Multi Pad The Multi Pads can be used to play percussion and pre-recorded chord that can be used to add impact and variety to your keyboard performances. Press any of the MULTI PADS to play the Multi Pad phrase. 1 2 3 4 5 6 7 8 Pressing “Pad” tab on the Controller Setting display will call up the Pad Setting display. Press the [MULTI PAD] button or press the pad button to select a pad to be edited. Assign PLAY DRUM function to the pad You can assign the pad to PLAY DRUM function. 1.
Global Setting Pedal Pressing “Pedal” tab on the Controller Setting display will call up the Pedal Setting display. Assign specific functions to the pedal Press the relevant button to select. Press this pedal to reduce the volume of the notes you play. SOSTENUTO If you play a note or chord on the keyboard and press the pedal while holding the note(s), the notes will sustain as long as the pedal is held. However, all subsequent notes will not sustain.
Global Setting Effect Pressing “Effect” on the Global Setting display will call up the Effect Setting display. Details see Voice. Press the [EXIT] button to exit to Global Setting display. MIDI I/O Pressing “MIDI I/O” on the Global Setting display will call up the MIDI Setting display. MIDI IN Press the relevant button to select the midi data that receive from the MIDI port or the USB port. Press the channel button to select the channel that receives the midi data.
Global Setting Fade In/Out FADE IN TIME Determines the time it takes for the volume to fade in. Determines the time it takes for the volume FADE OUT TIME to fade out. Determines the time the volume is held at 0 FADE OUT HOLD TIME following the fade out. Press the relevant time button to display a pop-up box. Use the DATA DIAL or Press the [+] and [-] buttons to select your desired time. System Reset Reset Performance Restores the all performance memory setting to the original factory settings.
Performance Memory The Performance Memory feature can make your performance more easily and efficiently. It allows you to save panel settings to a Performance Memory button, and then instantly recall your custom panel settings by pressing a single button (M1-M6). The saved settings for six Memory buttons should be saved as a single Bank (Performance file).
Performance Memory Freezing the Specific Item FREEZE The freezing function lets you maintain the settings of certain items and leave them unchanged, even when selecting other Performance Memory buttons. Press the [FREEZE ] button to turn the FREEZE function on or off. FREEZE How to select the frozen item? 1. Press the [BANK] button or press PERFORMANCE display area on the Main Display to call up the Performance Selection display. 2.
Performance Memory Saving, Deleting or Renaming the User Performance 1. Press“USER” or “USB” tab on Performance Selection display to call up the relevant display for user Performances. 2. Select your desired user performance by pressing the relevant name of user performance. 3. Press the “Menu” button to display the relevant buttons on the current display. 4. Press “SAVE TO USER” to call up soft keyboard display, enter the new name and press “OK” to save as a new user performance to the internal memory.
USB Device By connecting a USB storage device to your instrument, you can save data you’ve created to the connected device, as well as read data from the connected device. USB DISK Compatible USB device Recommended Brand: KINGSTON, SANDISK, SONY, LEXAR, TRANSCEND Format: FAT 16/32 Capacity: 1G,2G,4G,8G,16G,32G Using the USB device 1. Connect the USB storage device to the USB port. 2. Press the [USB DISK] button to display the folders and files under the root directory of USB device.
USB Device Viewing the file information Press the “Menu” button to display the relevant buttons on the current display. Press “File Info” to call up a pop-up box about the file information (EX. Full name, size, etc.). Creating a New Folder Press the “Menu” button to display the relevant buttons on the current display. Press “Folder” to call up soft keyboard display, enter the new folder name and press “OK” to create it. If the name you entered is same as the name of exited folder, a pop-up box will appear.
MIDI By using the MIDI functions you can expand your musical possibilities. This section explains what MIDI is, and what it can do, as well as how you can use MIDI on your instrument. What's MIDI? MIDI is an acronym that stands for Musical Instrument Digital Interface, which allows electronic musical instruments to communicate with each other, by sending and receiving compatible Note, Control Change, Program Change and various other types of MIDI data, or messages.
Troubleshooting Problem Possible Cause and Solution The speakers produce a “pop” sound whenever the power is turned ON or OFF. No sound when the keyboard is played. This is normal and is no cause for alarm. When using a mobile phone, noise is produced. The R1/R2/R3/L voice volume (Mixer) settings could be set to low. Make sure the voice volumes are set at appropriate levels. Using a mobile phone in close proximity to the instrument may produce interference.
Voice List No.
Voice List 112 Tango Accordion 2 Tango Accordion 2 169 Slap Bass 2 170 Synth Bass 1 Slap Bass 2 Guitar & Bass 113 Acoustic Guitar (nylon) Nylon Guitar 171 Synth Bass 2 172 Acoustic Bass 2 Synth Bass 2 173 Acoustic Bass 3 174 Acoustic Bass Detuned Acoustic Bass 3 175 Acoustic Bass Filter 176 Jazz Style Filter AcousBass 177 Acoustic Bass & Mute Guitar 178 Electric Bass (finger) 2 AcoBass&MuteGtr 179 Detuned Finger Bass 180 Dark Finger Bass Detuned FngrBass 181 Finger Slap Bass 2 182 Resonant F
Voice List 226 Choir Aahs Choir Aahs 227 Choir Aahs 2 Choir Aahs 2 228 Voice Oohs Voice Oohs 229 Humming Humming 230 Anlong Voice Anlong Voice 287 Trombone Trombone 231 Synth Voice Synth Voice 288 Trombone 2 Trombone 2 232 Orchestra Hit Orchestra Hit 289 Bright Trombone Bright Trombone 233 The Violin The Violin 290 Tuba Tuba 234 Violin 2 Violin 2 291 Muted Trumpet Muted Trumpet 235 Mono Violin Mono Violin 292 Muted Trumpet 2 Muted Trumpet 2 236 Octave Violin
Voice List 341 Sweet Soprano Sax Sweet Soprano Sax 342 Alto Sax 2 Alto Sax 2 343 Soft Alto Sax Soft Alto Sax 344 Super Alto Sax Super Alto Sax 345 Sax Band Sax Band 346 Tenor Sax 2 Tenor Sax 2 347 Baritone Sax 2 Baritone Sax 2 348 Soft Baritone Sax Flute & Woodwind 349 Oboe 350 English Horn 397 Pad 2a (sine pad) 398 Pad 3 (polysynth) Sine pad 399 Pad 4 (choir) 400 Pad 4a (itopia) Choir Pad 401 Pad 5 (bowed) 402 Pad 6 (metallic) Bowed Pad Halo Pad Soft Baritone Sax 403 Pad 7 (h
Voice List 455 Rising Rising 456 Congregate Congregate 512 Train 513 Jetplane 514 Starship 515 Burst Noise Starship FX 1 Rain 516 Applause 517 Laughing Applause 518 Screaming 519 Punch Screaming 520 Heart Beat 521 Footsteps Heart Beat 522 Gunshot 523 Machine Gun Gunshot 524 Lasergun 525 Explosion Lasergun FX & Effects 457 FX 1 (rain) 458 FX 2 (soundtrack) FX 2 SoundTrack 459 Prelude Prelude 460 FX 3 (crystal) FX 3 Crystal 461 FX 3a (synth mallet) Synth Mallet 462 Crystal 2 Cr
Voice List 569 Church Organ & Choir 570 Church Organ & Strings ChurchOrg&Choir 571 Harmonica & Acoustic Guitar 572 Harmonica & Strings Harmonica&AcGtr 573 Acoustic Guitar & Flute 574 Acoustic Guitar & Clavi AcGtr&Flute 575 24-Strings Guitar 576 24-Strings Guitar & Strings 24-Strings Guitar 577 Steel Guitar & Warm Pad 578 Stereo Strings & Horn SteelGtr&WarmPd ChurchOrg&Str Harmonica&Str AcGtr&Clavi 24-StrGtr&Str Strings&Horn 626 Marimba & Vibraphone 627 Wood Drum Marimba&Vibra 628 Xylophone 629
Style List No.
Style List 166 Country Pop 2 CntyPop2 NewAge Bluegrs2 Waltz & Traditional 192 Waltz 217 New Age 167 Bluegrass 2 Waltz 218 Tarantella Tarantel 168 2/4 Country 2/4Cntry 193 Old Waltz OldWaltz 219 Scottish Scottish 169 Country Quick Steps QuickStp 194 English Waltz EngWaltz 220 Norteno Norteno 170 Country Folk CntyFolk 195 German Waltz GemWaltz 171 Country Shuffle CnyShufl 196 Italian Mazurka ItaMazuk Pianist 221 Pianist 1 Pianist1 197 Mexico Waltz MexWaltz 222 Pianist 2 Pian
Chord List Chord Name Abbreviation Normal Voicing Display for Root "C" Major M 1+3+5 C Sixth 6 1+(3)+5+6 C6 Major seventh M7 1+3+(5)+7 Cm7 Major seventh add sharp eleventh M7(#11) 1+(2)+3+#4+5+7 CM7(#11) Add ninth (9) 1+2+3+5 C(9) Major seventh ninth M7(9) 1+2+3+(5)+7 CM7(9) Sixth ninth 6(9) 1+2+3+(5)+6 C6(9) Augmented aug 1+3+#5 Caug Seventh augmented 7aug 1+3+#5+b7 C7aug Major seventh augmented M7aug 1+(3)+#5+7 CM7aug Minor m 1+b3+5 Cm Minor sixth m6 1+b3+
MIDI Implementation List 21 108 100 95 75 25 5 0 80 aw_GRAND1000_Manual_G06_120912Part3 2012 9 12 12:33:50
100 95 75 25 5 Grand1000_G06 aw_GRAND1000_Manual_G06_120912Part3 2012 9 12 12:33:50 0