TASTIERA ELETTRONICA Manuale dell’Utente
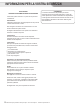
INFORMAZIONI PER LA VOSTRA SICUREZZA! PRECAUZIONI LEGGETE ATTENTAMENTE PRIMA DI PROCEDERE Conservate questo manuale in un posto sicuro per future consultazioni. Alimentazione Collegate il trasformatore di CA appropriato ad una presa di corrente dalla tensione corretta. ATTENZIONE Il normale funzionamento del prodotto può essere influenzato da forti campi elettromagnetici.In questi casi potete ripristinare il normale funzionamento reimpostando l’unità seguendo le istruzioni del manuale.
Sommario Descrizioni del Pannello & Display Mixer......................................................................19 Pannello Frontale......................................................4 Pannello Posteriore...........................................4 LCD...........................................................................5 Preparazione Alimentazione...........................................................6 Montare il Leggio.....................................................
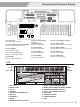
Descrizioni del Pannello & Display Pannello Frontale 120 SONGS 180 STYLES 001~018 Folk&Country 019~071 Golden&Pop 072~100 Classical 101~120 Piano 001~010 8Beat 011~020 16Beat 021~040 Pop&Ballad 041~055 Rock 056~074 Ballroom 075~086 Dance 087~099 Soul&Funk 508 VOICES 001~051 Piano 052~064 Chromatic Percussion 065~094 Organ 095~128 Guitar 129~153 Bass 154~185 Strings&Orchestral Instruments 100~118 Swing&Jazz 119~128 Country 129~142 Latin&Latin Dance 143~160 Waltz&Traditional 161~170 World 171~180 Pianist
Descrizioni del Pannello & Display 120 SONGS 180 STYLES 001~018 Folk&Country 019~071 Golden&Pop 072~100 Classical 101~120 Piano 001~010 8Beat 011~020 16Beat 021~040 Pop&Ballad 041~055 Rock 056~074 Ballroom 075~086 Dance 087~099 Soul&Funk 508 VOICES 001~051 Piano 052~064 Chromatic Percussion 065~094 Organ 095~128 Guitar 129~153 Bass 154~185 Strings&Orchestral Instruments 100~118 Swing&Jazz 119~128 Country 129~142 Latin&Latin Dance 143~160 Waltz&Traditional 161~170 World 171~180 Pianist 001 8BtBld 011
Preparazione Questa sezione contiene informazioni su come preparare lo strumento prima di suonare. Leggetela attentamente prima di accendere l’unità Alimentazione Questa tastiera elettronica può essere alimentata usando il trasformatore in CA specificato o a batterie. Prima di accendere lo strumento, abbassate il volume dell’unità e delle apparecchiature audio collegate. Open Usare le Batterie Inserite 6 batterie “AA” (SUM-3, Lr6) nel compartimento delle batterie. 1.
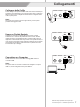
Collegamenti Collegare delle Cuffie PHONES SUSTAIN USB 12V Potete collegare alla presa PHONES delle cuffie stereo standard per esercitarvi senza disturbare o per suonare tardi la notte. Il sistema di diffusori interno viene scollegato automaticamente collegando delle cuffie a questa presa.
Alimentazione e Volume Generale Accensione e Spegnimento 1. Prima controllate di aver effettuato i collegamenti corretti in base alle istruzioni precedenti 2. Premete l’interruttore POWER SWITCH, lo schermo LCD si accende e mostra informazioni sui dati indicando che lo strumento è acceso. Nota: VOLUME Se il display non si illumina dopo aver acceso la tastiera, controllate le connessioni dell’alimentazione.
Suonare le Voice VOICE 1. Premete il tasto [VOICE]. Accedete al modo Voice. L’LCD mostra il nome e il numero della voice di default corrente. / NO / YES 2. Selezionate una Voice Usate la data dial o i tasti [+/Yes]/ [-/No] per selezionare la voice che volete suonare. Potete anche usare i pulsanti di selezione diretta delle voice per la selezione. 2 voice dirette per ogni tasto (upper e lower key). 3. Suonate la voice.
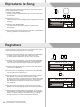
Riprodurre le Song SONG Questo strumento è dotato di 120 preset song. Ogni preset song può essere studiata tramite le Lesson. 1. Premete il tasto [SONG]. Entrate nel modo di selezione delle song, e suonano tutte le song ripetutamente. / NO / YES Toccata 2. Selezionate una song. Usate la data dial o i tasti [+/YES]/ [-/NO] per selezionare la song da riprodurre. 3. Premete il tasto [START/STOP]. Una volta avviata la riproduzione della song, questa suona ripetutamente. 4.
Le Voice Lo strumento offre 508 voice (timbri) preimpostate. Per offrirvi una migliore esperienza esecutiva, sono presenti alcuni utili effetti che possono essere attivati mentre suonate le voice. Fate riferimento al Function Menu. VOICE Selezionare una Voice Il numero della voice di default è 001 all’accensione e l’icona “VOICE R1” si accende nell’angolo superiore sinistro dell’LCD. Il nome e il numero della voice corrente appaiono nel display LCD.
Gli Style La funzione di accompagnamento automatico vi mette a disposizione un’intera band. Basta che suoniate gli accordi con la mano sinistra usando lo stile di accompagnamento selezionato, e l’accompagnamento suona automaticamente, seguendo istantaneamente gli accordi che eseguite. Con l’accompagnamento automatico, anche chi suona da solo può divertirsi suonando col supporto di un’intera band o orchestra. Questa tastiera è dotata di 180 style in una varietà di generi musicali differenti.
Gli Style Suonare Diverse Sezioni dell’Accompagnamento STYLE 1. Premete il tasto [STYLE]. 2. Premete i tasti Style Direct, usate la data dial o i tasti [+/YES]/ [-/NO] per selezionare uno style. 3. Premete il tasto [CHORD MODE] per accedere al modo A.B.C. (auto bass chord). 4. Premete il tasto SYNC START] 5. Premete il tasto [FILL A], selezionate la sezione Main A. 6. Premete il tasto [INTRO/ENDING]. Ora “A” appare nell’LCD, e lo style è pronto a suonare. 7.
Gli Style Diteggiatura degli Accordi Quinta Il modo in cui usare le dita per eseguire gli accordi con la mano sinistra (nella sezione dell’accompagnamento automatico della tastiera) è detto “diteggiatura”. Vi sono 2 tipi di diteggiatura, descritti sotto. Le Basi degli Accordi Tonica Terza Un accordo, in musica, è qualsiasi gruppo armonico di tre o più note che vengono eseguite simultaneamente. Gli accordi più comuni sono le triadi.
Gli Style Tempo Ogni style, in questo strumento è stato programmato con un tempo di default. Però potete cambiare questo tempo con i tasti [TEMPO +]/ [TEMPO -]. TEMPO ACCOMP 1. Usate i tasti [TEMPO +]/ [TEMPO -] per cambiare il valore del 2. tempo. Mentre i dati del tempo lampeggiano, usate anche la data dial. Premete simultaneamente i tasti [TEMPO+] e [TEMPO-] per ripristinare il tempo di default.
Il Menù Function SHIFT Tenete premuto il tasto [SHIFT] e poi premete il tasto [FUNCTION] per accedere al menù delle funzioni. Il display LCD mostra la funzione “Tune” di default. Usate i tasti [+/YES]/ [-/NO] per impostare il parametro del menù corrente. Le opzioni e i parametri sono elencati sotto: No.
Il Menù Function Beat Type 1. Tenete premuto il tasto [SHIFT] e poi premete ripetutamente il 2. SHIFT tasto [FUNCTION] per selezionare il menù beat. L'LCD mostra “xxx Beat”. Usate i tasti [+/YES]/ [-/NO] o la data dial per cambiare la suddivisione ritmica. I valori di beat type sono: 0, 2~9. Premete simultaneamente i tasti [+/YES] e [-/NO] per impostare il valore di beat type sulla sua impostazione di default: 4. PIANO FUNCTION / NO / YES Beat Pedal Type 1.
Il Menù Function Reverb Level Tenete premuto il tasto [SHIFT] e poi premete ripetutamente il tasto [FUNCTION] per selezionare il livello dei riverbero. L'LCD mostra “xxx Rev Lev”, valori impostabili: 0-32. Usate i tasti [+/YES]/ [-/NO] o la data dial per cambiare il livello dei riverbero. Premete simultaneamente i tasti [+/YES] e [-/NO] per ripristinare il valore di default: 23.
Il Menù Function MIDI IN/ OUT Tenete premuto il tasto [SHIFT] e poi premete ripetutamente il tasto [FUNCTION] per selezionare il menù MIDI in/ out. L'LCD mostra “xxx Midi In”/ “xxx Midi Out”. 1. Usate i tasti [+/YES]/ [-/NO] o la data dial per cambiare il canale di ricezione MIDI in: 1~16, ALL. Premete simultaneamente i tasti [+/YES] e [-/NO] per riportare il canale MIDI in sul valore di default: ALL. 2. Usate i tasti [+/YES]/ [-/NO] o la data dial per cambiare il canale di trasmissione MIDI out: 1~16.
Impostazioni Relative agli Effetti Octave SHIFT Tenete premuto il tasto [SHIFT] e poi premete il tasto [OCTAVE] per selezionare il menù della funzione octave. L'LCD mostra “xxx Octave”. Usate i tasti [+/YES]/ [-/NO] o la data dial per cambiare il valore dell’ottava, valori impostabili sono: -1~ +1. Premete simultaneamente i tasti [+/YES] e [-/NO] per ripristinare il valore di: 0. METRONOME OCTAVE / NO / YES Octave Touch 1.
Impostazioni Relative agli Effetti Pitch Bend Usate la rotella del pitch bend per alzare l’intonazione delle note (fate scorrere la rotella verso l’alto) o abbassarla (fate scorrere la rotella verso il basso) mentre suonate la tastiera. La rotella del pitch bend ritorna automaticamente al centro ripristinando l’intonazione non alterata quando la rilasciate.
La Memoria Registration La funzione Registration Memory rende ogni vostra esecuzione più facile ed efficiente. Vi permette di salvare tutte le impostazioni del pannello in una Registration Memory, e di richiamarle istantaneamente premendo un solo pulsante. I Registration Bank BANK STORE M1 M2 M3 M4 RECORD PLAY DUAL LOWER DICT. DSP Vi sono 8 banchi di memorie, e ogni bank ha 4 memorie (M1-M4). Salvare le Impostazioni del Pannello e Richiamare le Impostazioni Salvate 1.
Registrare Con le funzioni di registrazione facili da usare, potete registrare la vostra esecuzione alla tastiera in tempo reale sotto forma di user song. Questo strumento permette di registrare fino a 5 user song. Preparare la Registrazione SHIFT BANK 1. Prima di registrare, selezionate una user song in cui salvare la registrazione. RECORD 2. Tenete premuto il tasto [SHIFT] e poi premete il tasto [RECORD] per selezionare una user song, l’icona “REC” si accende.
Registrare Riprodurre la Registrazione SHIFT STORE 1. Durante la registrazione, tenete premuto il tasto [SHIFT] e premete il tasto [PLAY] per accedere all’interfaccia di selezione. L’LCD mostra “XXX NoFile_X”, se avete selezionato una user song che non contiene dati registrati; o l’LCD mostra “XXX PlySongX”, se avete selezionato una user song con dati registrati, per esempio, “001 PlySong1”. Potete usare i tasti [+/YES]/ [-/NO] o la data dial per selezionare una user song che volete riprodurre.
Il Modo Piano Questa funzione imposta la voice dell’intera tastiera su un timbro di piano istantaneamente. 1. Premete il tasto [PIANO] per attivare o disattivare il modo piano. PIANO FUNCTION 2. In modo piano, il controllo dell’accompagnamento è uguale a quello degli altri modi. L’accompagnamento suona solo il ritmo. Piano Nota: In modo piano, potete impostare la funzione mixer e accedere al menù Function.
Le Song Il Modo Lesson Il modo Lesson mode usa 4 combinazioni di tasti: [SHIFT] + [LESSON], [SHIFT] + [L], [SHIFT] + [R] e [SHIFT] + [L] + [R]. 1. Accedere al modo Lesson Mentre la song è ferma, tenete premuto il tasto [SHIFT] e premete il tasto [LESSON]. 2. Selezionare la mano da esercitare. Tutti i brani possono essere studiati valutando diversi aspetti: temporizzazione, correttezza delle note, ed entrambi. E la tastiera ha un sistema di valutazione che vi informa sui vostri progressi.
Il Dizionario degli Accordi Se conoscete il nome di un accordo, ma non sapete come eseguirlo, potete usare la funzione Chord Dictionary. Potete imparare l’accordo e provarlo grazie a questa funzione che mostra le note dell’accordo nel display LCD. DICT 1 (Imparare gli Accordi) Tenete premuto il tasto [SHIFT] e premete il tasto [DICT.] per accedere al modo DICT 1, l'LCD mostra “Dict.1” e la funzione A.B.C. viene attivata automaticamente.
Le Funzioni del Pedale L’uso del pedale rende la vostra esecuzione più naturale e maggiormente espressiva. PHONES SUSTAIN USB 12V Pedal Multi-funzione Potete fare riferimento alla sezione Pedal Type per i dettagli. 1. Sustain Pedal Questa funzione del pedale svolge la stessa funzione del pedale del forte di un piano acustico, permettendovi di mantenere in risonanza le note anche dopo aver rilasciato i tasti. Premete il pedale per attivare l’effetto.
Il MIDI Utilizzando le funzionalità MIDI, potete espandere le vostre possibilità musicali. Questa sezione spiega che cos’è il MIDI, e cosa può fare, ed anche come usare il MIDI sul vostro strumento. PHONES SUSTAIN USB 12V Che Cos'è il MIDI? 1. MIDI (acronimo di Musical Instrument Digital Interface) consente ad un’ampia varietà di strumenti musicali elettronici, computer, e altri apparecchiature simili di collegarsi e comunicare tra loro.
Risoluzione di Eventuali Problemi Problema I diffusori producono un “pop” all’accensione o spegnimento Lo strumento è acceso, però non si produce suono quando agite sui tasti. Quando usate un telefono cellulare, si producono dei rumori. L’accompagnamento automatico non suona anche se Sync è in standby e suonate un tasto. Si producono note sbagliate quando suonate la tastiera. Harmony non funziona. Possibile Causa e Soluzione Questo è normale e non deve preoccuparvi.
Lista delle Voice NO.
Lista delle Voice 108 Electric Guitar (pedal steel) PedalGt 162 Tremolo Strings TreStr 109 Electric Guitar (clean) CleaGt 163 Tremolo Strings 2 TreStr 2 110 Electric Guitar (clean) 2 CleaGt 2 164 Pizzicato Strings PizStr 111 Electric Guitar (detuned clean) DetClGt 165 Orchestral Harp Harp 112 Mid Tone Guitar MidGt 166 Yang Chin YangChin 113 Electric Guitar (muted) MuteGt 167 Timpani Timpani 114 Electric Guitar (muted) 2 MuteGt 2 168 String Ensembles StrEns 115 Electric Guitar (fu
Lista delle Voice Quint Quint Oboe 268 216 2 Oboe 2 Oboe Synth Pad 217 English Horn EngHorn 269 Pad 1 (new age) 2EngHorn 270 Pad 2 (warm) WarmPd Sine Pad 215 Oboe 218 2 English Horn NewAge 219 Bassoon Bassoon 271 Pad 2a (sine pad) 220 2 Bassoon 2Bassoon 272 Pad 3 (polysynth) PolySyn 221 Clarinet Clarine 273 Pad 4 (choir) ChoirPd 222 2 Clarinet 2Clarine 274 Pad 4a (itopia) ItopiaPd 275 Pad 5 (bowed) BowedPd Pipe 223 Piccolo Piccolo 276 Pad 6 (metallic) MetaPd 224
Lista delle Voice 321 Bag Pipe BagPipe 375 High Timbale HiTimbal 322 Fiddle Fiddle 376 Low Timbale LoTimba 323 Shanai Shanai 377 Cabasa Cabasa 378 Maracas Maracas Percussive 34 324 Tinkle Bell TinkBe 379 Analog Maracas AnMarac 325 Agogo Agogo 380 Short Guiro ShGuiro 326 Steel Drums SteeDru 381 Long Guiro LoGuiro 327 Woodblock WoodBlo 382 Claves Claves 328 Castanets Castan 383 Mute Cuica MuCuica 329 Taiko Drum TaiDrum 384 Open Cuica OpCuica 330 ConcertBass Drum ConBsD
Lista delle Voice 429 Screaming Scream 483 Flute & Clarinet Fl& Cl 430 Punch Punch 484 Flute & Oboe Fl&Ob 431 Heart Beat HeartBea 485 Flute & Bassoon Fl& Bn 432 Footsteps Footstep 486 Flute & Oboe & Clarinet Fl&Ob&Cl 433 Gunshot Gunshot 487 Flute & Clarinet & Bassoon Fl&Cl&Bn 434 Machine Gun MachiGun 488 Flute & Oboe & Bassoon Fl&Ob&Bn 435 Lasergun Lasergun 489 Flute Octave FlOct 436 Explosion Explosio 490 Flute & Oboe Octave Fl&ObOct 491 Flute & Clarinet Octave Fl&C
Lista degli Style NO.
Lista degli Style NO. Nome Nome LCD NO.
Lista delle Song NO.
Lista delle Song NO.
TABELLA DI IMPLEMENTAZIONE MIDI 1-16ch 1-16ch 1-16ch 3 Manuale di proprietà di Frenexport Spa - www.frenexport.it - vietata la riproduzione.