Thank you for purchasing this electronic keyboard. In order to obtain maximum performance and enjoyment from the keyboard, please follow the steps outlined in this manual while actually trying out its features. We are sure you will enjoy it and discover the limited possibility of your new keyboard. 7 1. 2. 3. 4. 5. 6. 7. 8. 9. 10. 11. 12. 13. 14. 15. 16. 17. 18. 19.
Preparation Take Care of Your Unit Using Power Adapter 1. Avoid placing the unit in areas that are subject to excessive humidity or heat. 2. Avoid locations in which the unit is likely to be exposed to excessive dust or moisture. 3. Do not place any heavy objects on the unit, and subject it to strong physical shock. 4. Never use chemicals such as benzine or thinner to clean the unit . An AC adaptor is required when use household current. The adaptor shall be 9-12V DC output, 500MA, center positive type.
Plug an audio cord into PHONE jack. Then plug the other end of the cord into LINE IN or AUX IN of the amplifier. Play the Keyboard 1. To turn on the keyboard, set POWER to ON. The display lights. a "score" to show you the notes that are playing (center of the display) Note: To remind you to save power during operation, the keyboard automatically sounds a voice about every 5 minutes if you do not press a key. a "keyboard" to show you the fingering and which keys are pressed (bottom of the display) 2.
Selecting/Playing a Preset Voice 1. Press VOICE. VOICE and the current voice's number appears. 3. Press START/STOP to start the selected Auto-Style. Note: Each time you turn the keyboard on, it automatically selects the voice Grand PIANO (No. 01). 4. To change the tempo, repeatedly press TEMPO + or TEMPO -. The current tempo setting appears. 2. To play a different voice, choose a preset voice from the VOICES list and enter its two-digit number on the number button.
Using Auto Accompaniment 5. Begin the accompaniment at the desired interval by pressing the desired accompaniment key(s). The 19 keys on the left side of the keyboard with note labels above them are called accompaniment keys. The accompaniment keys you press determine the type of chord that plays. 6. To play a melody along with the accompaniment, press any key(s) to the right.
pressed LEARNING, a black dot appears next to MELODY GUIDE and a note appears. Press the correct key to continue learning. The song doesn't play until you press the correct key. MELODY GUIDE - in this mode, the melody does not play until you play a correct note. The next note of the song appears. MELODY OFF -in this mode, you can play melody with accompaniment. Follow these steps to set the learning mode. 1.
Using Sustain For added flexibility and control as you make music, you can set the keyboard, so it sustain sound. To sustain notes you play, press SUSTAI N.SUSTAIN appears and the keyboard sustains the played note until you release SUSTAIN. Press SUSTAIN again to turn off sustain. Percussion Pads Using a Percussion Pad Your keyboard's percussion pads put the sound of 5 different percussion instruments (bass drum, snare drum, hi-hat open, high tom-tom, and hi-hat close) at your finger tips.
Connecting with PC (Personal Computer) 1. Switch off both keyboard and PC. 2. Connect the keyboard and PC with a MIDI adaptor (one end with 5-pin plug and the other end with 15-pin plug). 3. Switch on both keyboard and PC. Make sure to minimize the volume setting by pressing the VOLUME -. 4. To select your desired channel (0116)which shown on the LCD display, press the MIDI button on keyboard. 5. You can play the keyboard by pressing the black & white keys.
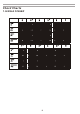
Chord Charts 1.
2. Fingered A.
2. Fingered B.