ELEKTRONISCH KEYBOARD MD200 2 Gebruiksaanwijzing
VEILIGHEIDSINFORMATIE WAARSCHUWING FCC-VOORSCHRIFTEN (VOOR DE VS) THE FCC REGULATION WARNING (for USA) Deze apparatuur is been getesttested en bevonden tetovoldoen This equipment has and found complyaan withde the beperkingen vanBeen Class B digitaal apparaat, limits for a Class digital device, pursuant to Part volgens 15 of thePart FCC 15 van de FCC-reglementen. Rules.
Inhoudsopgave Beschrijving bedieningspaneel en –venster Panel & Display Description Frontpaneel Front Panel..........................................................................4 4 Achterpaneel Rear Panel...........................................................................5 5 LCD-venster Display.................................................................................5 5 Voorbereiding Setup Voeding Power Supply.......................................................................
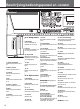
Beschrijving bedieningspaneel en -venster Frontpaneel Front Panel 21 15 16 17 18 4 3 6 19 20 7 5 1 44 45 46 1. Aan/uit-schakelaar 1...POWER / OFF aan of Schakelt hetON apparaat Turn uit. the power on and off. 2...MASTER VOLUME 2. Master Volume Set a volume level with itin. control. Stelt het geluidsniveau 3...PERFORM 3. Perform Enter the Performance Activeert de Performance Assistant. Assistent. 4...IFX 4. IFX Turn the Insert Effect on and off. Schakelt het Insert-Effect aan of uit. 5...
Beschrijving bedieningspaneel en -venster 42 26 43 27 25 41 36 24 38 28 29 30 31 32 33 37 40 39 35 Achterpaneel Rear Panel 38. -/NO 38.../ NO Doet de waarde afnemen Decrease the displayed met value1.by 1. 42. Voice Direct 42...VOICE DIRECT Select-toets kiest geluiden SELECT BUTTON Select a rechtstreeks. direct voice. 39. +/YES 39...+ / YES Doet de the waarde toenemen Increase displayed met value1.by 1. 43 LCD display 43...
Voorbereiding Deze behandelt opzetten van het instrument de voorbereidingen te gaan spelen. Leesgo deze This sectie section containshet information about setting upen your instrument andalvorens preparing to play. Please through this sectie aandachtig door voordat het apparaat wordt ingeschakeld. section carefully before turning the power on. Power Supply Voeding First,ervoor please sure that POWER ON/OFF switch thestaat. 1.Zorg 1.
Aansluitingen Connecting a pair of Headphones Een hoofdtelefoon aansluiten A standard pair of stereo headphones can be plugged in herevan Een standaard hoofdtelefoon kan worden aangesloten ten behoeve for private practice or late-night playing. The stereo bijvoorbeeld oefenen zonder anderen te storen en internal gebruik in de late uurtjes.
Demo's afspelen Het instrument is voorzien van 5 prachtige demoʼs. Zie de Demo-lijst. The instrument features 5 wonderful demos. Please refer to DEMO LIST. Press the [STYLE] [VOICE] buttons simultaneously 1.Druk 1. gelijktijdig op de and knoppen STYLE en VOICE om de demo to weer start playing the demo. te geven. 2.Kies de demo-song. 2. Select a demo song. Use the data dial, the [+/YES] button or the [-/NO] button to Gebruik het datawiel, of de knoppen +/YES of -/NO om de song te select a demo song.
Geluiden gebruiken Playing Two Voice Simultaneously-DUAL Twee geluiden gelijktijdig-DUAL Press [DUAL] button. 1. op the de DUAL-toets. 1.Druk 2. devoices. geluiden. Play the 2.Bespeel Er klinken tegelijkertijd twee verschillende, gestapelde geluiden. Het Two different voices are sounded simultaneously in a layer. geluidsnummer wordt in het LCD-venster The numbervan of het thegestapelde dual voicegeluid will be displayed on the LCD.getoond. 3. een geluid voor for VOICE R2 R2. Selecting a voice VOICE 3.
Geluiden gebruiken Sustain Als Sustain geactiveerd, klinken langer uit. Druk op de When the is Sustain is turned on,alle all gespeelde notes will noten play with a longer SUSTAIN-knop uitklankeffect AAN of zetten. sustain. Pressom thedit[SUSTAIN] button toUIT turntethe SUSTAIN effect ON or OFF. Opmerking: Het indrukken van het sustainpedaal heeft een groter effect dan het gebruik Note: van de SUSTAIN-knop.
Begeleidingsautomaat De automatische begeleidingsfunctie geeft ajefull eenbacking volledig band begeleidingsorkest onder handbereik. Het enige wattojedo is play the The auto accompaniment feature puts at your fingertips.
Begeleidingsautomaat Accompaniment Sections Begeleidingssecties Er zijn verschillende die je in sections staat stellen There are various types typesbegeleidingssecties of Auto Accompaniment thathet allow you toaan vary arrangement ofdie thejeaccompaniment toIntro, Main arrangement te the passen aan de song speelt. De secties: match the song are playing. They are: Main (A, B), (A, B), Fill-In (A, B)you en Ending. Door tussen dezeIntro, secties te schakelen, Fill-in (A, B) anddynamische Ending.
Begeleidingsautomaat Note: Opmerking: Hold down the FILL-IN A/B button when the style is playing, the Wanneer de FILL-IN A/B-toets ingedrukt wordt gehouden, wordt het selected FILL pattern repeats continuously until button is geselecteerde Fill-In-patroon herhaald totdat de knop weer wordt losgelaten. released. Druk de FILL-IN wanneer stylechange stopt, waarna teruggaat naar PressopFILL-IN A/BA/B-toets when style stop,de it will to the hij normal de gewone sectie. verlicht.
Begeleidingsautomaat Inde theC-drieklank C major triad shown, thegrondtoon lowest note is the “root” the In hierboven is de de laagste noot inof het akkoord. Dit is gebruik van andere dan de chord (this is de the“grondligging”. chord’s “rootHet position”…using other chord grondtoon “omkeringen”.The De grondtoon notes for als thelaagste lowest noot noteresulteert results inin “inversion”).
Begeleidingsautomaat The FULL RANGE mode De Full Range-modus When the detection is is iningesteld the FULL mode, the Wanneer de chord akkoordherkenning opRANGE de Full Range-modus instrument will creëert automatically createautomatisch appropriateeen accompaniment (volledig bereik), het instrument passende while you als playje just anything bothklavier hands, anywhere begeleiding met about beide handen hetusing volledige bespeelt. on the keyboard.
Digitale effecten With built in digital effects, can add ambiance and depth youraan music in a variety of ways – such as Met dethe ingebouwde effecten kun jeyou op verschillende manieren ruimte en to diepte je muziek toevoegen – zoals adding that makes you sound like you speelt are playing a concert hall adding galm, diereverb je laat klinken alsof je in een concertzaal of een in verdubbeling vooror een vol, rijkharmony geluid. notes for a full, rich sound. DSP Theeffect effect will toegevoegd. be applied.
Harmoniseren Je kunt een verscheidenheid aan harmoniserende noten toevoegen aan de noten die je in de rechterhandzone speelt. You can add a variety of harmony notes to the keys you played in the right-hand section. Selecting a Harmony type een harmoniseervorm Kies Press [FUNCTION] button. 1.Druk 1. opthe de FUNCTION-knop. 2.Kies “DUET”. 2. Select “DUET”. Use the [FUNCTION], [BACK] or [NEXT] button to select Gebruik de toetsen FUNCTION, BACK of NEXT om “Duet” te selecteren. Het Duet.
Insert-effect 1. opthe de IFX-knop. Press [IFX] button. 1.Druk Schakel Insert-effect, Het LCD-venster Turn het on the IFX and het theIFX-pictogram icon “IFX” willlicht be op. lighten. The LCD toonr displays it means the default effect setting “Chorus”, wat“Chorus”, betekent dat de standaard instelling Chorus is. is Chorus. 2. Zet het effect uit. off theop effect. 2.Turn Druk nogmaals de IFX-knop om het Insert-effect uit te schakelen.
Geheugen Dit keyboard is een instrument met with een verscheidenheid aan bedieningsorganen functies. Het Memory geheugenfeature kan je can make The keyboard is an instrument a variety of controls and functions, theenRegistration uitvoering sterk vereenvoudigen en doelmatiger maken. Je kunt vrijwel alle instellingen van het bedieningspaneel your performance more easily and efficiently.
Song Het keyboard heeft een muziekbibliotheek van 120 voorgeprogrammeerde songs. Elke song kan worden geoefend in de Les-modus. The keyboard has a music library of 120 preset songs. Each song can be practiced in LESSON mode. Listening to the Songs Songs beluisteren Press [SONG] button to entertethe songtotmode and it will de 1.Druk 1. opthe de SONG-knop om toegang krijgen de Song-modus; playworden all songs circularly. songs achter elkaar in een lus afgespeeld. 2. Kies een song. 2.
Song 2.2.Kies de oefenhand. Select the practice hand. Er zijn 3 lesniveaus. Gebruik knoppenUse RIGHT of LEFT om de hand There are 3 levels of thedelessons. [LEFT] or [RIGHT] buttonwaarmee to selectjewhich hand you want van to practice. If neither te kiezen wilt oefenen. Als geen beide handen is hand is selected, keyboard will automatically select the gekozen, selecteert hetthe keyboard automatisch voor de oefeningen voor right hand practice for you. de rechterhand.
Song Lesson 3 - Performance Les 3 – Uitvoering Press [LESSON] in LESSON 2om to toegang enter thetelesson 1.Druk 1. in the de Les 2-modus button op de LESSON-knop krijgen tot 3 demode. Les 3-modus. In Les LESSON 3 mode, it will score yourzowel practice by the In de 3-modus beoordeelt het keyboard op ritmiek/timing als of the timevan value and note. op correction juistheid/trefzekerheid de noten. Press [START/STOP] button totestart to practice. 2.Druk 2. opthe START/STOP om te oefening beginnen.
Akkoordenboek Chord in essentially feite een “akkoordenboek” datbook” helpt bij hethelp vaststellen de individuele van eencan learn the ChordDictionary dictionaryis is a built-in “chord that you tovan check the Chordnoten notes. You akkoord. Hiermee kun je akkoorden leren en uitproberen. chord and test in this features.
Song-opname Met gebruiksvriendelijke Song-opnamefuncties je eigen opvoering opnemen in een Gebruikerssong. ErUser song. 5 Withdethe easy-to-use song recording features,kun youjecan record your own keyboard performances as a user songs can be recorded withopgenomen 3 tracks (1met ACCOMP track, 2 MELODY tracks) each.2 melodiesporen). kunnen 5 Gebruikerssongs worden elk 3 sporen/partijen (1 begeleidingsspoor, Starting Recording Opname starten Press button om to enter theteuser song selection 1.Druk 1.
Song-opname Stoppingbeëindigen Recording Opname Druk de opname nogmaals op decan RECORD-toets om de Pressgedurende [RECORD] again while recording stop this action immediately. oname onmiddellijk te beëindigen. When thedecapacity is full, the recording will be stopped Wanneer beschikbare opnamecapaciteit zijn einde heeft bereikt, stopt automatically. de opname automatisch. When the record ending is finished, the recording will be stopped automatically.
Uitvoeringsassistent What’s theUitvoeringsassistent? Performance Assistant? Wat is de Performance Assistant angebruiksvriendelijke easy-to-use function. With De Uitvoeringsassistent is is een functie. Metthis deze functie function youboeiender will find playing will be interesting. Evenbent, if helpt zul je spelen vinden. Zelfs alsmore je geen keyboardspeler you are not a keyboard player, the Performance Assistant will help you to play your familiar instrument voice on the keyboard. vertrouwd mee bent.
Uitvoeringsassistent Playingin in de theGitaar-modus Guitar Mode Spelen Speel akkoord in de Akkoordenzone Play een a chord in the chord part. Het LCD-venster toont akkoordtype het basis gitaargeluid A chord type will be een displayed on theenLCD and the guitar base klinkt. will be sounded. GUITAR KEY MAP Speel gebroken akkoord Subzone 1 Play een a broken chord in theinsub area 1.
Uitvoeringsassistent Modus Traditionele Chinese Instrumenten Klaviertoekenning Traditionele Chinese instrumenten. Chinese Traditional Instruments Key Map In je geluiden van een Chinese instrumenten Indeze this modus mode, kun a keyboard player canaantal play some Chinese The Chinese Traditional Instruments key map door middel van heteasily klavierby bespelen. Je keyboard. kunt kiezen There uit 5 instrumenten: instrument voice using the are 5 is as the picture: GUZHENG, andGUZHENG, ZHONRUAN.
Andere functies Turning the Metronome ON/OFF Metronoom aan/uitschakelen Press [Metronome] buttonomtode turn the metronome on. 1.Druk 1. op the de METRONOME-toets metronoom aan te zetten. METRONOME Press the [Metronome] button again toom turn metronome 2.Druk 2. nogmaals op de METRONOME-knop dethe metronoom uit te off. zetten. GrandPn1 Tuning Stemming 1. op the de FUNCTION-toets. Press [FUNCTION] button. 1.Druk Select “TUNE”. 2.Kies 2. “TUNE”. Use de [FUNCTION], [BACK]BACK or [NEXT] button select TUNE.
Andere functies Setting the Octave Octaafinstellingen Press [FUNCTION] button. 1.Druk 1. op the de FUNCTION-toets. Select “OCTAVE”. 2.Kies 2. “OCTAVE”. Use [FUNCTION], [BACK] or [NEXT] button to select OCTAVE. The LCD displays the octave value. The value LCD-venster toont de huidige instelling. Deze waarde heeft een bereik van -1 ranges from -1 to 1 and the default value is relevance to the tot 1voice. en de standaardwaarde is afhankelijk van het gekozen geluid.
Andere functies Fade Out Durat Fade-out-duur 1. opthe de FUNCTION-toets. Press [FUNCTION] button. 1.Druk 2. “FADE OUT”. Select “FADE OUT”. 2.Kies Use [FUNCTION], [BACK] BACK or [NEXT] button select FADE Gebruik de toetsen FUNCTION, en NEXT om to FADE OUT te kiezen. Het FUNCTION BACK NEXT OUT. Thetoont LCDdedisplays the time Deze value.waarde The value LCD-venster huidige instelling. heeft ranges een bereik van 1 from 1 to 30 and the default value is 10.
MIDI-functies Door middel van de MIDI-functies kunnen je je muzikale mogelijkheden sterk uitbreiden. Dit hoofdstuk wat By using the MIDI functions you can expand your musical possibilities. This section explainsbehandelt what MIDI is, and what MIDI watas MIDI hoeyou je MIDI instrument kunt gebruiken. it canis,do, wellkan asen how can met usejeMIDI on your instrument.
Probleemoplossing Mogelijke oorzaak en oplossing Probleem Problem Possible Cause and Solution speakersproduceren produce aeen “pop” sound This is normal is no cause for alarm. is normaal en and het kan geen kwaad. DeThe luidsprekers tikgeluid telkens als het Dit whenever the power is turned ON or OFF. apparaat wordt in- of uitgeschakeld. De Volume-instellingen (Mixer) staan op een te laag niveau. Zorg ervoor No sound when the keyboard is played.
Geluidenlijst No. Name PIANO 1 2 3 4 5 6 7 8 9 10 11 12 13 14 15 16 17 18 19 20 21 22 23 24 Acoustic Grand Piano Stereo Grand Piano 1 Grand Piano Bright Piano Stereo Grand Piano 2 Electric Grand Piano Grand Piano / W Honky-Tonk Honky-Tonk / W E.Piano 1 Detuned E.P1 E.Piano 1 / V 60's E.Piano E.Piano 2 Detuned E.P2 E.Piano 2 / V E.Piano Legend E.
Geluidenlijst PAD 172 173 174 175 176 177 178 179 180 181 NewAge Pad Warm Pad Sine Pad Poly Synth Space Choir Itopia Bowed Glass Metal Pad Halo Pad Sweep Pad EFFECTS 182 183 184 185 186 187 188 189 190 191 192 Fx Rain Sound Track Crystal Syn Mallet Atmosphere Brightness Goblins Echo Drops Echo Bell Echo Pan Star Theme ETHNIC 193 194 195 196 197 198 199 200 201 202 203 204 Sitar 1 Sitar 2 Banjo Shamisen Koto Taisho Koto Kalimba Bag Pipe Fiddle Shanai Tinkle Bell Agogo PERCUSSIVE 205 206 207 208 209 210
Geluidenlijst 36 348 349 350 351 352 353 354 355 356 357 358 359 360 361 362 363 364 365 366 367 368 369 370 371 372 373 374 375 376 377 378 379 380 381 382 383 384 385 386 387 388 389 390 391 392 393 394 395 396 397 398 399 400 401 402 403 404 405 406 407 408 Tremolo Tango 2 Accord Bass Fx+Accordion 1 Harpsichord+Accordion Fx+Tango 2 Accordion+Percussion EP+Marimba Et Steel 1 Ad Synth Bass Organ Guitar Guitar Honky 1 Mix Guitar Wah Guitar Reverse Overdrive Guitar Mix Overdrive 1 Harpsichord+Honky Mix Ov
Style-lijst No.
Songlijst No.
Akkoordenlijst Chord Name (Abbreviation) Normal Voicing Chord Display Major [M] Major sixth [6] Major seventh [M7] Major sharp eleventh [b5] Major seventh sharp eleventh [M7b5] Major seventh sharp eleventh [M7#11] Major add ninth [Madd9] Major ninth [M9] Major sixth add ninth [6 9] Augmented [aug] Minor [m] Minor sixth [m6] Minor seventh [m7] Minor seventh flatted fifth [m7b5] Minor add ninth [madd9] Minor ninth [m9] Minor eleventh [m11] Minor major ninth [mM7] Minor major ninth [mM9] Diminished [dim] D
MIDI-implementatiekaart Function Basic Channel Mode Note Number Velocity Default Changed Default Messages Altered Note :True voice Note on Note off key’s Ch’s After Touch Pitch Bend 0 Control 1 Change 5 6 7 10 11 64 65 66 67 80 81 91 93 120 121 123 Transmitted Recognized 1ch 1-16ch × × *********** 0—127 *********** ○ 9nH,V=1-127 × (9nH,V=0) × × ○ ○ ○ × ○ ○ × × ○ × × ○ ○ ○ ○ ○ × × ○ ○ *********** × × × × × × *1 × ○ × × ALL 1-16ch 3 3 × 0—127 0—127 ○ 9nH,V=1-127 ×(9nH,V=0; 8nH,V=0-127) × × ○ ○ ○ ○ ○ ○ ○