Software manual GoPal Navigator Version 4
GoPal Navigator Version 4 Contents CHAPTER 1. INTRODUCTION ................................................................................. 1 Greeting.................................................................................................................................................. 1 Contents of CD/DVD ............................................................................................................................. 1 System requirements.............................................
Software manual CHAPTER 5. ADJUSTING THE SETTINGS ........................................................... 21 Basic settings for operation............................................................................................................... 21 Security settings................................................................................................................................ 22 Music track title ........................................................................................
Software manual iii
GoPal Navigator 4 Chapter 1. Introduction Greeting Welcome and thank you for choosing our mobile navigation system. While the instructions included with the device outline the basic operation of your navigation device and additional applications (MP3 Player, Picture Viewer etc.
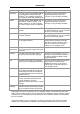
Introduction Element Description Target folder ActiveSync This folder contains the installation data for This program must be installed to the ® Program Files directory on your PC the synchronisation software Microsoft ® ActiveSync . This software synchronises (manually or using the Setup Assistant). your navigation device with a Windows PC. Adobe This folder contains the installation data for This program must be installed to the ® ® ® Program Files directory on your PC Adobe Adobe Acrobat Reader .
Introduction included: That means that you can use your navigation system straightaway, without having to install anything else. ® We do, however, recommend that you install additional applications like GoPal Assistant or ® ® ® Adobe Acrobat Reader to be able to take advantage of the corresponding functions. In addition, it may be necessary, due to a malfunction, for you to reinstall various software components for your navigation system after the fact.
Introduction • Entries taken from the software (like buttons, menu items or labels for check boxes) are in bold. • Specific functions and programs of your navigation system (e. g. MP3 Player etc.) or PC (e. g. Windows Explorer etc.) are italicised. • Information about directories and paths (on the external SD card or on the flash memory of your navigation device) are italicised.
Introduction • Please note that your navigation device must be set to the local time zone to be able to calculate the correct time of arrival for future route calculations. • You can also follow your current position on the map without entering a destination. If available, the name of the street you are currently on will be displayed • Note that temporary local changes and/or restrictions to road traffic regulations (e. g.
GoPal Navigator 4 Chapter 2. Manual installation and start-up The Windows CE operating system has already been installed on your navigation device. In addition, software components such as the navigation software or map material for various countries (depending on the version) may already be pre-installed on the device or on the memory card supplied.
Manual installation and start-up 2. Insert the memory card into the MMC/SD card slot of your navigation device until you hear a click. 3. Switch on the navigation device by pressing the ON/OFF switch on the device (see device operating instructions). The necessary software components will now be installed automatically. If you switch on your navigation device without inserting the memory card supplied, the following screen appears. Insert the memory card into your device and tap the button installation.
Manual installation and start-up Reinstallation and updating the software If necessary, you can remove all or individual application files such as the navigation software or map material from the memory of your navigation device (see device operating instructions). This ® would be necessary, for example, to install a current version of the GoPal Navigator software that you purchased at a later date.
Manual installation and start-up 5. Go to the directory window of the external memory card and create a new folder called MapRegions. 6. Now put all of the copied files into this folder. Proceed as follows to copy additional POI files from the inserted CD/DVD to the memory card: 1. Open the POI folder in the directory of your CD/DVD drive. 2. Copy the desired files (e. g. hotel.de.psf etc.). 3. Go to the directory window MapRegions of the external memory card and insert the copied contents.
Manual installation and start-up 6. Go to the directory Mobile Device > My Flash Disk > INSTALL and put the copied contents there. Proceed as follows to also copy map material to the internal memory of your navigation: 1. Go to the MapRegions directory of your CD/DVD drive and copy all of the desired files ending in .psf : The file names indicate the region to which the map data refers. 2. Select Mobile device in your Windows Explorer and go to the My Flash Disk directory. 3.
GoPal Navigator 4 Chapter 3. Installation and start-up using the GoPal® Assistant In addition to manual installation, it is also possible to transfer the necessary data from the ® ® CD/DVD to your mobile device using the GoPal Assistant software: The GoPal Assistant is a special tool which facilitates communication between your navigation device and your PC and ® simplifies the transfer of selected files.
Installation and start-up using the GoPal® Assistant User interface of the GoPal® Assistant ® Once it has been successfully installed, start the GoPal Assistant via the item Medion GoPal Assistant in the folder Start > All Programs > Medion GoPal Assistant. ® The GoPal Assistant interface is divided as follows: Menu bar You can operate all of the basic functions of the software via the menu bar. The menus are structured as follows: • File. ® Exit allows you to close the GoPal Assistant.
Installation and start-up using the GoPal® Assistant • Help The entry About opens the dialog box of the same name which contains information about the ® current version of the GoPal Assistant as well as legal licensing information. Library, Data Selection and Device Information ® The central area of the GoPal Assistant manages the software and content files for your navigation system as well as the connected devices.
Installation and start-up using the GoPal® Assistant ® The following description assumes that the GoPal Assistant and all necessary map and special destination files have been installed from the CD/DVD onto the internal volume of your PC with the help of the Setup Assistant. Proceed as follows to manually select and transfer data to your mobile navigation device: ® 1. Open the GoPal Assistant by going to the entry of the same name under Start > All Programs >Medion GoPal Assistant. 2.
Installation and start-up using the GoPal® Assistant 5. Click on the Synchronize button. ® The GoPal Assistant now performs data synchronisation between the selected items in the Library and the selected volume: The data sets are then installed onto the selected volume. Actions using the Content Import Wizard ® In addition to manual synchronization, the GoPal Assistant also offers the opportunity to automatically transfer the data in the library using the Content Import Wizard.
Installation and start-up using the GoPal® Assistant • Date of last sync This shows the last time the data from the PC and the navigation device were synchronized. Changing the device name When delivered, your navigation device has a standard name derived from the product name. You can change this name at any time and replace it with a user-defined name which will be used when registering your PC. Proceed as follows to rename your navigation device: 1.
Installation and start-up using the GoPal® Assistant Tip External memory cards in a card reading device and USB sticks can be selected from the Selected Volume menu and formatted at any time. The available memory is displayed in the Memory Status area via the entries and the progress bar once formatting is complete.
GoPal Navigator 4 Chapter 4. Basics of operation Your navigation device is ready to operate immediately following start-up. However, in order to enter your own navigation destinations and user-specific settings, you must be familiar with the basic operating concept of your navigation system, which will be presented to you on the following pages. If you are already familiar with the operating concept, please go directly to Chapter 5, Adjusting the settings.
Basics of operation Various screens require you to select from the available options in a list. • To show hidden entries in the list, you can move the display area up or down using the or button. The current position in the list is displayed on the information bar between these buttons. On various screens you can lower or raise a pre-set value. • To lower or raise the currently displayed value, press the buttons displayed on the value scale between the two buttons. or .
Basics of operation Buttons Status displays This button opens the settings window Volume: Adjust the volume of the voice, button click and MP3 Player output here. The distance to the next manoeuvre is displayed here. This button is only available if your navigation system is equipped with a Bluetooth hands-free device (see device manual). The TMC reception quality is displayed here. This button takes you from the map view back to the menu view. The GPS reception quality is displayed here.
GoPal Navigator 4 Chapter 5. Adjusting the Settings After starting your navigation device, the start screen gives you the available function areas of your navigation system to choose from. Use this button to start the GoPal Navigator 4 navigation software. The operation of this application is described in the following chapter. Use this button to start the Travel Guide. For information about this application, consult the operating instructions for your navigation device.
Adjusting the settings • Screen settings • Power management • Restore factory settings Tap one of the buttons to open the corresponding sub-menu. To close the menu again, tap the button. Security settings Your navigation system gives you the option of protecting your system from access using a userdefined password. More information on the security settings can be found in the device manual. Note Please be aware that this setting is only available on certain types of device.
Adjusting the settings Power management This sub-menu enables you to adapt the energy options for either battery or mains operation as well as to check the current charge status. • If you tap the selection menu under the entry Battery mode: Turn off device after: you can select one of the following options from the list in the relevant pop-up menu: o Never turn off device The navigation device is only switched off when the capacity of the internal battery has been exhausted (default).
Adjusting the settings valid. • 1 Minute When you tap the option 1 Minute in the list, the device is automatically switched off 1 minute after the plug has been pulled out. • 2 Minutes When you tap the option 2 Minutes in the list, the device is automatically switched off 2 minutes after the plug has been pulled out. • 5 Minutes When you tap the option 5 Minutes in the list, the device is automatically switched off 5 minutes after the plug has been pulled out.
Adjusting the settings another opportunity to familiarise yourself with your navigation system by way of a brief introduction after the navigation software starts: You can also skip this step and start operating your navigation system immediately, as required. Specific settings for the navigation software Following start-up your navigation system functions with standard settings which can, however, be changed and adapted to your personal needs in the Settings menu at any time.
Adjusting the settings • o Route calculation has been optimised for Bicycle (possible in a radius of up to 50 km from the current position): Cycling paths have also been taken into account when calculating the route, pedestrian zones are directly accessible. The shortest route is always calculated and the traffic jam detour function is generally not active. The use of motorways and toll roads is excluded; the corresponding route options are automatically deactivated (see later section).
Adjusting the settings o The use of motorways is avoided for the purposes of route calculation. Only rural roads, roads and A-roads are accounted for during route calculation. Toll roads are taken into account for route calculation. • As an alternative to the default setting you can select the following option: The use of toll roads is avoided for the purposes of route calculation.
Adjusting the settings o • All time information within the navigation software is displayed using the 12-hour format (AM/PM). The map is still displayed during a manoeuvre. A smaller version of the manoeuvre arrow pops up in the map. As an alternative to the default setting you can select the following options: • o During a manoeuvre, the display changes dynamically from map view to arrow view. After the manoeuvre, the display switches back to map view.
Adjusting the settings As an alternative to the default setting you can select the following options: The traffic jam avoidance function based on TMC information is not active o o With the manual traffic avoidance function you are only informed of any traffic disturbances conveyed via TMC with a warning symbol in the map view. Tip You can retrofit the commercial service V-Trafic if needed: In this case, traffic information for France is also available.
Adjusting the settings The speed limit for this section of road is displayed on the map. Your navigation system also emits an acoustic warning signal when you exceed the speed limit by the selected amount. • Entries are made alphanumerically (e. g. country, place and street names) on a keyboard with an alphabetically organised standard keyboard layout.
Adjusting the settings Tip Please be aware that the use of so-called speed-cam warnings may not be permitted. Before you use the speed-cam warning, you must find out about its current legal status. If the use of speed-cam warnings is not permitted, you must not use this function. Note Please be aware that depending on the pack contents, this function may not be available on every version of the navigation software and therefore may not be displayed.
Adjusting the settings Proceed as follows to assign the desired functions to the buttons in the Quick menu: 1. Tap on the button Quick menu settings in the toolbar in the Quick menu. The Quick menu settings menu then opens. 2. Tap any button to set up a new function assignment or to change the existing assignment. 3. On the screen Quick menu settings, tap the button for the main group belonging to the desired function.
GoPal Navigator 4 Chapter 6. Operating the GoPal® navigation software This section covers the basic set-up and operation of your navigation software. The following description assumes that you are familiar with the basic operation of your navigation system and that you are working with the default settings as delivered. If you have already adjusted certain settings to meet your personal needs, the description may differ from the content displayed on your system.
Operating the GoPal® navigation software Tip If you have already entered one or more destinations into your navigation device, three buttons with the last entered destinations appear in the area above the menu keys. Using these buttons you can start the navigation to this destination directly. Manually entering destination information After starting the navigation device, you can enter a destination to calculate a route from your current location to the desired position.
Operating the GoPal® navigation software 1. Tap the Country button. A menu list of all of the countries whose map material is installed on the navigation system then opens. 2. Tap on the desired country entry: The selection is accepted. Note ® With the help of the GoPal Assistant you can select which map material is saved on your navigation device. If necessary, you can install more map material on the external memory card or to the flash memory of your navigation device at any time.
Operating the GoPal® navigation software Tip To indicate another destination country at this time, tap on the Countries button in the bottom right corner of the screen: The menu list is now opened and contains all of the countries whose map material has been saved on your navigation device. After selecting the destination, the screen to enter the street name automatically pops up.
Operating the GoPal® navigation software name at the destination using one of the buttons for preselection or list view (More hits). The following options are now available on this screen: o Enter the house number manually: As soon as the desired house number appears on one of the three buttons for preselection, tap it to select it directly.
Operating the GoPal® navigation software Coordinate input is now complete: The destination is displayed on the Detailed information screen on an overview map along with the latitude and longitude. On this screen you can store this destination as a favourite, show the route options, add another destination or start navigation. The following pages contain more information on this subject.
Operating the GoPal® navigation software 4. Tap on the button to display the current destination on the Detailed information screen on an overview map: If there is an address stored or available for this destination, it is displayed. Using the buttons on the lower edge of the screen you can add the current destination to your favourites and start route calculation. If you do not want to make a selection, return to the destination selection screen in the map view using the button. 5. Tap on the destination.
Operating the GoPal® navigation software Country, Town, Postcode and Street or using its Coordinates. This process is described in the Manually entering destination information section. o Tap the Favourites button to select the new destination from the favourites saved on your navigation device. This process is described in the Managing favourites section. o Tap the button Points of interest to select a destination from amongst the desired point of interest category.
Operating the GoPal® navigation software 2. Browse through the list using the and buttons and tap the desired category: The Where do you want to search? screen then appears. If you do not want to select a category, return to button. the start screen using the 3. Use the buttons to choose from the following options: o Tap on the button At a certain place, to select a new destination in the New destination menu. This process is described in the Adding destinations section.
Operating the GoPal® navigation software the entry on the Detailed information screen using the button. o Tap the button Enter new dest. to enter the destination/favourite manually using the input menus for Country, Town, Postcode and Street or using its Coordinates. This process is described in the Manually entering destination information section. o Tap the button Points of interest to select a destination/favourite from amongst the desired point of interest category.
Operating the GoPal® navigation software 4. The Detailed information screen appears again: To confirm the newly entered name, tap the button. The changed name is now used for display in the favourites list. Changing the route The Change route button on the start screen of your navigation system allows you to plan your route ahead of time or change and/or optimise a planned route subsequently. In addition, this menu allows you to save frequently used tours and load them at a later time.
Operating the GoPal® navigation software Editing the entries in the tour list You can delete the entries in the tour list at any time as required or change the order of the entries in the list to alter the course of the tour. Proceed as follows to delete an entry from the list: • Tap the button for the respective destination: The entry is deleted from the list. Unless the entry was the final destination on the route, all subsequent destinations move one position forward.
Operating the GoPal® navigation software 3. To start navigation for this tour, tap the button. If you do not want to make a selection, button. return to the Edit route screen with the If you no longer need a saved tour, tap the appropriate button : The entry is deleted from the list. If needed, you can also change the tour information at a later date. Proceed as follows: 1. Tap the load/save button. The Edit route screen then opens. 2.
Operating the GoPal® navigation software When you wish to exit the directions screen, use the route information. button to return to the selection menu for Traffic conditions This function enables you to display current traffic information received by your navigation system in a list and call up specific pieces of information. Proceed as follows to configure reception of traffic information: 1. Tap the button Traffic information. The Traffic situation screen then appears. 2.
Operating the GoPal® navigation software Avoid route Under certain circumstances, traffic disturbances may occur on the planned routes which were unknown at the time the route was planned and thus were not taken into account during calculation. In this case, you can manually block off a section of the route to come after your current position in order to calculate an alternate route for the selected distance and to avoid the traffic disturbance in this way.
Operating the GoPal® navigation software your current position is displayed on the screen once again. • Within the simulation you can use the Next manoeuvre button to skip to the next manœuvre, to shorten real time navigation. The time specifications regarding trip duration are adjusted accordingly. In addition, all of the functions of your navigation system are available during simulation.
Operating the GoPal® navigation software • The map section is shown on the whole screen: if necessary, in the Settings > Display > Map view menu, you can activate the Dynamic (depending on the manoeuvre, the arrow view is activated) or Arrow and Map (split-screen) options: split-screen shows a combination of arrow and map view and also allows access to the first two buttons in the Quick menu. • Within the map section, the planned route is shown in blue.
Operating the GoPal® navigation software Compass display You can call up an alternative view to the map display in the Quick menu. In compass display, your current position is shown in relation to the four cardinal points, North being labelled in colour for better orientation. In addition, your current position is stated with longitude and latitude in degrees, arc minutes and arc seconds.
Operating the GoPal® navigation software Arrow view You can call up an alternative view to the map display in the Quick menu. In the arrow view, you are guided by a guidance system based on arrows, independent of a map. In addition to the arrow which describes the next or current manœuvre, the arrow view offers the following information: • The current direction of travel is described using the arrow.
Operating the GoPal® navigation software Note The values in the Trip infos are automatically reset to 0 if your navigation device has received no valid GPS data packet in two hours.