58 cm LCD TV with Inbuilt DVD Player and HD Tuner What Your 2 Year Warranty Means Great care has gone into the manufacture of this product and it should therefore provide you with years of good service when used properly. In the event of product failure within its intended use over the course of the first year after the date of purchase, we will remedy the problem as quickly as possible once it has been brought to our attention.
Contents What Your 2 Year Warranty Means ......................................................................................................................1 Contents ...............................................................................................................................................................2 Safety Instructions ...............................................................................................................................................
SPEAKER SETUP Menu ............................................................................................................................................................................... 20 DIGITAL Menu............................................................................................................................................................................................... 21 The Integrated Media Browser ............................................................................
Safety Instructions Operating Safety Children should be supervised to ensure they do not play with this unit. This unit is not intended for use by people (including children) with reduced physical, sensory or mental abilities or for those without experience and/or knowledge, unless they are supervised by a person responsible for their safety or they have been instructed on its use. Keep packaging material such as plastic film away from children. There is a risk of suffocation if used improperly.
Repairs Repairs to your LCD TV should only be carried out by qualified specialists. Please contact our Help Desk on 1 300 884 987 if you have any problems with your LCD TV. ALWAYS have repairs completed only by our authorised service centre. Make sure to use only replacement parts provided by the manufacturer. The device may sustain damage if unsuitable replacement parts are used.
Norms/Electromagnetic Compatibility The LCD TV fulfils the electromagnetic compatibility requirements and the following electrical safety standards: EN 55013: 2001 + A1: 2003 + A2: 2006 Sound and television broadcast receivers and associated equipment. Radio interference characteristics. Limits and methods of measurement. EN 55020: 2007 Sound and television broadcast receivers and associated equipment. Immunity characteristics EN 60065: 2002 + A1: 2006 Audio, video and similar electronic apparatus.
Box Includes Unpacking Select a suitable place for setting up the device. Open the box very carefully to avoid damaging the device. The device could be damaged if you use a knife with a long blade to open the box. The box contains a number of small items (including batteries). Keep these items out of reach of children; the parts are easy to swallow. Store the packaging material in a safe place; only use this box to transport the TV. CAUTION! Do not let children play with the plastic film.
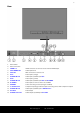
Overview Of The Device LCD TV Front 1. TFT display 2. LED TV Mode indicator: orange when the device is in standby mode; green when the device is switched on. 3. Infrared sensor: reception field for the infrared TV signals. 4.
Rear 1. Mains switch 2. Mains connection 3. HDMI 1-2 HDMI connection: to connect a device with an HDMI output. 4. VGA AUDIO IN Audio input for PC 5. VGA IN VGA connection: to connect a PC 6. AV1 Video input 1 (orange) 7. AUDIO IN L/R Audio inputs (red/white) for AV1 8. AV2 Video input 1 (yellow) 9. AUDIO IN L/R Audio inputs (red/white) for AV2 and S-VIDEO 10. S-VIDEO Video input: to connect a device via S-VIDEO 11. AERIAL Connection using an aerial (analogue or DVB-T) 12.
Controls and Connections on the Left-Hand Side 1 2 3 DVD drive CARD READER USB IN Card Reader port for SD/MMC/MS USB port 4 Disc: skip one track forward 5 Disc: skip one track back 6 Stop playback 7 8 Start/pause playback Eject the disc Controls on the Right-Hand Side 1 INPUT Change the input source 2 MENU Display the main menu on screen; use to go to the previous level of OSD.
Remote Control 1 POWER STANDBY, i.e. switch off the LCD TV temporarily 2 Number keys TV/DTV: select programme; Teletext: select page; DVD/USB/SD mode: select track 3 -/-- Press to enter multi-digit numbers 4 NICAM AUDIO R/L Select audio mode in TV mode. 5 VOL +/– Setting volume 6 OK Confirm entries Select audio channel in DTV mode. Select R/R channel or L/L channel of VCD audio.
USB/DVD pages. DVD/USB/SD mode: call out interface to switch between DVD or USB or SD mode. LANG CANCEL DTV mode: to display the languages available; Teletext: press button once to disable ATV Teletext content display except page number; press twice will enable the Teletext display.
Start of Operation Before starting up please make sure that you read the "Safety instructions" section on page 4ff. Inserting the Batteries in the Remote Control Open the battery compartment cover on the back of the remote control. Insert two R03 (AAA) 1.5-V batteries in the battery compartment of the remote control. Check the battery polarity (inscribed on the bottom of the battery compartment). Replace the cover. Note Remove the batteries if the device will not be used for long periods.
Channel Selection To select a channel, either press the buttons CH+/– (on the device or on the remote control) or select the channel directly by pressing the appropriate numbers. To enter a two or three-digit number press the -/-- button twice or three times and then enter the channel number. Press the button to select the last channel played. Setting the Volume You can increase or decrease the volume by pressing the volume buttons VOL +/- on the remote control or on the device.
Opening the Favourites List You can enter a list of your favourite channels under the menu options CHANNEL > Programme Edit (see page 16). Press FAV/REPEAT to display your list of favourite channels. Use the direction arrows to select a channel. Press OK to switch to this channel. Selecting the Source Use INPUT to call up the source selection list.
Note Technical changes to the device means the menus described here may differ from the menus actually displayed on the screen. Note Not all menus are available, depending on the source you selected. Switch to a different source to access all available menus. Menu System CHANNEL Menu Menu Item Setting Auto Tuning Use the button to select the country. Select Start to proceed auto tuning. DTV Manual Tuning Use the button to select the desired DTV channel for manual tuning.
Tuning the Video Recorder Manually You can use ATV Manual Tuning, for example, to tune a video recorder to the LCD TV. Connect the TV and the video reorder via the antenna cable (see the instructions for connecting the video recorder, page 28) and set the video recorder to the test signal. Perform a manual channel search with the LCD TV. When the test signal is located, save the test signal on channel 0. This channel is not used by any of the TV channels.
SOUND Menu Menu Item Setting Sound Mode Select sound mode Standard, Music, Movie, Sports, Personal. This function is under the SMODE button. You can customise the parameters Bass and Treble under the Personal option. The other parameters are defined. Treble Increase or decrease treble (on a scale of 0 – 100). Bass Increase or decrease bass (on a scale of 0 – 100). Balance Set the balance between the left and right speakers.
LOCK Menu Menu Item Setting Lock System The default password is 0000 Enable/disable system lock. Locked system prevents all sorts of tuning and Program Edit. Change Password Change the lock/unlock password. Block Programme Select which channel to be blocked in the channel list. Press the GREEN button ( ) to mark the channel to be blocked. Parental Guidance Select TV rating to be blocked for parental guidance Restore Factory Default Reset everything back to factory setting.
5 PG-R: (“Parental Guidance Restriction”) parental guidance for young people under 17; 6 R: (“Restriction”) parental guidance strongly recommended for young people under 17; 7 NC-17: not for young people under 17; 8 ADULT: For adults only. You must enter the password to change the parental lock settings. See previous menu option. DEFAULT Restore all settings to delivery state here. All default settings will be deleted. EXIT SETUP Exit the DVD system menu.
DIGITAL Menu Menu Item Setting DYNAMIC RANGE Setting the various volume levels for a DVD. DUAL MONO Choose between 4 different audio outputs. EXIT SETUP Exit the DVD system menu.
The Integrated Media Browser With the integrated Media Browser you have various possibilities to playback different media: Disks USB memory sticks (up to 8 GB, USB 1.1 and 2.0 supported) Multimedia cards (SD/MMC/MS) The following formats are supported: Disks* USB Multimedia Cards DVD DVD -/+RW SD (up to 4 GB, SDHC) DVD-/+R HDCD CD MMC MS JPEG MP3 WMA MPEG 1/2/4 DivX *Note The drive only plays media with a 12-cm diameter.
Operating the Media Browser Via the LCD TV The following functions are available on the LCD TV: The DVD is ejected from the DVD slot Stop playback Start or pause playback fast forward or rewind You will need to use the remote control to set additional functions or input commands. Operating the Media Browser Using the Remote Control The remote control has the following commands for operating the media browser: Ref. Key Function 6 OK Use these buttons to confirm your selection.
Ref. Key Function 18 Use this button to jump to the previous chapter/track/file. 19 You can set the fast forward speed using this option. Press the button several times to access a variety of fast forward speeds: FORWARD x 2, FORWARD x 4, FORWARD x 8, FORWARD x 20 20 You can set the rewind speed using this option. Press the button several times to set a variety of rewind speeds: BACKWARD x 2, BACKWARD x 4, BACKWARD x 8, BACKWARD x 20 21 SUB.
Teletext Teletext is a free service broadcast by most analogue TV channels and contains the latest news, weather, TV programmes, share prices, sub-titles and other information. Using Teletext Note The teletext function can only be used, while viewing analogue TV channels. Your remote control has special buttons for operating the teletext. Select a TV channel that broadcasts teletext. Press TXT once to display the start/index page.
Useful Teletext Functions Hold The teletext page that you have selected may contain more information than can fit on a single screen. In this case the information will be divided up over several subpages. The subpages are scrolled at regular time intervals. Press the HOLD button to prevent the page changing automatically. The HOLD symbol is displayed in the top left hand corner of the screen and prevents the page changing automatically.
Connecting Devices Connecting the DVD Player There are a number of options for connecting a DVD player. 1. With A Stereo Cinch Cable and a Video Cinch / S-video Cable Connect a video cinch cable (yellow jack) to the video input on the LCD TV and the video output on the external device. Connect a stereo cinch cable (red and white jack) to the audio input on the LCD TV and the video outputs on the external device.
Connecting a Receiver (SAT, DVB-T, Decoder, Etc.) There are different options for connecting a receiver (e.g. SAT receiver, DVB-T receiver, decoder, set-top box) to your LCD TV. 1. With a Stereo Cinch Cable and a Video Cinch / S-Video Cable Connect a video cinch cable (yellow jack) between the video input on the LCD TV and the video output on the external device.
Device with HDMI or DVI Output HDMI ("High Definition Multimedia Interface") in consumer electronics is the only interface that transmits audio and video data simultaneously. It handles all image and sound formats currently in use, including HDTV (High Definition TV), which means it can also display resolutions of 1080i without any loss in quality. Many consumer electronic devices, e.g. DVD players, are now equipped with HDMI outputs.
Troubleshooting Malfunctions can sometimes have quite trivial causes, but on other occasions they are the result of defective components. We would like to give you a few options for rectifying your problem. If these tips don’t do the trick, then we’ll be more than pleased to help you out. Just give us a call! You’ll find the phone numbers on the back inside cover, under the warranty conditions. Fault Solution There is no picture and no sound.
Do You Need More Help? If the suggestions in the previous section did not rectify your problem please contact us.
Cleaning You can increase the lifespan of your device as follows: Caution! Always unplug the unit and disconnect all cables before cleaning. Do not use solvents, corrosive or aerosol detergent to clean. Clean the screen with a soft, lint-free cloth. Ensure that no water droplets remain on the LCD TV. Water droplets may result in permanent discolouration. Do not place the screen in strong sunlight or near ultraviolet light.
Technical Specifications Nominal voltage Screen size: Power consumption: 100-240 V ~ 50/60 Hz 23" (58cm) TFT, 16:9 Display 60 Watt Power consumption on standby: Physical resolution: TV system: <1W 1920 x 1080 PAL, SECAM, B/G, D/K, K’, I/I, L/L’ Channels: VHF (channels I/III) UHF (BAND U) HYPERBAND CABLE TV (S1-S20) / (S21-S41) Stereo/Nicam 199 + AV Audio: Program Storage Sorting: Antenna input: Connections: 75 Ohm General 1 x USB Interface; 1 x Antenna Socket Video 2 x HDMI (with HDCP Decoding);