
Operation Manual


After Sales Support
T
EL: 1300 884 987
13
Start of Operation
Before starting up please make sure that you read the "Safety instructions" section on page 4ff.
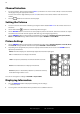
Inserting the Batteries in the Remote Control
Open the battery compartment cover on the back of the remote control.
Insert two R03 (AAA) 1.5-V batteries in the battery compartment of the remote control. Check the battery polarity
(inscribed on the bottom of the battery compartment).
Replace the cover.
Note
Remove the batteries if the device will not be used for long periods. The remote control can be damaged by
leaking batteries.
Connect TV Aerial
To connect to the house antenna or cable system, connect a double-screened cable from the antenna socket to
the LCD TV.
Connecting Power Supply
Connect the power cable supplied with the device to the 100-240-V ~ 50/60 Hz connection on the back of the unit
and insert the plug into a 100-240 V ~ 50/60 Hz mains socket near the device.
Switching the TV On and Off
Switch the power button to “
I
” to active the power supply. The device switches to standby mode and the display
on the front will light up orange.
To switch on the unit either press the
POWER
button on the remote control or on the right-hand side of the
unit. The display on the front will light up green.
Press the
POWER
button to switch the device over to standby mode again. The unit continues to consume
power in this mode.
Press the mains switch at the back of the unit to switch it off completely.
Note
If the input signal is interrupted, after some time a countdown will appear on the screen with the information
that the device will be switched off automatically. The unit is in standby mode.
After Switching on the Unit for the First Time
You will be guided through the Installation Guide menu after you switch the device on for the first time. You can
change the language while you are making these initial settings.
You can always access the Installation Guide screen again via Lock > (Enter the default password 0000) >
Restore Factory Default and go through the settings again. See also page 21.
Use the up/down arrows
to go to the Language menu option. Use the direction arrows to select the
language for the OSD (the menu language).
Use the up/down arrows
to go to the Auto Tuning menu option. Use the direction arrows to select the
Country before starting installation procedure.
Select Start to start Auto Tuning.
The ATV channels and afterwards the DTV channels (including digital radio channels if available) are scanned.
The search function may take a few minutes to complete. Wait for it to finish.