82799 BE ALDI BE Cover RC1.FH11 Thu Dec 16 09:44:39 2010 Seite 1 C M Y CM MY CY CMY K Design Touch-Music-Center met docking voor iPhone/iPod Design Touch-Musik-Center mit Docking-Station für iPhone/iPod Music Center tactile design avec station d'accueil iPhone/iPod MEDION® LIFE® P64054 (MD 82799) AA 18/11 A Medion B.V. John F. Kennedylaan 16a 5981 XC Panningen Nederland Schwarz BE Hotline: 022006198 Fax: 022006199 LU Hotline: 34-20 808 664 Fax: 34-20 808 665 Gebruikt u a.u.b.
Sommaire FR Vue d'ensemble de l'appareil ...................................................... 5 Côtés droit et gauche ............................................................................ 5 Façade et arrière .................................................................................... 6 Vue de dessus ....................................................................................... 7 Arrière ..............................................................................................
Fonctions de base ......................................................................19 Touches tactiles ................................................................................... 19 Mise en marche/arrêt – POWER ........................................................... 19 Réglage de l'heure .............................................................................. 19 Arrêt automatique – SLEEP ..................................................................
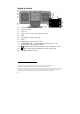
Vue d'ensemble de l'appareil FR Côtés droit et gauche NL DE 1) 2) 3) 4) POWER ON/OFF : allumer/éteindre l'appareil Prise casque jack 3,5 mm LINE IN : entrée audio Cinch L/R FM ANT : entrée antenne 5
Façade et arrière 5) 6) 7) 8) 9) 10) 11) 12) 13) 14) 15) 16) 1 Haut-parleurs Témoin de veille Tiroir CD Support iPod : station d'accueil pour un iPod1 Pied Capteur IR pour télécommande Écran FUNCTION : sélectionner le mode IPOD/MEM/C.-ADJ.
Vue de dessus FR NL DE 17) 18) 19) 20) 21) 22) STANDBY : allumer l'appareil en mode Veille et le remettre en veille RADIO SEARCH : rechercher une station selon son code PTY Port USB Fente pour carte mémoire SD SKIP/TUNE SEARCH / : titre précédent/suivant, recherche des stations en avant/arrière OPEN/CLOSE : ouvrir et fermer le tiroir CD Arrière 23) 24) 25) Trous pour montage mural Cordon d'alimentation Écarteur (à déplier pour le montage mural) 7
Télécommande 1) 2) 3) 4) 5) 6) 7) 8) 9) 10) 11) 12) 13) 14) 15) 16) 17) 18) 19) 20) 8 STANDBY : allumer l'appareil en mode Veille et le remettre en veille RADIO SEARCH : rechercher une station selon son code PTY RADIO MODE : afficher les informations RDS IPOD/MEM/C.
Consignes de sécurité FR Veuillez lire attentivement le présent mode d'emploi dans son intégralité et respecter toutes les consignes indiquées. Vous serez ainsi assuré du bon fonctionnement et de la durée de vie de votre appareil. Gardez toujours le présent mode d'emploi à portée de main à proximité de l'appareil. Conservez bien le mode d'emploi afin de pouvoir le remettre au nouveau propriétaire si vous donnez ou vendez l'appareil.
Utilisation conforme Le présent appareil sert à la lecture de données audio et vidéo (CD, supports de données MP3, appareils USB et cartes mémoire) et à écouter la radio. Vous pouvez en plus y recharger des appareils iPod et les y raccorder pour lire des données audio. N'utilisez cet appareil dans aucun autre but.
En cas de fortes variations de température ou d'humidité, il est possible que, par condensation, de l'humidité se forme à l'intérieur de l'appareil, pouvant provoquer un court-circuit. AVERTISSEMENT ! N’essayez en aucun cas d’ouvrir et/ou de réparer vousmême l’appareil. Vous risqueriez de vous électrocuter ! FR NL DE Adressez-vous à notre Centre de Service si vous rencontrez des problèmes techniques avec votre appareil.
Généralités Ne posez pas sur l’appareil ni à proximité de l'appareil de récipients contenant du liquide, tels que des vases, et protégez toutes les pièces contre les gouttes d'eau et éclaboussures. Le récipient pourrait se renverser et le liquide porter atteinte à la sécurité électrique. Si la fiche, le cordon d’alimentation ou l’appareil est endommagé(e), débranchez immédiatement la fiche de la prise.
Classe laser FR Le présent appareil est un produit laser de classe 1. Il est équipé d'un système de sécurité qui empêche la fuite de rayons laser dangereux au cours d'une utilisation normale. Pour prévenir tout risque de blessure des yeux, prenez garde de ne jamais manipuler ni abîmer le système de sécurité de l'appareil. La télécommande comporte une diode infrarouge de classe 1. N'observez pas la LED avec des appareils optiques.
Veillez à ce que les piles ne soient jamais exposées à une source de chaleur intense (par ex. rayons du soleil, feu, etc.). N'inversez jamais la polarité. Veillez à respecter le pôle plus (+) et le pôle moins (-) afin d'éviter tout court-circuit. Retirez les piles de votre appareil si vous n'avez pas l'intention de l'utiliser pendant un certain temps. Remplacez simultanément toutes les piles usées d'un appareil par des piles neuves du même type.
Préparation FR Contenu de l’emballage NL ATTENTION ! Conservez les emballages hors de portée des enfants : ils pourraient s'étouffer ! DE Au cours du déballage, vérifiez que les éléments suivants ont bien été livrés : Micro chaîne hifi Télécommande Antenne FM Le présent mode d'emploi et la carte de garantie Insérer la pile dans la télécommande La pile est déjà insérée dans la télécommande à la livraison.
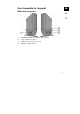
Installation et prises Installer l'appareil Installez l'appareil sur une surface stable et plane. Veuillez tenir compte à ce sujet des consignes de sécurité indiquées à la page 8. Le vernis particulièrement agressif de certains meubles peut attaquer les pieds en caoutchouc de l'appareil. Placez éventuellement une protection sous l'appareil.
Insérez des chevilles en plastique de 6 mm dans les trous percés. Insérez les vis dans les chevilles et serrez-les solidement à l'aide d'un tournevis. Accrochez l'appareil par les trous de serrure prévus et dépliez l'écarteur pour que l'appareil soit bien droit sur le mur. Prise antenne FR NL DE Pour écouter la radio, raccordez un câble antenne à la prise antenne FM ANT de 75 ohms de l'appareil. Une antenne-fil est fournie avec l'appareil.
Port USB Ouvrez le clapet sur le dessus de l'appareil. Vous pouvez brancher sur le port USB situé en façade un appareil USB tel qu'un lecteur MP3. Sélectionnez le mode USB avec la touche FUNCTION. REMARQUE ! Les fonctions de lecture sont décrites à partir de la page 25. Cartes mémoire SD/MMC Ouvrez le clapet sur le dessus de l'appareil. Insérez dans la fente de carte une carte mémoire SD/MMC avec le coin biseauté à gauche et les contacts dirigés vers l'arrière.
Fonctions de base FR Touches tactiles Les touches tactiles sont sensibles au toucher et doivent être simplement effleurées sans exercer de pression. NL Mise en marche/arrêt – POWER DE L'interrupteur d'alimentation ON/OFF au dos de l'appareil vous permet d'allumer votre appareil. Celui-ci se trouve alors en mode Veille. Le témoin de veille rouge s'allume sur l'appareil. Pour mettre l'appareil en marche, appuyez sur la touche STANDBY/ON de l'appareil ou de la télécommande.
Si vous sélectionnez le format 12 heures, « AM » ou « PM » s'affiche devant l'heure : AM : les heures de 00:00 à 11:59 ; PM : les heures de 12:00 à 23:59. Appuyez une nouvelle fois sur IPOD/MEM/C.-ADJ. : l'affichage des heures clignote. Dans les 6 secondes qui suivent, entrez les heures avec la touche / . Appuyez de nouveau sur IPOD/MEM/C.-ADJ. : l'affichage des minutes clignote. Dans les 6 secondes qui suivent, entrez les minutes avec la touche / . Appuyez de nouveau sur IPOD/MEM/C.-ADJ.
Programmer la minuterie FR Pour régler l'heure d'allumage et d'arrêt automatique : Appuyez sur la touche TIMER de la télécommande pour régler l'heure d'allumage automatique. L'affichage ON apparaît sur NL l'écran et les chiffres des heures clignotent. Appuyez dans les 6 secondes qui suivent sur ou pour régler les heures. Appuyez une nouvelle fois sur la touche TIMER. L'affichage des minutes clignote. Réglez les minutes avec ou .
Fonctions de commande générales Volume Appuyez sur la touche VOLUME+ pour augmenter le volume. Appuyez sur la touche VOLUME– pour baisser le volume. Désactivation du son – MUTE Appuyez sur la touche pour désactiver le son. Appuyez sur la touche le son. ou sur une touche de volume pour réactiver Régler l'égaliseur Appuyez plusieurs fois sur la touche EQ pour régler un des effets sonores suivants : CLASSIC > ROCK> POP> JAZZ> PASS.
Vous pouvez commander votre iPod comme vous en avez l'habitude. Il se peut que vous deviez appuyer sur la touche IPOD/MEM/C-ADJ. pour activer le menu de commande de l'iPod. IPODMENU s'affiche. FR Vous avez en plus la possibilité d'exécuter certaines fonctions de l'iPod sur la station d'accueil. NL Les touches suivantes de l'appareil et de la télécommande vous permettent maintenant de commander votre iPod : IPOD/MEM/C-ADJ.
Réglage des stations Appuyez sur la touche manuellement. ou pour régler une station Recherche automatique des stations Maintenez la touche ou enfoncée plus longtemps pour exécuter une recherche automatique des stations en avant/arrière. Mémorisation et sélection d'une station La radio dispose de 30 emplacements mémoire sous lesquels vous pouvez mémoriser des stations. Réglez la station que vous voulez mémoriser. Pour la mémoriser, appuyez sur la touche IPOD/MEM/C-ADJ.
Réception RDS FR RDS s'affiche sur l'écran si une station de radio émet des signaux RDS. Informations RDS Appuyez sur la touche RADIO MODE pour afficher les informations suivantes : RDS NAME : nom de la station (si non disponible, PS NONE s'affiche) RDS TYPE : code PTY de la station actuellement écoutée (si non disponible, PTY NONE s'affiche) RDS TEXT : autres informations du radiotexte (si non disponibles, RT NONE s'affiche).
Mode CD/USB/Carte mémoire Supports de données pris en charge Votre appareil prend en charge les supports de données suivants : CD audio, CD-R, CD-RW. Clé USB ou lecteur MP3 (version USB 1.1 et 2.0). Veuillez noter qu’il n’est pas possible de garantir une compatibilité à 100 % avec toutes les clés USB. Carte mémoire SD/MMC. REMARQUE ! Les fonctions de lecture pour ces supports de données sont en grande partie identiques et sont donc décrites ensemble dans le présent mode d'emploi.
Insertion et retrait de CD FR Remarques concernant le tiroir CD Insérez uniquement des CD et aucun autre objet dans le tiroir CD : vous détruiriez la mécanique. Pour éviter tout encrassement par la poussière, ne laissez jamais le couvercle du tiroir CD ouvert trop longtemps. Ne touchez en aucun cas la lentille dans le tiroir CD. Si le CD est très sale ou comporte de nombreuses traces de doigts, il est possible que la lecture soit retardée ou qu'elle commence à un autre endroit.
Fonctions de lecture PLAY, PAUSE, STOP, saut de titre Appuyez sur la touche /ENTER de l'appareil ou de la télécommande pour lancer la lecture. Appuyez de nouveau sur la touche pour interrompre la lecture. En mode Pause, le temps écoulé clignote. Appuyez de nouveau sur /ENTER pour reprendre la lecture là où vous l'aviez interrompue. Appuyez sur /MENU pour arrêter définitivement la lecture. L'appareil passe en mode Arrêt. Pour sauter au début d'un titre, appuyez sur ou .
REPEAT – fonctions de répétition FR Appuyez pendant la lecture ou en mode Arrêt sur la touche REPEAT. REPEAT s'affiche sur l'écran. Le titre actuel est répété. Appuyez de nouveau sur la touche REPEAT. REPEAT ALL s'affiche sur l'écran. Tous les titres sont répétés. En mode MP3/WMA, appuyez une nouvelle fois sur REPEAT pour répéter tout le dossier. Pour quitter la fonction REPEAT, appuyez sur la touche REPEAT jusqu'à ce que l'affichage disparaisse.
Programmation de l'ordre de lecture Vous pouvez programmer un ordre de lecture jusqu'à 32 titres en mode CD et 64 titres en mode MP3/ WMA. Pour cela, l'appareil doit se trouver en mode Arrêt. Arrêtez la lecture de manière à ce que STOP s'affiche sur l'écran. Appuyez sur la touche IPOD/MEM/C-ADJ. de l'appareil ou de la télécommande. MEMORY et l'emplacement mémoire p-01 s'affichent. En lecture CD, les titres 00 clignotent et en lecture MP3/WMA, les dossiers 00.
Modification de la liste programmée FR Quittez la lecture avec /MENU. Appuyez de nouveau sur IPOD/MEM/C-ADJ. pour composer une nouvelle liste de votre choix. NL Suppression de la liste programmée DE La liste programmée est supprimée si : le tiroir CD est ouvert, un autre mode est sélectionné, l'appareil est éteint.
En cas de problèmes En cas de problèmes, veuillez tout d'abord vérifier si vous pouvez y remédier vous-même en vous aidant du tableau ci-dessous.
L'appareil ne réagit pas à la télécommande La pile est peut-être usée ou mal insérée dans la télécommande. Retirez les obstacles éventuels entre l’émetteur infrarouge, la télécommande et le capteur de l’appareil. Êtes-vous éventuellement trop loin de l'appareil ? FR Pas de son La fonction de désactivation du son elle activée ? DE (MUTE) est- Nettoyage Avant de nettoyer l'appareil, débranchez impérativement la fiche de la prise. Pour nettoyer l’appareil, utilisez uniquement un chiffon doux et sec.
Recyclage Emballage Votre appareil se trouve dans un emballage de protection afin d'éviter qu'il soit endommagé au cours du transport. Les emballages sont des matières premières et peuvent être recyclés ou réintégrés dans le circuit des matières premières. Appareil Une fois l'appareil arrivé en fin de vie, ne le jetez en aucun cas avec les déchets domestiques. Informez-vous auprès de votre municipalité des possibilités de recyclage écologique et adapté.
Données techniques Tension : Puissance consommée : Puissance de sortie : Pile de la télécommande : Radio Bande FM : FR 230 V ~ 50 Hz 38 W 2 x 10 watts RMS 3 V (CR2032) NL DE 87,5 - 108 MHz Connectique Antenne FM : Prise casque (façade) : Entrée USB : 75 ohms connecteur jack 3,5 mm version 2.
ATTENTION ! Il existe aujourd'hui de nombreux procédés d'enregistrement sur CD et de protection anti-copie dont certains ne sont pas encore standardisés ainsi que différents types de disques vierges CD-R et CD-RW. Des erreurs ou des ralentissements de lecture peuvent donc se produire dans certains cas. Il ne s'agit pas d'un défaut de l'appareil. Sous réserve de modifications techniques ! ---------------------------------------------Copyright © 2010. Tous droits réservés.
Inhoudsopgave FR Overzicht apparaat ...................................................................... 5 Linker en rechter zijkant ........................................................................ 5 Voorzijde en achterzijde ........................................................................ 6 Bovenkant ............................................................................................. 7 Achterkant....................................................................................
Basisfuncties ..............................................................................19 Sensortoetsen ..................................................................................... 19 In-/uitschakelen – POWER ................................................................... 19 Tijd instellen ........................................................................................ 19 Automatisch uitschakelen – SLEEP .......................................................
Overzicht apparaat FR Linker en rechter zijkant NL DE 1) 2) 3) 4) POWER ON/OFF: Apparaat inschakelen/uitschakelen Hoofdtelefoonaansluiting 3,5 mm connector LINE IN: Audio-ingang tulp L/R FM ANT: Antenne-ingang 5
Voorzijde en achterzijde 1) 2) 3) 4) 5) 6) 7) 8) 9) 10) 11) 12) 1 Luidsprekers Stand-by-led Diskvak iPod-station: “Docking station” voor een iPod-apparaat1 Voet IR-sensor voor afstandsbediening Display FUNCTION: Modus kiezen IPOD/MEM/C.-ADJ.
FR Bovenkant NL DE 1) 2) 3) 4) 5) 6) STANDBY: Apparaat vanuit stand-bymodus inschakelen en weer in stand-by zetten, RADIO SEARCH: Zenders zoeken op basis van het PTY-signaal USB-aansluiting Kaartslot voor SD geheugenkaarten SKIP/TUNE SEARCH /: Vorige/volgende nummer, achteruit/vooruit naar zenders zoeken OPEN/CLOSE : Diskvak openen en sluiten Achterkant 1) 2) 3) Gaten voor wandmontage Netsnoer Afstandhouder (uitklappen voor wandmontage) 7
Afstandsbediening 1) 2) 3) 4) 5) 6) 7) 8) 9) 10) 11) 12) 13) 14) 15) 16) 17) 18) 19) 20) 8 STANDBY: Apparaat vanuit standbymodus inschakelen en weer in stand-by zetten RADIO SEARCH: Zenders zoeken op basis van het PTY-signaal RADIO MODE: RDS-informatie wisselen IPOD/MEM/C.
Veiligheidsadviezen FR Lees deze handleiding goed door en volg alle gegeven aanwijzingen op. Zo bent u verzekerd van een betrouwbare werking en een lange levensduur van uw apparaat. Houd deze handleiding steeds binnen handbereik bij uw apparaat. Bewaar de bedieningshandleiding goed, zodat u deze bij de verkoop van het apparaat kunt doorgeven aan de nieuwe eigenaar.
Beoogd gebruik Het apparaat dient voor het afspelen van geluids- en beeldmedia (cd's, MP3-gegevensdragers, USB-apparaten en geheugenkaarten) en voor radio-ontvangst. Daarnaast kunt u iPod-apparaten in het dockingstation zetten om audiobestanden af te spelen en op te laden. Gebruik het apparaat voor geen enkel ander doel.
Bij grote schommelingen in temperatuur of luchtvochtigheid kan er door condensatie vochtvorming in het apparaat optreden, en dit kan kortsluiting veroorzaken. FR WAARSCHUWING! PROBEER IN GEEN GEVAL HET APPARAAT ZELF TE OPENEN EN/OF TE REPAREREN. DAARDOOR IS ER KANS OP ELEKTRISCHE SCHOKKEN. Neem bij technische problemen met het apparaat contact op met ons Service Center. Voeding LET OP! Ook bij uitgeschakelde aan/uit-schakelaar staan onderdelen van het toestel onder spanning.
Algemeen Zet geen met vloeistof gevulde voorwerpen, zoals vazen, op of vlakbij het apparaat en bescherm alle onderdelen tegen druip- en spatwater. Het voorwerp kan omvallen, en de combinatie van vloeistof en elektriciteit is gevaarlijk. Trek bij beschadiging van de stekker, het aansluitsnoer of het apparaat meteen de stekker uit het stopcontact. Dit toestel is bedoeld voor privégebruik en niet voor toepassing in de zware industrie.
Laserklasse FR Het apparaat is een Klasse 1 laserproduct. Het heeft een veiligheidssysteem dat bij normaal gebruik het vrijkomen van gevaarlijke laserstraling voorkomt. Beschadig of verander het veiligheidssysteem van het apparaat nooit om oogletsel te voorkomen. De afstandsbediening heeft een Klasse 1 infrarooddiode. Kijk niet in de led met behulp van optische instrumenten.
Draai nooit de polariteit om. Let erop dat de plus- (+) en minpool (–) juist zijn geplaatst om kortsluiting te vermijden. Haal de batterijen uit het apparaat als u het langere tijd niet gebruikt. Vervang alle lege batterijen in een toestel tegelijk door nieuwe batterijen van hetzelfde type. VOORZICHTIG! Haal lekkende batterijen onmiddellijk uit het apparaat. Vermijd contact met de huid, ogen en slijmvliezen.
Voorbereiding FR Controleer de inhoud van de verpakking NL LET OP! Hou verpakkingen uit de buurt van kinderen. Verstikkingsgevaar! Controleer bij het uitpakken of de volgende onderdelen zijn meegeleverd : Micro-audiosysteem Afstandsbediening FM-antenne Deze bedieningshandleiding en het garantiebewijs Batterij in de afstandsbediening plaatsen Bij aflevering zit de batterij al in de afstandsbediening.
Opstellen en aansluitingen Apparaat opstellen Zet het apparaat op een vlak, stevig oppervlak. Lees hiervoor ook de veiligheidsadviezen op pagina 9. Sommige agressieve soorten meubellak kunnen de rubber voetjes van het apparaat aantasten. Leg eventueel iets onder het apparaat. LET OP! Trek, voordat u aansluitingen aan een extern apparaat uitvoert, eerst de netstekkers van alle apparaten uit het stopcontact. Voet aanbrengen Als u het apparaat ergens wilt neerzetten gebruikt u daarvoor de meegeleverde voet.
Antenneaansluiting FR Sluit voor de radio-ontvangst een antennekabel aan op de antenneaansluiting FM ANT Ohm op het apparaat. Er is een binnenantenne inbegrepen. Sluit de binnenantenne aan en richt hem uit voor de beste ontvangst (1). NL Als alternatief kunt u een antennekabel gebruiken die u aansluit op de antenneaansluiting in de muur (2). DE Ingangen Audiosignalen van een extern apparaat afspelen Het apparaat heeft een analoge geluidsingang voor de aansluiting van een extern audioapparaat.
SD/MMC geheugenkaarten Open de klep op de bovenkant van het apparaat. Zet een SD/MMC geheugenkaart met de schuine hoek naar links en de contacten naar achteren in het kaartslot. Kies met de toets FUNCTION de modus CARD. AANWIJZING! De afspeelfuncties worden beschreven vanaf pagina 26. Hoofdtelefoon aansluiten Sluit een hoofdtelefoon met een 3,5 mm mini-jackplug aan op de hoofdtelefoonaansluiting De luidsprekers worden dan automatisch uitgeschakeld.
Basisfuncties FR Sensortoetsen NL De sensortoetsen zijn aanraakgevoelig en hoeven alleen aangeraakt worden, zonder druk uit te oefenen. DE In-/uitschakelen – POWER Met de schakelaar ON/OFF op de achterzijde van het apparaat schakelt u het apparaat in en uit. Het apparaat staat nu in de modus stand-by. De STANDBY-LED op het apparaat brandt rood. Druk voor het inschakelen van het apparaat op de toets STANDBY/ON op het apparaat of op de afstandsbediening. Er wordt informatie op het display weergegeven.
Handmatig instellen van de tijd: Zet het apparaat op stand-by. Druk op de toets IPOD/MEM/C.-ADJ. Kies met de toets of tussen de 24- of 12-uursweergave (24 HOUR of 12 HOUR) . Als u de 12-uursweergave kiest wordt voor de urenweergave “AM” of “PM” weergegeven: AM: de uren van 00:00 tot 11:59; PM: de uren van 12:00 tot 23:59. Druk opnieuw op IPOD/MEM/C.-ADJ.. De urenaanduiding knippert. Voer binnen 6 seconden met de toetsen of de uurtijd in. Druk opnieuw op IPOD/MEM/C.-ADJ.
FR Automatisch uitschakelen – SLEEP U kunt een tijd instellen na welke het apparaat automatisch naar de modus stand-by gaat. Druk herhaald op de toets SLEEP op de afstandsbediening om de gewenste tijd in te stellen: 90 minuten > 80 minuten > 70 minuten enz. tot 10 minuten. Op het display wordt het bed-symbool weergegeven; dit geeft aan dat de SLEEP-timer is ingesteld. Om de SLEEP-timer uit te schakelen drukt u zo vaak op SLEEP tot het bed-symbool uitgaat.
Druk op of om de uurtijd in te stellen. Druk opnieuw op de toets TIMER. Op het display knippert de minutenaanduiding. Stel met of de minuten in. Druk opnieuw op de toets TIMER. Kies vervolgens met of de muziekbron: TUNER > CD > USB > CARD > IPOD. Druk op de toets TIMER. Kies vervolgens met of het volume waarmee het apparaat moet inschakelen. Bevestig opnieuw met de toets TIMER. De Timer is ingesteld.
FR Modus kiezen Radio, CD, USB, CARD, IPOD, AUX NL Kies met de toets FUNCTION de modus: TUNER: Radio CD: Afspelen vanaf een audio- of MP3-cd USB: Weergave van een USB gegevensdrager CARD: Afspelen vanaf van een geheugenkaart IPOD: Afspelen vanaf een iPod/iPhone AUX: Afspelen vanaf een extern apparaat DE iPod-modus Zet uw iPod/iPhone in het inschuifvak voor de speler. Druk herhaald op de toets FUNCTION tot op het display “iPod” wordt weergegeven.
Met de volgende toetsen op het apparaat en op de afstandsbediening kunt u nu de iPod bedienen: IPOD/MEM/C-ADJ.: Wisselen tussen de iPod-menubesturing en de iPodafspeelbediening VOLUME: Volume instellen Bediening bij ingeschakelde iPod-menubesturing /MENU: Menu openen. /ENTER: Keuze bevestigen en : Keuze in menu's verplaatsen Bediening bij ingeschakelde iPod-afspeelbediening /ENTER: Afspelen starten. Om het afspelen te onderbreken drukt u opnieuw op de toets.
Zenders opslaan en weergeven FR De radio heeft 30 geheugenplaatsen voor het opslaan van zenders. Stel de zender in die u wilt opslaan. Om een ingestelde zender op te slaan drukt u op de toets IPOD/MEM/C-ADJ. en kiest u vervolgens met de toetsen PRESET/FOL. de programmaplaats. Om het opslaan af te sluiten drukt u op opnieuw op de toets IPOD/MEM/C-ADJ.. Met de toetsen PRESET/FOL. gaat u na elkaar naar de opgeslagen zenders.
RDS-zoeken Druk op de toets RADIO SEARCH om zenders op basis van hun PTYsignaal te zoeken. Kies vervolgens met de toetsen PRESET/FOL. het PTY-signaal dat u wilt zoeken. Om het zoeken achteruit resp. vooruit te starten drukt u op de toets resp. . Het zoeken stopt bij de eerste zender met dit signaal. Als er geen zender met dit signaal gevonden wordt, wordt op het display “NO FOUND” weergegeven.
FR Over MP3 en WMA MP3 en WMA zijn Windows-compressieformaten voor audiogegevens. WMA staat voor “Windows Media Audio”. MP3-/WMA-bestanden worden alleen herkend als zij zijn opgeslagen met de bestandsextensies *.mp3 resp. *.wma. Gegevensdrager met MP3- en WMA-nummers kunnen in mappen, submappen en bestanden (titels) zijn gestructureerd. Ze bevatten meestal veel meer nummers dan een audio-cd zodat er sneller wordt ingelezen en genavigeerd.
Plaats een cd met de tekstzijde naar boven. Sluit het cd-vak door nogmaals op de toets /ENTER te OPEN/CLOSE of de toets drukken. De cd begint te draaien en op het display wordt READING weergegeven. De cd begint automatisch met afspelen. Als er geen of een niet leesbare disk is ingevoerd wordt NO DISC op het display weergegeven. VOORZICHTIG! Open de cd-lade niet zolang de cd nog afspeelt of draait. Druk eerst op STOP.
Map in MP3-/WMA-formaat Om bij een MP3-/WMA-gegevensdrager van map te wisselen drukt u op de toets PRESET/FOLDER of. Als de bestaande nummers in het ID3-formaat geschreven zijn kunt u de opgeslagen informatie weergeven. Druk op ID3/MONO/ST., op het display wordt dan ID3 ON weergegeven. De gegevens worden in lopende tekst weergegeven: “TITLE” – naam van het nummer – “ARTIST” – naam van de artiest. Als u de ID3-functie wilt verlaten drukt u opnieuw op de toets ID3/MONO./ST.
Druk opnieuw op de toets INTRO op de afstandsbediening om weer naar de normale afspeelmodus te gaan. Afspeelvolgorde programmeren U kunt een afspeelvolgorde voor tot 32 nummers in de cd-modus en 64 nummers in de MP3-/WMA-modus programmeren. Het apparaat moet daarvoor in de Stop-modus staan. Stop het afspelen zodat STOP op het display wordt weergegeven. Druk op de toets IPOD/MEM/C-ADJ. op het apparaat of op de afstandsbediening. Op het display wordt MEMORY weergegeven en de programmaplaats p-01.
FR Geprogrammeerde lijst bewerken Beëindig het afspelen met /MENU. Druk opnieuw op IPOD/MEM/C-ADJ. om de lijst opnieuw te maken. NL Geprogrammeerde lijsten wissen De geprogrammeerde lijst wordt gewist, als het cd-vak wordt geopend, DE een andere modus gekozen wordt, het apparaat uitgeschakeld wordt.
In geval van storingen Controleer bij storingen eerst of u het probleem zelf kunt oplossen. Het volgende overzicht kan u daarbij helpen. LET OP! Probeer in geen geval zelf het apparaat te repareren. Neem, als er een reparatie nodig, contact op met ons service-centrum of een ander geschikt deskundig bedrijf.
Het apparaat reageert niet op de afstandsbediening Geen geluid. Controleer of de batterijen niet leeg of onjuist geplaatst zijn. Verwijder eventuele obstakels tussen de infraroodzender van de afstandsbediening en de sensor op het apparaat.
Reiniging Trek altijd de stekker uit het stopcontact voordat u het apparaat schoonmaakt. Gebruik voor het reinigen een droge, zachte doek. Gebruik geen chemische oplos- en schoonmaakmiddelen omdat deze het oppervlak en/of de opschriften van het apparaat kunnen beschadigen. Recycling Verpakking Het apparaat is verpakt ter bescherming tegen transportschade. Verpakkingen zijn grondstoffen en kunnen worden hergebruikt of teruggebracht in de grondstoffenkringloop.
Technische gegevens Spanning: Opgenomen vermogen: Uitgangsvermogen Batterij afstandsbediening: FR 230 V ~ 50 Hz 38 W 2 x 10 watt RMS 3 V (CR2032) NL DE Radio FM-band: 87,5 – 108 MHz Aansluitingen FM-antenne: Hoofdtelefoonaansluiting (voorzijde): USB-ingang: 75 Ohm 3,5 mm connector Versie 2.
LET OP: Er zijn tegenwoordig veel verschillende, deels niet gestandaardiseerde cdopnamemethoden en kopieerbeschermingen en daarnaast diverse soorten blanco cd-r's en cd-rw's. In een enkel geval kunnen daardoor leesfouten of vertragingen optreden. Dit is geen defect van het apparaat. Technische wijzigingen voorbehouden. ---------------------------------------------Copyright © 2010. Alle rechten voorbehouden. Het copyright berust bij het bedrijf Medion®.
Inhaltsverzeichnis FR Inhaltsverzeichnis ..................................................................................... 3 Geräteüberblick ........................................................................................ 5 Linke und Rechte Seiten ........................................................................ 5 Vorderseite und Rückseite ..................................................................... 6 Oberseite ...................................................................
Kopfhörer anschließen ........................................................................ 18 Grundfunktionen .................................................................................... 19 Sensortasten ....................................................................................... 19 Ein-/Ausschalten – POWER .................................................................. 19 Uhr stellen ...........................................................................................
Geräteüberblick FR Linke und Rechte Seiten NL DE 1. 2. 3. 4.
Vorderseite und Rückseite 5. 6. 7. 8. 9. 10. 11. 12. 13. Lautsprecher Standby-LED Diskfach iPod Schale: „Docking Station“ für ein iPod Gerät1 Standfuss IR-Sensor für Fernbedienung Display FUNCTION: Betriebsart wählen IPOD/MEM/C.-ADJ.: iPod-Menüsteuerung, Programmierfunktion und Uhrzeit einstellen 14. /ENTER : Wiedergabe starten und unterbrechen, Eingaben bestätigen 15. /MENU: Wiedergabe stoppen/Menü aufrufen (iPod-Betrieb) 16.
FR Oberseite NL DE 17. 18. 19. 20. 21. STANDBY: Gerät vom Standby-Modus einschalten und wieder in den Standby-Modus schalten, RADIO SEARCH: Sender anhand ihrer PTY-Kennung suchen USB-Anschuss Kartensteckplatz für SD-Speicherkarten SKIP/TUNE SEARCH /: Vorheriger/Nächster Titel, Sendersuchlauf rückwärts/vorwärts 22. OPEN/CLOSE : Diskfach öffnen und schließen Rückseite 23. Löcher für Wandmontage 24.
25. Abstandshalter (Ausklappen für Wandmontage) Fernbedienung 1. 2. 3. 4. 5. 6. 7. 8. STANDBY: Gerät vom StandbyModus einschalten und wieder in den Standby-Modus schalten RADIO SEARCH: Sender anhand ihrer PTY-Kennung suchen RADIO MODE: RDS-Anzeige wechseln IPOD/MEM/C.
20. Batteriefach (a. d. Rückseite) FR Sicherheitshinweise Lesen Sie unbedingt diese Anleitung aufmerksam durch und befolgen Sie alle aufgeführten Hinweise. So gewährleisten Sie einen zuverlässigen Betrieb und eine lange Lebenserwartung Ihres Gerätes. Halten Sie diese Anleitung stets griffbereit in der Nähe Ihres Gerätes. Bewahren Sie die Bedienungsanleitung gut auf, um sie bei einer Veräußerung des Gerätes dem neuen Besitzer weitergeben zu können.
WARNUNG! Warnung vor Gefahr durch elektrischen Schlag! Bestimmungsgemäßer Gebrauch Das Gerät dient zum Abspielen von Ton- und Bildmedien (CDs, MP3Datenträger, USB-Geräte und Speicherkarten) sowie zum Radioempfang. Darüber hinaus können Sie in der Ladeschale iPod Geräte zum Aufladen und zur Wiedergabe von Audiodaten anschließen. Benutzen Sie das Gerät zu keinem anderen Zweck.
Halten Sie einen Mindestabstand von ca. 10 cm nach oben und um das Gerät herum zwischen Wänden und Gerät ein. Sorgen Sie für eine ausreichende Belüftung. FR Betreiben Sie Ihr Gerät nicht im Freien, da äußere Einflüsse wie Regen, Schnee etc. das Gerät beschädigen könnten. NL Halten Sie mindestens einen Meter Abstand von hochfrequenten und magnetischen Störquellen (Fernsehgerät, Lautsprecherboxen, Mobiltelefon usw.), um Funktionsstörungen zu vermeiden.
Wickeln Sie das Kabel für den Betrieb vollständig ab. Knicken oder quetschen Sie das Netzkabel nicht. Verwenden Sie keine Verlängerungskabel, um Stolperfallen zu vermeiden. Achten Sie darauf, dass das Netzkabel nicht mit heißen Gegenständen oder Oberflächen in Berührung kommt. Allgemein Stellen Sie keine mit Flüssigkeit gefüllten Gefäße, wie z. B. Vasen, auf das Gerät oder in die nähere Umgebung und schützen Sie alle Teile vor Tropf- und Spritzwasser.
Verwenden Sie für die Reinigung nur ein trockenes, weiches Tuch. Benutzen Sie keine chemischen Lösungs- und Reinigungsmittel, weil diese die Oberfläche und/oder die Beschriftungen des Geräts beschädigen können. FR NL Laserklasse Das Gerät ist ein Laserprodukt der Klasse 1. Das Gerät ist mit einem Sicherheitssystem ausgerüstet, das das Austreten von gefährlichen Laserstrahlen während des normalen Gebrauchs verhindert.
Laden Sie niemals Batterien (es sei denn, dies ist ausdrücklich angegeben). Es besteht Explosionsgefahr! Schließen Sie die Batterien niemals kurz. Zerlegen oder verformen Sie Batterien nicht. Ihre Hände oder Finger könnten verletzt werden oder Batterieflüssigkeit könnte in Ihre Augen oder auf Ihre Haut gelangen. Sollte dies passieren, spülen Sie die entsprechenden Stellen mit einer großen Menge klaren Wassers und informieren Sie umgehend Ihren Arzt.
Vorbereitung FR Lieferumfang prüfen ACHTUNG! Halten Sie Verpackungen von Kindern fern. Es besteht Erstickungsgefahr Vergewissern Sie sich beim Auspacken, dass folgende Teile mitgeliefert wurden: Micro-Audio-System Fernbedienung UKW-Antenne Diese Bedienungsanleitung und Garantiekarte Batterie in die Fernbedienung einlegen Im Auslieferzustand ist die Batterie bereits in der Fernbedienung eingelegt.
Aufstellung und Anschlüsse Gerät aufstellen Stellen Sie die Geräte auf eine ebene, feste Oberfläche. Beachten Sie hierzu auch die Sicherheitshinweise auf Seite 9. Einige aggressive Möbellacke können die Gummifüße der Geräte angreifen. Stellen Sie das Gerät ggf. auf eine Unterlage. ACHTUNG! Wenn Sie Anschlüsse an ein externes Gerät vornehmen, ziehen Sie vorher die Netzstecker aller Geräte ab! Standfuss anbringen Wenn Sie das Gerät aufstellen wollen, verwenden Sie den mitgelieferten Standfuß.
Fügen Sie 6-mm-Plastikdübel in die gebohrten Löcher ein. Fügen Sie die Schrauben in die Dübel ein und ziehen Sie sie mit einem Schraubendreher fest. Hängen Sie das Gerät in die vorgesehenen Schlüssellöcher ein und klappen Sie die Abstandshalter aus, damit das Gerät gerade an der Wand hängt. FR NL DE Antennenanschluss Für den Radioempfang verbinden Sie ein Antennenkabel mit dem Antennenanschluss FM ANT Ohm am Gerät. Eine Wurfantenne ist mitgeliefert.
Eingänge Audiosignale eines externen Geräts wiedergeben Das Gerät verfügt über einen analogen Toneingang für den Anschluss externer Audiogeräte. Schließen Sie ein 3,5 mm Stereo-Klinkenkabel an die Buchse LINE IN am Gerät und an die entsprechenden Ausgänge am externen Gerät an. USB-Anschluss Öffnen Sie die Klappe an der Oberseite des Geräts. An den USB-Anschluss an der Vorderseite des Geräts können Sie ein USB-Gerät, wie z. B. einen MP3-Player, anschließen.
Zu hohe Lautstärke bei der Verwendung von Ohrhörern oder Kopfhörern erzeugt übermäßigen Schalldruck und kann zum Verlust des Hörsinns führen. Stellen Sie die Lautstärke auf ein Minimum, bevor Sie einen Ohrhörer aufsetzen. Grundfunktionen NL DE Sensortasten Die Sensortasten sind berührungsempfindlich und müssen lediglich berührt werden ohne dabei Druck auszuüben. Ein-/Ausschalten – POWER Mit dem Betriebsschalter ON/OFF an der Rückseite des Gerätes schalten Sie das Gerät ein.
So stellen Sie die Uhrzeit manuell ein: Schalten Sie das Gerät in den Standby-Modus. Drücken Sie die Taste IPOD/MEM/C.-ADJ. Wählen Sie mit der Taste oder zwischen der 24- oder 12-Stunden Anzeige (24 HOUR oder 12 HOUR) . Wenn Sie die 12-Stunden-Anzeige wählen, erscheint vor der Stundenanzeige ein „AM" oder „PM": AM: die Stunden von 00:00 bis 11:59; PM: die Stunden von 12:00 bis 23:59. Drücken Sie erneut IPOD/MEM/C.-ADJ.. Die Stundenanzeige blinkt.
FR Automatisches Ausschalten – SLEEP Sie können eine Zeit einstellen, nach der das Gerät automatisch in den Standby-Modus schaltet. Drücken Sie die Taste SLEEP an der Fernbedienung wiederholt, um die gewünschte Zeit einzustellen: 90 Minuten > 80 Minuten > 70 Minuten usw. bis 10 Minuten. Im Display erscheint das Bett-Symbol zum Zeichen dafür, dass der SLEEP-Timer eingestellt ist. Um den SLEEP-Timer auszuschalten, drücken Sie SLEEP so oft, bis das Bett-Symbol verschwindet.
Drücken Sie die Taste TIMER erneut, um die Ausschaltzeit einzustellen. Die Anzeige OFF erscheint und die Stundenziffer blinkt. Drücken Sie auf oder , um die Stunde einzustellen. Drücken Sie die Taste TIMER erneut. Im Display blinkt die Minutenanzeige. Stellen Sie mit oder die Minuten ein. Drücken Sie die Taste TIMER erneut. Wählen Sie nun mit oder die Musikquelle: TUNER > CD > USB > CARD > IPOD. Drücken Sie die Taste TIMER.
Betriebsart wählen FR Radio, CD, USB, CARD, IPOD, AUX Wählen Sie mit der Taste FUNCTION die Betriebsart: TUNER: Radio NL CD: Wiedergabe von einer Audio- oder MP3-CD DE USB: Wiedergabe von einem USB-Datenträger CARD: Wiedergabe von einer Speicherkarte IPOD: Wiedergabe von einem iPod/iPhone AUX: Wiedergabe von einem externen Gerät iPod-Betrieb Schieben Sie Ihren iPod/iPhone in das Einschubfach für den Player.
Über die folgenden Tasten am Gerät und auf der Fernbedienung können Sie nun den iPod bedienen: IPOD/MEM/C-ADJ.: Zwischen iPod-Menüsteuerung und iPodWiedergabesteuerung wechseln VOLUME: Lautstärke einstellen Bedienung bei aktivierter iPod-Menüsteuerung /MENU: Menü aufrufen. /ENTER: Auswahl bestätigen und : Auswahl in Menüs bewegen Bedienung bei aktivierter iPod-Wiedergabesteuerung /ENTER: Wiedergabe starten. Um die Wiedergabe zu unterbrechen, drücken Sie die Taste erneut.
Sendersuchlauf FR Halten Sie eine der Tasten bzw. länger gedrückt, um eine automatische Sendersuche vorwärts/rückwärts durchzuführen. NL Sender speichern und aufrufen Das Radio verfügt über 30 Speicherplätze, auf denen Sie Sender ablegen können. Stellen Sie den Sender ein, den Sie speichern wollen. Um einen eingestellten Sender zu speichern, drücken Sie die Taste IPOD/MEM/C-ADJ. und wählen anschließend mit den Tasten PRESET/FOL. den Programmplatz.
RDS-Empfang Strahlt ein Radiosender RDS-Signale aus, so erscheint RDS im Display. RDS-Anzeigen Drücken Sie die Taste RADIO MODE, um die folgenden Informationen im Display anzuzeigen: RDS NAME: Sendername (falls nicht verfügbar erscheint die Anzeige PS NONE) RDS TYPE: PTY-Kennung des aktuell wiedergegebenen Senders (falls nicht verfügbar erscheint die Anzeige PTY NONE) RDS TEXT: Weitere Informationen des Radiotextes (falls nicht verfügbar erscheint die Anzeige RT NONE).
CD-/USB-/Speicherkartenbetrieb FR Abspielbare Datenträger NL Abspielbare Datenträger sind: Audio-CDs, CD-Rs, CD-RWs. USB-Memory-Stick oder MP3-Player (USB-Version 1.1 und 2.0). Bitte beachten Sie, dass die Kompatibilität mit allen Memory Sticks nicht zu 100 Prozent gewährleistet werden kann. Speicherkarte SD/MMC. HINWEIS! Die Abspielfunktionen für diese Datenträger sind weitgehend identisch und werden in dieser Anleitung daher zusammen beschrieben.
CDs einlegen und entnehmen Hinweise zum CD-Fach Legen Sie keine fremden Gegenstände in das CD-Fach, da hierdurch die Mechanik zerstört werden kann. Um Verschmutzung durch Staub zu vermeiden, lassen Sie den Deckel des CD-Fachs nicht für längere Zeit offen stehen. Berühren Sie auf keinen Fall die Linse im CD-Fach. Ist die CD stark verschmutzt oder weist sie starke Fingerabdrücke auf, kann es passieren, dass das Abspielen verzögert wird oder an einer anderen Stelle beginnt.
Wiedergabefunktionen FR PLAY, PAUSE, STOP, Titelsprung Drücken Sie die Taste /ENTER am Gerät oder an der Fernbedienung, um die Wiedergabe zu starten. NL Um die Wiedergabe zu unterbrechen, drücken Sie die Taste erneut. In der PausenAnzeige blinkt die ablaufende Zeit. DE Drücken Sie /ENTER erneut, um die Wiedergabe zu an derselben Stelle fortzusetzen. Drücken Sie /MENU, um die Wiedergabe zu beenden. Das Gerät geht in den Stoppmodus.
Um die REPEAT-Funktion zu beenden, drücken Sie die Taste REPEAT, bis die Anzeige verschwindet. RANDOM – Zufallswiedergabe Bei der RANDOM-Funktion werden alle Titel in einer zufälligen Reihenfolge wiedergegeben. Drücken Sie während der Wiedergabe oder im Stopp-Modus die Taste RANDOM auf der Fernbedienung. Die Zufallswiedergabe startet nun. Drücken Sie die Taste RANDOM erneut, um in den normalen Wiedergabemodus überzugehen.
zunächst mit PRESET/FOLDER einen Ordner. Drücken Sie wieder IPOD/MEM/C-ADJ. Bei CD-Wiedergabe wählen Sie einen weiteren Titel. Bei MP3-/WMA-Wiedergabe wählen Sie jetzt einen Titel. Drücken Sie wieder IPOD/MEM/C-ADJ. und speichern Sie weitere Titel auf die gleiche Weise. Drücken Sie IPOD/MEM/C-ADJ. um die Lieder in der Liste nacheinander durchzugehen. Wenn Sie die Liste abspielen wollen, drücken Sie FR NL DE /ENTER.
STÖRUNG MÖGLICHE URSACHE / MASSNAHME ALLGEMEIN Keine StandbyAnzeige Prüfen Sie den Netzanschluss: sitzt der Stecker fest in der Steckdose? Keine Funktion Stellen Sie den POWER-Schalter am Gerät auf ON, (STANDBY) an der dann drücken Sie die Taste Fernbedienung. Falls das Gerät durch ein Gewitter, eine statische Aufladung oder einen anderen externen Faktor gestört ist, versuchen Sie folgendes Vorgehen: Stellen Sie den POWER-Schalter am Gerät auf OFF.
Reinigung FR Bevor Sie das Gerät reinigen, ziehen Sie unbedingt immer zuerst den Netzstecker. Verwenden Sie für die Reinigung nur ein trockenes, weiches Tuch. Benutzen Sie keine chemischen Lösungs- und Reinigungsmittel, weil diese die Oberfläche und/oder die Beschriftungen des Gerätes beschädigen können.
Bitte beachten Sie: Es gibt heute viele, zum Teil nicht standardisierte CD-Aufnahmeverfahren und Kopierschutzverfahren, sowie unterschiedliche CD-R- und CD-RWRohlinge. Darum kann es in Einzelfällen zu Einlesefehlern oder Verzögerungen kommen. Dies ist kein Defekt des Geräts. Technische Änderungen vorbehalten! Entsorgung Verpackung Ihr Gerät befindet sich zum Schutz vor Transportschäden in einer Verpackung.
FR NL DE ---------------------------------------------Copyright © 2010. Alle Rechte vorbehalten. Das Copyright liegt bei der Firma Medion®. Warenzeichen: Warenzeichen sind Eigentum ihrer jeweiligen Besitzer. Technische und optische Änderungen sowie Druckfehler vorbehalten.
82799 BE ALDI BE Cover RC1.FH11 Thu Dec 16 09:44:39 2010 Seite 1 C M Y CM MY CY CMY K Design Touch-Music-Center met docking voor iPhone/iPod Design Touch-Musik-Center mit Docking-Station für iPhone/iPod Music Center tactile design avec station d'accueil iPhone/iPod MEDION® LIFE® P64054 (MD 82799) AA 18/11 A Medion B.V. John F. Kennedylaan 16a 5981 XC Panningen Nederland Schwarz BE Hotline: 022006198 Fax: 022006199 LU Hotline: 34-20 808 664 Fax: 34-20 808 665 Gebruikt u a.u.b.