
Product Manual

Vital Signs Monitor User’s Manual
4-7
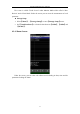
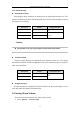
4. Scale
It is to scale the value of parameters.
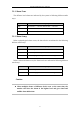
5. Parameter displaying area
It is to display values of all the monitored parameters at the time where the
cursor indicates now.
6. The selected parameter
It is to display the name of the selected parameter and its value at the time where
the cursor is.
7. Setting interval
Interval is the time between the left time and the right time on the time scale. It
can be 1, 2, 3, 4 or 5 hours. Turn the Trim Knob to select 【Setting interval】. The
sign of “+” is to add the time value while “-” is to decrease it. Each time you press
the two buttons, the time will add 1 hour or decrease 1 hour.
8. Cursor
It is to indicate the selected parameter’s trend graph at the time where it is. Turn
the Trim Knob to select 【Tcursor】 button, the color of the button will turn into
green like the cursor. Then turn Trim Knob to move the cursor where you need.
9. Setting step
Step is the time the cursor move on the time scale at one time. Turn the Trim
Knob to select 【Step】, then the options of 【1 Min】, 【5 Min】 and 【10 Min】
will pop up, select one you need.
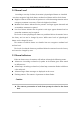
4.3 Patient Information
Select “Patient Information” icon to enter【Patient Info】menu. In the menu you
can view patient’s ID, Name, Type, Gender and Age.
4.3.1 Continuous the same patient
When the patient to be monitored is the one displayed in【Patient Info】menu,
please select【Return】. The monitor will continuous the monitoring of the same
patient and add current data to the previous one.