
User's Manual

Page 2 of 6
© Corventis 2010
For US distribution only IFU NUVANT 04-10
7. PiiX is water resistant but not waterproof. It should not be submerged in water (showering is acceptable, but swimming and submersion bathing are
prohibited).
8. PiiX should not be disassembled.
9. Replace the PiiX if it peels off; do not reapply the PiiX.
10. Replace the PiiX if it appears damaged.
11. No creams or lotions should be applied immediately prior to use of PiiX.
12. Store PiiX in a cool, dry location. The device is designed to withstand environmental temperature fluctuations between 0° to 40°C.
The NUVANT System is not intended to replace direct communication with your healthcare provider. The system data should not be used alone, but should be
used along with all other clinical data and exams to come to a diagnosis. The system is not intended to alarm or alert physicians, and will not summon emergency
response in the event you need help. Talk to your healthcare provider immediately if you have any concerns, or if your condition changes.
Step-by-step Operating Instructions – NUVANT MCT System
No specific training is needed for the use of this system.
The zLink should be set-up first prior to the PiiX application.
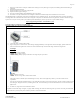
zLink Set-up
1. Remove the zLink from the box.
2. Connect the charger connector with the zLink
3. Plug the charger into an electrical outlet. zLink will begin charging immediately. If the lights on the zLink do not display, push the round Power
button located below the lights to turn on the zLink. The zLink should be kept connected to the charger until the Power light is blue.
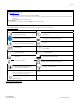
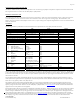
zLink Lights
Power Light:
BLUE ON: Full charge confirmed
AMBER ON: Low charge warning
AMBER Flashing: Battery capacity less than 10%. Full charge may take up to 4 hours
Cell Light:
BLUE: Adequate cell coverage
AMBER: No cell coverage. Move zLink to another location
Other lights on zLink are utilized only if troubleshooting is necessary. Refer to these lights only if asked by a Corventis Customer Service
representative.
zLink may also be turned ON and OFF manually. To turn zLink ON when zLink is not connected to the charger, press the round Power button located
below the lights. All lights will come on, confirming zLink is ON. To turn zLink OFF, press the round Power button for several seconds until all the
lights turn off.
4. To initiate use, charge the zLink for a minimum of 4 hours.
Keep zLink connected to the charger overnight, every night. With a full charge, the zLink will remain charged for up to 12 hours. Preferably, the zLink should
be kept within 30 feet (9 meters) of the patient as much as possible to ensure data transmission.