
Use and Care Manual


855-833-6483 OR EMAIL US AT SUPPORT@MONSTERMOTO.COM!
PROBLEMS? DO NOT RETURN TO STORE! CALL US AT
7
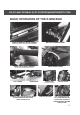
TW O TOP RISERS
( SLIG H TLY RAISED ON TOP)
TW O BOTTOM RISERS
( F LAT ON TOP)
F OUR NUTS
F OUR BOLTS
G ETTING STARTED: ASSEMBLING &
CH ARG ING TH E E-MINI BIK E
After you remove the mini bike from its packaging, there are several steps you need
to take in order to prepare your mini bike for its rst use.
ATTACH ING TH E H ANDLEBARS
1. Park your mini bike on a rm, level surface.
2. Locate the handlebar assembly hardware,
which was included in the mini bike parts bag.
4. Once the handlebars are attached according to the diagram above, sit on the mini
bike to ensure the handlebars are in an appropriate position. Tighten the bolts when
you are comfortable with the placement of the handlebars. Do not over-tighten.
ATTACH ING TH E F RONT PLATE
1. Park your mini bike on a rm,
level surface.
2. Locate the front plate, which was included
in the mini bike parts bag.
3. Remove the two screws and
two washers from the front
plate brackets.
4. Using the washers and screws
removed in step 2, mount the front plate to the
front plate brackets.
F RONT PLATE
F RONT PLATE
BRACK ETS
removed in step 2, mount the front plate to the
(EACH HOLDS ONE SCREW
AND ONE WASHER)
3. The diagram below illustrates how to attach the mini bike’s handlebars to the mini bike.
BOLTS
THROTTLETHROTTLEBRAKE LEVER BRAKE LEVER
TOP RISERS
ASSEMBLED H ANDLEBARSH OW TO ASSEMBLE
BOTTOM RISERS
NUTS
STEERING
COLUMN
MOUNTING
PLATE
(AS VIEWED WHILE SITTING ON MINI BIKE SEAT)
(AS VIEWED WHILE SITTING ON MINI BIKE
SEAT)