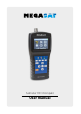
Satmeter HD 3 Kompakt User manual
Content 1. Reference 1.1 General features............................................................................................................ 03 1.2 Delivery............................................................................................................................... 03 2. Descriptions and key assignment........................................................................ 04 3. Quick Guide 3.1 Instructions for quick measurement....................................................
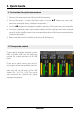
1. Reference 1.1 General features • • • • • • • • • • • Satellite meter for measuring DVB-S/S2 signals Pre-programmed satellite and transponder list 2.3 inch TFT LCD display with 320 x 240 pixels. Unicable fit (EN 50494 + EN 50607) Konstellation- and spectrum analysis Automatic calculation of turn and tilt angle of the antenna Displaying dBµV, CNR, BER, signal strength and quality in percent Integrated power battery with up to 3 hrs.
2.
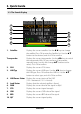
2. Descriptions and key assignment 1. RF In Satellite signal input port, connects directly to satellite antenna using coaxial cable. 2. LCD Screen Show the Menu 3. Red: the battery is being charged / Blue: battery is full. 4. The light will blink once the antenna connects shortly. 5. Power indicator: Indicate the device is power on or off. Function keys F1: Turn LCD screen on/off. F2: Activate / deactivate the key tones F3: View Transponder controll in search menu F4: No function 6.
3. Quick Guide 3.1 Instructions for quick measurement 1. Connect the antenna to the LNB input of the Satmeter. 2. Turn on the meter - it seems the Search menu. Use the pq buttons to switch between the individual values (satellite, transponder, ...) 3. Use the t u buttons to change the satellite, and press OK to enter the value manually. 4.
3. Quick Guide 3.3 The Search Display 4 9 1 2 3 5 7 6 10 8 11 1. Satellite Displays the current satellite. Use the t u keys to change the satellite. Press OK to enter the Satellite list. Use the pq buttons to the desired, and click OK to confirm. Transponder Displays the current transponder. Use the t u keys to switch the transponder. With OK you can have a Transponder manually enter (use this the change pq buttons to the value). Click OK to confirm. 2. 22 K Displays the current 22 K status. 3.
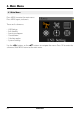
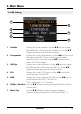
4. Main Menu 4.1 Main Menu Press MENU to enter the main menu. Press MENU again, to leave it. There are 6 submenus: • • • • • • LNB Setting Edit Satellite Spectrum diagram Constellation Calculate angles System Settings Use the t u buttons, or the pq buttons to navigate the menu. Press OK to enter the submenu. With MENU return to the main menu.
4. Main Menu 4.2 LNB Settings 1 2 3 4 5 6 7 1. Satellite 2. 3. 4. 5. 6. 7. Displays the current satellite. Use the t u keys to change the satellite. Press OK to enter the Satellite list. Use the pq buttons to desired, and click OK to confirm. Transponder Displays the current transponder. Use the t u keys to switch the transponder. With OK you can have a transponder manually enter (use this the change pq buttons to the value). Click OK to confirm. LNB Typ Displays the current LNB type.
4. Main Menu Unicable settings (EN 50494) 1. Use the pq buttons to enter the line of the port selection (see picture). Go with the t u buttons on SATCR-50494 Port A and confirm with OK to enter the Unicable settings. 2. Use the t u buttons to choose the band that you want to measure (eg. 1). Switch with the pq buttons to User Freq and click OK to confirm. Note: You can measure max. 8 bands on Unicable (EN 50494). 3. Now enter the corresponding frequency of the band.
4. Main Menu Unicable II settings (EN 50607) 1. Use the pq buttons to enter the line of the port selection (see picture). Go with the t u buttons on SATCR-50494 Port A and confirm with OK to enter the Unicable settings. 2. Use the t u buttons to choose the band that you want to measure (eg. 9). Switch with the pq buttons to User Freq and click OK to confirm. Note: You can measure max. 32 bands on Unicable (EN 50607). 3. Now enter the corresponding frequency of the band.
4. Main Menu USALS Settings Press OK when you have found the type of engines on USALS to enter settings in the USALS. • Satellite • Longitude • Latitude • Go to center • Go to position Use the t u keys to select the desired satellite. Press OK to change the longitude. Use the navigation buttons to change the value. Press OK to change the latitude. Use the navigation buttons to change the value. Rotates the antenna to the center position. Rotates the antenna to the desired position. DiSEqC 1.
4. Main Menu 4.3 Edit Satellite 1. Select a satellite with the pq buttons and press OK to edit it. 2. Press OK to change the orbit position. This can be noted with the navigation buttons and confirm with OK. 3. Use the pq buttons to select a transponder from the list and press OK to change the selected. This can be noted with the navigation buttons and confirm with OK.
4. Main Menu 4.4 Spectrum Analysis 1 2 3 4 5 7 8 6 9 1. 2. 3. 4. 5. 6. 7. 8. 9. 10. 10 Displays the current status of 22 K (- - = K off / 22 K = on). Displays the current voltage to LNBs. The values are: 13 V, 18 V or OFF. Displays the range of power levels (0 ~ 100). Displays the graphical portion of the spectrum. Displays the current frequency. Go with the t u keys. Displays the initial frequency of the spectrum. Displays the power level value of the LNB voltage.
4. Main Menu 4.5 Constellation Analysis 1 2 3 4 1. 2. 3. 4. 5. 5 Displays the current satellite. Use the t u buttons to change the satellite. Press OK to enter the Satellite list. Use the pq buttons to select from, and click OK to confirm. Displays the current transponder. Use the t u buttons to switch the transponder. With OK you can enter a transponder manually (use this the pq buttons to set the value to change). Click OK to confirm. Press OK to display the constellation.
4. Main Menu 4.6 Calculate Angles • Satellite Use the t u keys to select the desired satellite. • Longitude Press OK to change the longitude. Use the navigation buttons to change the value. Press OK to change the latitude. Use the navigation buttons to change the value. • Latitude 16 • Calculate Calculates the angle of the satellite. • Elevation Displays the vertical angle of the antenna. • Azimuth Displays the horizontal angle of the antenna.
4. Main Menu 4.7 System Settings • Sound signal Activate or deactivate the key tones. • Auto Standby Set the auto standby time. Select between OFF, 10 min., 20 min. or 30 min. • Language Set the language of the menu. • Factory setting To set the device to the factory settings, click OK to confirm. NOTE: All data you have entered are hereby deleted! • Hardware Ver. Displays the current hardware version of the device. • Software Ver. Displays the current firmware version of the device.
5. Specifications Identification DVB-S DVB-S2 Demodulation QPSK QPSK, 8QPSK Code Rate 1/2, 2/3, 3/4, 5/6, 7/8 1/4, 1/3, 2/5, 1/2, 3/5, 2/3, 3/4, 5/6, 8/9, 9/10 Symbol Rate 2~90 MSPS Input frequency 950-2150 MHz Input impedance 75 Ω Min. Level in 35 dBµV (noise) Max. Level in 90 dBµV LNB Power and Pol Vertical 13 V, Horizontal 18 V, 500 mA Bandwidth C/Ku-Band selectable Edit Satellite Satellite Name Max.
Notes Extract of the Declaration of Conformity Hereby the company Megasat Werke GmbH declares, that the device Megasat Satmessgerät HD 3 Kompakt (Art.-Nr.
Version: 1.2 (April 2016) // Technical changes, misprints and errors reserved. Megasat Werke GmbH | Industriestraße 4a | D-97618 Niederlauer | www.megasat.tv | info@megasat.