Bedienungsanleitung User Manual Digitaler HD Satelliten Receiver Megasat HD900CI Stand: Dezember 2011 V1.
INHALT Allgemeine Informationen……………………………………………. 4 Haupteigenschaften........................................................................... 5 Sicherheitshinweise........................................................................... 6 Lieferumfang...................................................................................... 5 Vorderansicht des Receivers.............................................................7 Rückansicht des Receivers…………………………………………….. 7 Fernbedienung................
ALLGEMEINE INFORMATIONEN Der digitale DVB S2 Satelliten-Receiver ermöglicht Ihnen die Vielfalt der über Satellit empfangenen HD und Standard Kanäle anzuschauen. Diese Bedienungsanleitung unterstützt Sie bei der Installation des digitalen Satelliten Receivers und zeigt Ihnen, wie Sie die verschiedenen Funktionen nutzen können. Die in dieser Bedienungsanleitung enthaltenen Informationen können geändert werden.
Hauptfunktionen PID(Packet Identifier) A set of numbers that identifies transport stream packets containing data from a single data stream. MPEG2 SD, MPEG2 HD, H.264AVC SD, H.264/AVC HD, MP4 USB Schnittstelle (Mediaplayer Unterstützung) Polarization DV-OUT HDTV (HDMI) 480i/p, 576i/p, 720p, 1080i, 1080p mit HDCP Polarizations allows several programmers to be fit into the same frequency Scart-Anschluss, Video und L/R Audio Chinch band.
Vorderansicht 5.3 Glossary Antenna A device collects and radiates electromagnetic waves. Includes a satellite dish and broadband antenna. DiSEqC DiSEqC(Digital Satellite Equipment Control)system, it is a communication bus between satellite receivers and peripheral equipment using the only 1. Standby Taste: Gerät Ein/Aus Schalten 2. CH Tasten: Programmwechsel, Menüsteuerung Auf/Ab 3. VOL Tasten: Lautstärkeregelung, Menüsteuerung Links/Rechts 4. Menu Taste: Menü starten 5.
5.2 Technical Specification Fernbedienung Tuner & Demodulator Frequency Range Input Connector Signal Level RF Impedance IF Band width LNB Power & Polarization LNB Tone Switch DiSEqC Control Demodulation Symbol Rate FEC Decode 950 MHz to 2150 MHz F-type, IEC 169-24, Female -25 to -65 dBm 75Ω¸unbalanced 55 MHz/8Hz(Per 5Msps) Vertical : +13 V, 14V +/-5% Horizontal : +18 V, 19V+/-5% Current : 500 mA Max. Overload Protection 22KHz+/-2KHz, 0.6Vpp+/-0.2V Version 1.0/1.
5. Additional Information 5.1 Trouble Shooting Fernbedienung You might meet abnormal working of this STB with various reasons. Check the following which may help you. 25. VOL +/-: Lautstärkeregelung. 26. FIND: Sendernamen suchen 27. OPT: Öffnet Unterkanäle bei diversen Pay TV Sendern 28. PAGE+/-: Seiten blättern AUF /AB. 29. F1: Funktions-Taste.
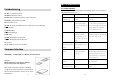
get this window. Press / to view channel in different types, ALL, FTA, Scrambled and MPEG4/H264.Press SAT button, select one satellite and press OK, all channels will be Anschluss LNB Sat-Spiegel listed under that satellite you selected. Receiver mit der Außeneinheit (LNB) verbinden. TXT: Show the teletext content if teletext transmitted is (1) Verbinden Sie die Koaxialleitung über die F-Anschlüssen mit dem Receiver und dem LNB. (Receiver LNB IN).
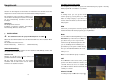
4.6 Other Useful Information Hauptmenü This will guide you on how to use general info while watching TV program or listening Radio program with some buttons on your RCU. Schalten Sie den Megasat am Netzschalter an und drücken Sie die Menü Taste. Das Hauptmenü erscheint und Sie können mit den Grundeinstellungen beginnen. FAV Das Haupmenü zeigt verschiedene Funktionen an, die Sie mit den Steuerungstasten (links/rechts auf/ab) auf der Fernbedienung auswählen und mit OK bestätigen.
Installation 4.5 EXPANSION Games Some classic games which will give your some happy times to play with !! Hinzufügen Wählen Sie mit den Curser Tasten „Hinzufügen“ um einen neuen Satelliten hinzuzufügen. Geben Sie die Daten des neuen Satelliten ein und bestätigen diese mit OK. Der neue Satellit wird der Satellitenlist hinzugefügt. Multi Pictures In this menu, user can watch 9 different small TV in one windows, we called it MULTI PICS Satelliten Pos.
CI MENU Installation In this menu, insert the smart card, and you will get smart card info, and you can watch the scrambled channels. UniCable Systeme: Unter dem Menüpunkt LNB Frequenz, können Sie die Einstellungen für Einkabelsysteme (UniCable) vornehmen. Mit den Tasten können Sie verschiedene Einstellungen für das LNB wählen. Der Receiver ist für unterschiedliche UniCable Systeme programmierbar. Je nach System kann an ein System bis zu 8 Receiver angeschlossen werden.
Favorites Press MENU button, here you can sort the 22KHz Hier können Sie die Standardeinstellung der 22KHz Schaltung ändern. Als Standard ist die Option „Auto“ gewählt. channels in different type, such as news, movies, music, sports, Using the UP/DOWN keys select any sort press OK, then you can set the channels FAV type by pressing FAV key. USALS Haben Sie eine Anlage mit Motorsteuerung, können Sie hier die nötigen Einstellungen vornehmen. Wählen Sie die gewünschte Steuerung USALS/ DiSEqC 1.
4.2 EDIT CHANNEL Programme verwalten In this menu you can set program edit like Programme verwalten Hier können Sie die Senderlisten bearbeiten. Wählen Sie zwischen folgenden Optionen: TV Programme – Radio Programme – Favoriten bearbeiten – Sender sortieren – Benutzer Senderliste TV Programme Hier können Sie über die Auswahl: Bewegen – Löschen – Sperren – Umbenennen – Tauschen Ihre Senderliste entsprechend der Auswahl bearbeiten.
F: Channel search In this menu, you can select scan mode like TP/blind/network scan, you also can select all Channels & FTA Channels by setting the search option G: Start Search Channels After set above step, press ok you will be asked whether delete all exist channels if there are existing channels on selected satellites or TPs, you can choose yes or no, will start searching. During searching the TV Channel and Radio Favoriten Wählen Sie Favoriten bearbeiten um Ihre Favoriten Gruppen zu erstellen.
OSD Einstellung Im Menü OSD Einstellung können Sie mit Hilfe der Cursor Tasten die gewünschten Optionen: Menü Transparenz – Videotext Transparenz – Bildschirm Auflösung – TV Typ – TV Format – OSD Anzeigezeit ändern. Kindersicherung Im Menü Kindersicherung können Sie mit Hilfe der Cursor Tasten die gewünschten Optionen: Passwort Sperre – Installationssperre – Senderbearbeitung – Systemsperre – Altersbeschränkung – PIN ändern auswählen.
Erweitert Add Add satellite by using the Red key. Here you can input new Satellite angle, Satellite Direction (east, west), Band (ku,c). OK to confirm the setting and this new satellite will be added to the Spiele Im Menü Spiele haben Sie 8 Spiele zur Auswahl. end of the Satellite list. Edit Select the satellite then press green button. You can change the satellite’s name, angle, direction and band. Input the characters which you want to edit using the browser.
Tasten Erklärung 4. Installation and Operation After connecting the receiver to other required equipment, turn on the receiver, there Info Drücken Sie die INFO-Taste, um das Info-Fenster anzuzeigen. Drücken Sie erneut die Info-Taste und es werden technische Informationen zum Kanal Angezeigt. Press MENU button to activate main menu, main menu consists of Installation, Service organization, Output, System, Timer, USB.
3. Installation and Connection The following diagram shows you how to connect the HD receiver, TV, LNB and other equipment, please read this first if you are not sure about the connection, and it will guide you to the correct connection. 3.1 Connecting to Dish LNB and TV You can connect one fixed dish LNB directly to the LNB IN, or connect at least two dish LNB by DiSEqC Switch, you can also connect to HH mount dish LNB. OK/List 1.
Fehlersuche Common Interface Bei Problemen Prüfen Sie bitte folgende Fehlerhinweise. CAM Problem Mögliche Ursachen Maßnahmen LED brennt nicht.
Remote Control Unit 19. VOL / : Change volume in viewing mode. 20. OK: Confirm the highlighted menu item, Open the program list. 21. AUDIO : Select or change the Audio. 22. PAUSE: Pause and Freeze the picture. 23. ZOOM: Zoom in current TV channel 24. INFO: Show the information of the current channel. 25. VOL +/-: Change volume in viewing mode. 26. FIND: Quickly find channels 27.
Table of Contents 2.3 Remote Control Unit 1.TV/R: Switch between TV and RADIO. Safety Precaution ........................................................................................................2 2. POWER: 3. MUTE: 1. Reference 1.1 General Features ...................................................................................................3 1.2 Accessories ............................................................................................................
2.2 Rear Panel Safety Precaution This STB has been designed and manufactured to satisfy the international safety standards. Please read the following safety precautions carefully before operating this receiver. Main Supply: Before operating, please check the units operating voltage is 100~240V AC 50/60Hz. Overload: Do not overload a wall outlet, extension cord or adapter, neither use damaged power cord or touch it with wet hand as this may result in electric shock. 1.
1. Reference 2. Basic Function 1.1 General Features 2.1 Front Panel DVB-S/DVB-S2 Satellite Compliant (MPEG-II/ MPEG-IV/ H.264). DiSEqC 1.0, 1.1, 1.2 & 1.3 (USALS) Compatible. SCPC & MCPC Receivable from C/Ku Band Satellites LNB Supported. Universal, Single, Single S & C Band Wide band LNB. Sensitive Tuner with Loop-Through. PAL / NTSC Conversion. Variable Aspect Ratio (4:3, 16:9) with Pan Vector or Letter Box. Output Resolution: 576p & 576i, 720p & 1080i.