R/C HELICOPTER Flight Manual This manual is for the Real World Helicopter Series. Your exact model may vary from the one pictured, but all functions will be the same. www.megatech.com Entire contents © Megatech 2008 Rev.
If you have questions about operating or assembling your new Megatech product... Please Call Megatech First! DO NOT RETURN THIS PRODUCT TO THE STORE Call our Service Department at: (201) 662-8500 or email support@megatech.com 10am - 5pm EST Monday through Friday (except holidays) Technical assistance is also available on the web at www.megatech.
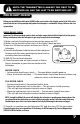
Important! Before you begin, please read all safety precautions and warnings. Failure to comply with any of the following could lead to bodily harm or injury. The Megatech helicopter is not intended for use by those under 8 years of age without proper adult supervision. SAFETY PRECAUTIONS TRANSMITTER SAFETY • Since your helicopter is controlled by an optical link it is very important to always use fresh alkaline batteries in the transmitter.
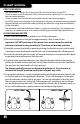
Package contents A. Before getting started you will need: • 6 “AA” 1.5V Alkaline batteries (sold separately) First make sure the contents of your package are complete: C. A. Helicopter micro helicopter B. Transmitter with integrated peak charger C. Spare tail rotor blade (1) B. RADIO SYSTEM A. F. G. E. B. C. D. A 2-channel transmitter featuring Spectra-Link Optical control guides the helicopter. THE CONTROLS A.
B. Tail Rotor Control Stick - Will spin the helicopter clockwise or counter clockwise depending on the control input. Note: You can only use the tail rotor control stick when throttle input is given. C. Tail Rotor Trim Button - This adjusts for straight and stable flight when the tail rotor control stick is in the neutral position. D. Charging Cord - Located inside a compartment at the base of the transmitter and used when charging the helicopter. E.
4) Reattach the battery hatch & secure with the hold-down screw. (Do not over tighten) 5) Turn the Transmitter ON to make sure that the Red LED illuminates bright and the transmitter powers up and then turn the transmitter OFF. Fresh alkaline batteries will provide about 3-hours or more of power to the transmitter depending on use. NOTE: If the red LED does not illuminate, flashes or is dim change the transmitter batteries with fresh alkaline batteries.
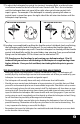
NOTE: The transmitter is always the first to be switched ON, and the last to be switched OFF! PRE-FLIGHT CHECK Before you switch ON your helicopter ALWAYS make sure to release the throttle control stick (left) so the rotor blades do not start up unexpectedly when the helicopter is switched ON. Always follow a safe start up procedure. RADIO RANGE CHECK Important Tip: Always perform a motor-check and radio-range check with the help of a friend or parent.
FLIGHT SCHOOL PRE-FLIGHT NOTES • The transmitter is always first to be turned ON, and the last to be turned OFF. • Check to make sure the red power LED on the transmitter is glowing, if it is not, change the transmitter batteries. • Check to make sure the tail rotor and throttle controls are working properly. • You MUST point your controller at the helicopter at all times to maintain accurate control.
7) To adjust the helicopter for neutral (no turning), hovering flight, use the tail rotor trim button located to the left of the tail rotor control stick. Press the trim button until the helicopter does not move left or right when no tail rotor control stick input is given. For example: If the helicopter is naturally spinning left when no control input is given then press the right side of the tail rotor trim button until the helicopter stops spinning.
REPAIRING YOUR HELICOPTER • If the tail rotor disengages or breaks during flight gently pull off the damaged rotor. Press on the new tail rotor included with your kit. Make sure the beveled side of the rotor blades face toward the tail motor. Do not press the new tail rotor onto the motor shaft too far or the motor will bind. • Use Foam Safe glue to repair cracks or damage to the fuselage assembly. • If any glued parts come loose, please use foam safe glue to reattach.
TROUBLESHOOTING GUIDE If you are experiencing trouble, please follow these guidelines or call one of our technicians at (201)662-8500. We will have your helicopter up and running in no time! Always make sure your transmitter batteries are fresh and your helicopter is fully charged, as this can be the cause of many operational issues.
PROBLEM CAUSE SOLUTION No green light on transmitter when charging or helicopter will not charge Power switch on the helicopter and/or the transmitter is not in the correct position for charging Set the Transmitter power switch to “ON” and then make sure the helicopter power switch is set to “OFF”. Plug the charge cord into the helicopter and the green LED on the transmitter will come on.
LIMITED WARRANTY Megatech® International guarantees this item to be free from defects for a period of 30 days from the date of purchase. If any component of this product fails to function properly due to defects in materials or the manufacturing process during this 30 day period, the manufacturer’s obligations are limited and the manufacturer can choose to either repair or replace the item.
FCC EMISSIONS INFORMATION NOTE: This equipment has been tested and found to comply with the limits for a class B digital device, pursuant to Part 15 of the FCC Rules. These limits are designed to provide reasonable protection against harmful interference in a residential installation. This equipment generates, uses and can radiate radio frequency energy, and if not installed and used in accordance with the instructions, may cause harmful interference to radio communications.
NOTES 15
Megatech® International 8300 Tonnelle Avenue North Bergen, NJ 07047 (201) 662-8500 www.megatech.com Email: support@megatech.